README
Datadog CI
![]()
![]()
Execute commands with Datadog from within your Continuous Integration/Continuous Deployment scripts. A good way to perform end to end tests of your application before applying your changes or deploying. It currently features running synthetics tests and waiting for the results.
How to install the CLI
The package is under @datadog/datadog-ci and can be installed through NPM or Yarn:
# NPM
npm install --save-dev @datadog/datadog-ci

# Yarn
yarn add --dev @datadog/datadog-ci
If you need datadog-ci as a CLI tool instead of a package, you can run it with npx or install globally:
# npx
npx @datadog/datadog-ci [command]

# NPM install globally
npm install -g @datadog/datadog-ci

# Yarn v1 add globally
yarn global add @datadog/datadog-ci
Usage
Usage: datadog-ci <command> <subcommand> [options]

Available commands:
  - dependencies
  - lambda
  - sourcemaps
  - synthetics
  - dsyms
  - git-metadata
  - junit
  - trace
Each command allows interacting with a product of the Datadog platform. The commands are defined in the src/commands folder.
Further documentation for each command can be found in its folder, ie:
Contributing
Pull requests for bug fixes are welcome, but before submitting new features or changes to current functionality open an issue and discuss your ideas or propose the changes you wish to make. After a resolution is reached a PR can be submitted for review.
Running command in development environment
When developing the tool it is possible to run commands using yarn launch. It relies on ts-node so does not need building the project for every new change.
yarn launch synthetics run-tests --config dev/global.config.json
Framework and libraries used
This tool uses clipanion to handle the different commands.
The tests are written using jest.
The coding style is checked with tslint and the configuration can be found in the tslint.json file.
Repository structure
Commands are stored in the src/commands folder.
The skeleton of a command is composed of a README, an index.ts and a folder for the tests.
src/
└── commands/
    └── fakeCommand/
         ├── __tests__/
         │   └── index.test.ts
         ├── README.md
         └── index.ts
Documentation of the command must be placed in the README.md file, the current README must be updated to link to the new command README.
The index.ts file must export classes extending the Command class of clipanion. The commands of all src/commands/*/index.ts files will then be imported and made available in the datadog-ci tool.
A sample index.ts file for a new command would be:
import {Command} from 'clipanion'

export class HelloWorldCommand extends Command {
  public async execute() {
    this.context.stdout.write('Hello world!')
  }
}

module.exports = [HelloWorldCommand]
Lastly, test files must be created in the __tests__/ folder. jest is used to run the tests and a CI has been set using Github Actions to ensure all tests are passing when merging a Pull Request.
The tests can then be launched through the yarn test command, it will find all files with a filename ending in .test.ts in the repo and execute them.
Continuous Integration tests
The CI performs tests to avoid regressions by building the project, running unit tests and running one end-to-end test.
The end-to-end test installs the package in a new project, configures it (using files in the .github/workflows/e2e folder) and runs a synthetics run-tests command in a Datadog Org (Synthetics E2E Testing Org) to verify the command is able to perform a test.
The synthetics tests ran are a browser test (id neg-qw9-eut) and an API test (id v5u-56k-hgk), both loading a page which outputs the headers of the request and verifying the X-Fake-Header header is present. This header is configured as an override in the .github/workflows/e2e/test.synthetics.json file. The API and Application keys used by the command are stored in Github Secrets named datadog_api_key and datadog_app_key.
The goal of this test is to verify the command is able to run tests and wait for their results as expected as well as handling configuration overrides.
Workflow
# Compile and watch
yarn watch

# Run the tests
yarn jest

# Build code
yarn build

# Format code
yarn format

# Make bin executable
yarn prepack
Release Process
Releasing a new version of datadog-ci unfolds as follow:
- create a new branch for the version upgrade
- update the version using
yarn version [--patch|--minor|--major]depending on the nature of the changes introduced. You may refer to Semantic Versioning to determine which to increment. - push the branch along with the tag to the upstream (Github), create a Pull Request with the changes introduced detailed in the description and get at least one approval. (sample Pull Request)
- merge the Pull Request
- create a Github Release from the Tags page with the description of changes introduced
- Once the release has been created, a Github Action will publish the package
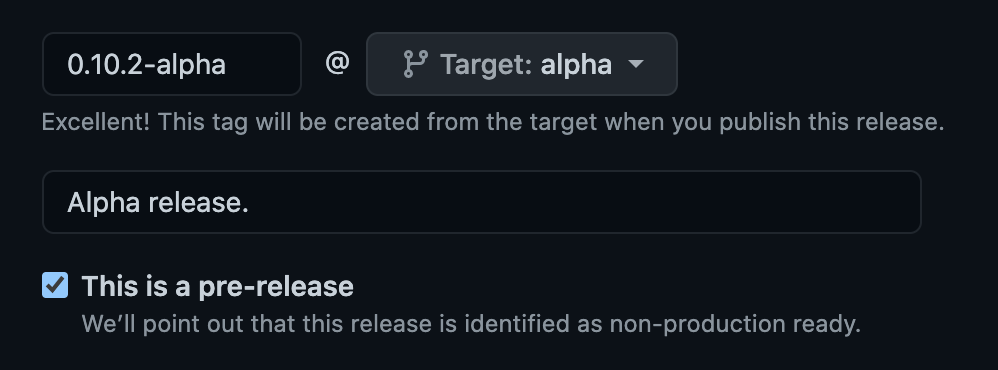
Pre-Release Process
If you need to create a pre-release or releasing in a different channel here's how it works:
- create a new branch for the channel you want to release to (
alpha,beta, ...). - create a PR for your feature branch with the channel branch as a base.
- pick a version following this format
version-channel, it can be0.10.9-alphaor1-beta... - update the
versionfield inpackage.json - merge the Pull Request
- create a Github Release:
- target the channel branch
- pick a tag based on your version
version-channel - check the
This is a pre-releasecheckbox
- publish the release and an action will publish it on npm