README
This Module was originally forked from https://github.com/alinz/react-native-share-extension and was modified in order to share multiple images with your host app by using AppGroups
The Documentation is not 100% up to date! PR are anytime welcome :)
React Native Share Extension
This is a helper module which brings react native as an engine to drive share extension for your app.
Installation
installation should be very easy by just installing it from npm.
yarn add @freiraum/react-native-share-extension
Setup
the setup requires a little bit more work. I will try to describe as detail as possible. I would love to use rnpm so I will welcome pull request.
iOS
- click on your project's name
- click on
+sign
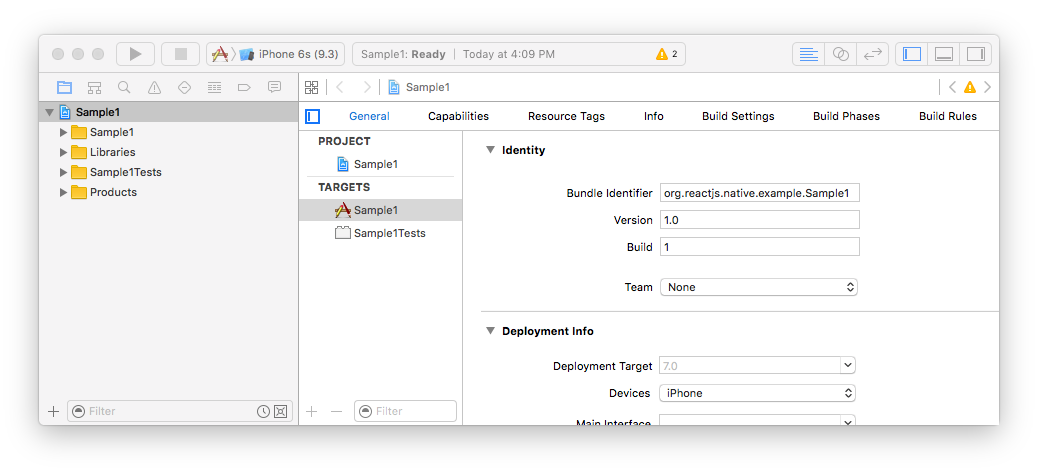
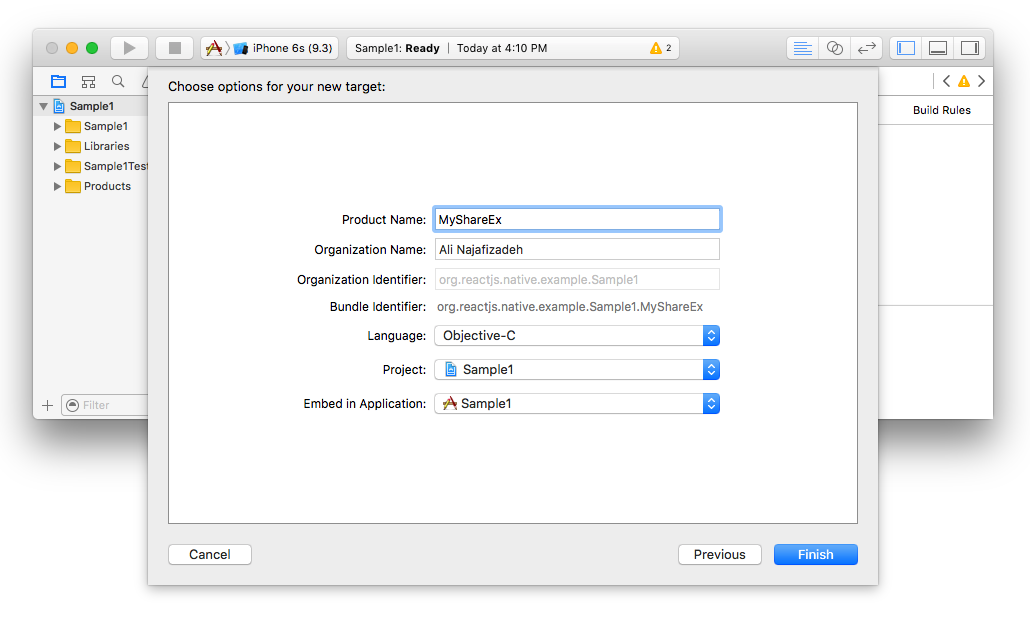
- select
Share ExtensionunderiOS > Application Extension

- select a name for your new share extension, in my case I chose
MyShareEx
- replace the code of
ShareViewController.handShareViewController.mwith follwoing:
ShareViewController.h =>
#import <Foundation/Foundation.h>

// Need config this two value bellows:

static NSString *const KApp_Scheme = @"main://";

static NSString *const KApp_Group_ID = @"your.group.id";

@interface ShareMaster : NSObject

+ (NSString*)store:(NSString*) urlStr   name:(NSString*) name;

+ (NSString*)storeData:(NSData*) data   name:(NSString*) name ;

+ (NSURL*)combineURL:(NSString*)name;

@end
ShareViewController.m =>
#import "ShareMaster.h"

@implementation ShareMaster

+ (NSString*)store:(NSString*) urlStr   name:(NSString*) name {
  NSLog(@"will storeData read from ->%@",urlStr);
  NSFileManager *fileManager = [NSFileManager defaultManager];

  NSData* data = [fileManager contentsAtPath:urlStr];
  return [ShareMaster storeData:data name:name];
}

+ (NSString*)storeData:(NSData*) data   name:(NSString*) name {
  NSURL* fileURL = [ShareMaster combineURL:name ];
  NSLog(@"will storeData->%@",fileURL);
  NSError* error;
  BOOL result =[data writeToURL:fileURL options:NSDataWritingAtomic error:&error];
  //  [data writeToURL:fileURL atomically:true];
  NSLog(@"storeData->%@",result ? @"success": @"failed");
  return [fileURL absoluteString];
}

+ (NSURL*)combineURL:(NSString*)name{
  NSURL *groupURL = [ShareMaster getWorkDir];
  NSURL *fileURL = [groupURL URLByAppendingPathComponent:name];
  return fileURL;
}

+ (NSURL*)getWorkDir{
  NSURL *groupURL = [[NSFileManager defaultManager] containerURLForSecurityApplicationGroupIdentifier:KApp_Group_ID];
  NSURL* result = [groupURL URLByAppendingPathComponent:@"user_share"];
  [ShareMaster createDirAtSharedContainerPath:[result path]];
  return result;
}

+(void)createDirAtSharedContainerPath:(NSString*)dirPath
{
  BOOL isdir;
  NSError *error = nil;

  NSFileManager *mgr = [[NSFileManager alloc]init];

  if (![mgr fileExistsAtPath:dirPath isDirectory:&isdir]) { //create a dir only that does not exists
    if (![mgr createDirectoryAtPath:dirPath withIntermediateDirectories:YES attributes:nil error:&error]) {
      NSLog(@"error while creating dir: %@", error.localizedDescription);
    } else {
      NSLog(@"dir was created....");
    }
  }
}

@end
- create new file under your share extension group. in my case it was
MyShareEx
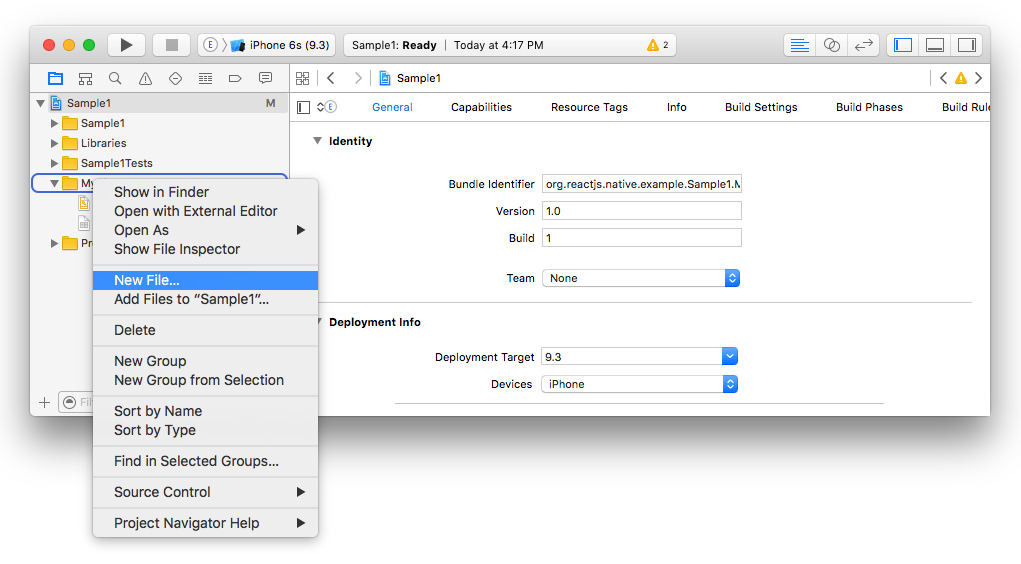
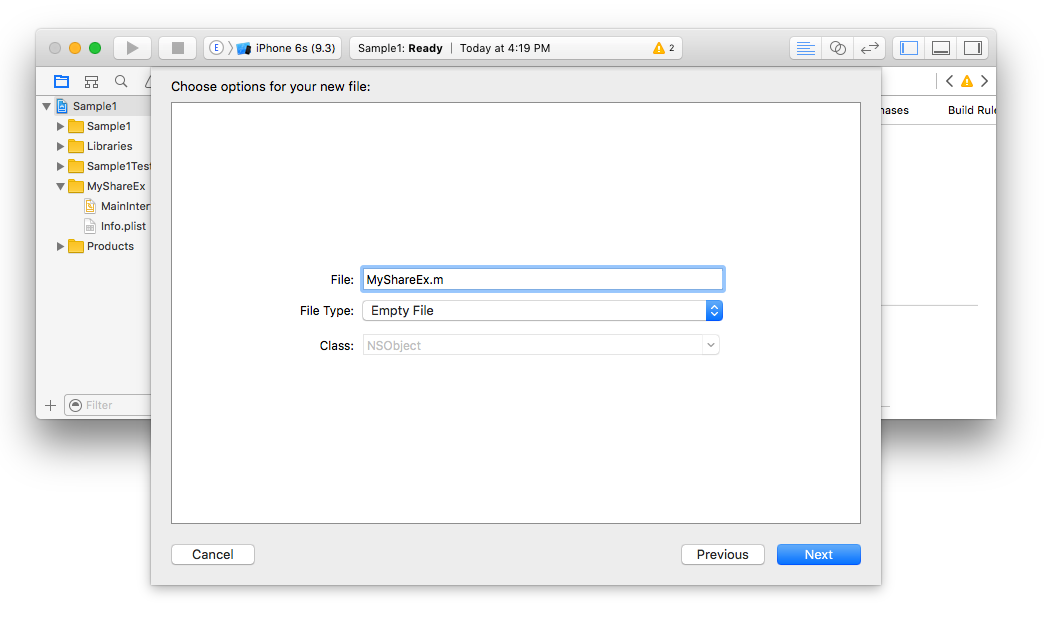
- make sure the type of that object is
Objective-c File, e.g. forMyShareExname itMyShareEx.m

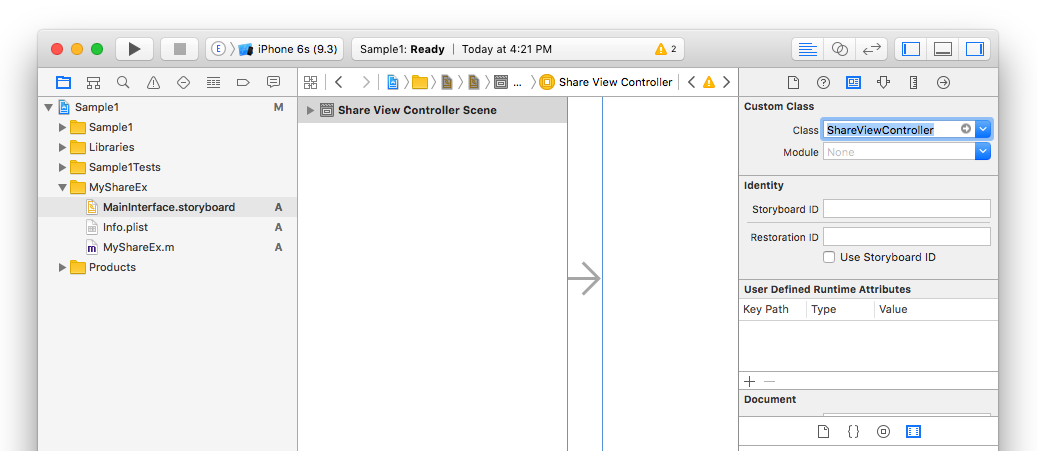
- update the storyboard of your share extension where the view needs to be loaded. So click on
MainInterface.storyboardand replace the class field fromShareViewControllerto whatever you chose above (in my caseMyShareEx)
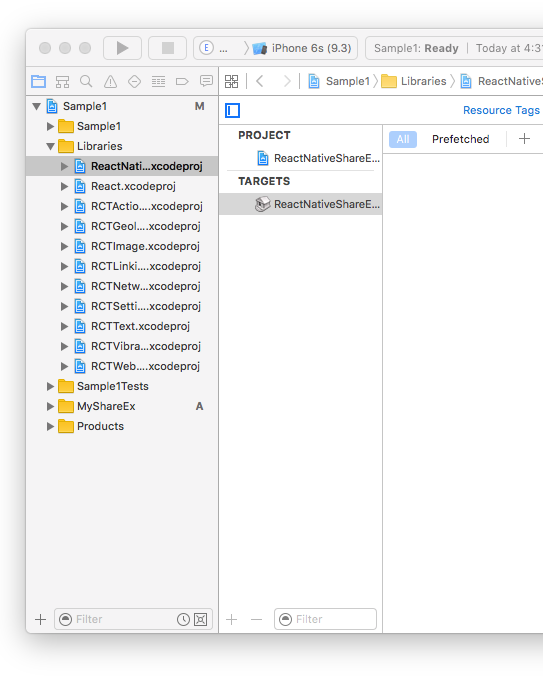
- now it's time to add our library. Right click on
Librariesgroup and selectAdd Files to "Sample1"...

- select
node_modules>@freiraum/react-native-share-extension>ios>ReactNativeShareExtension.xcodeproj
- now we need to tell the share extension that we want to read new header files. click on project name, in my case
Sample1then click on your extension name (in my caseMyShareEx). After that click on Build Settings and search forHeader Search Paths
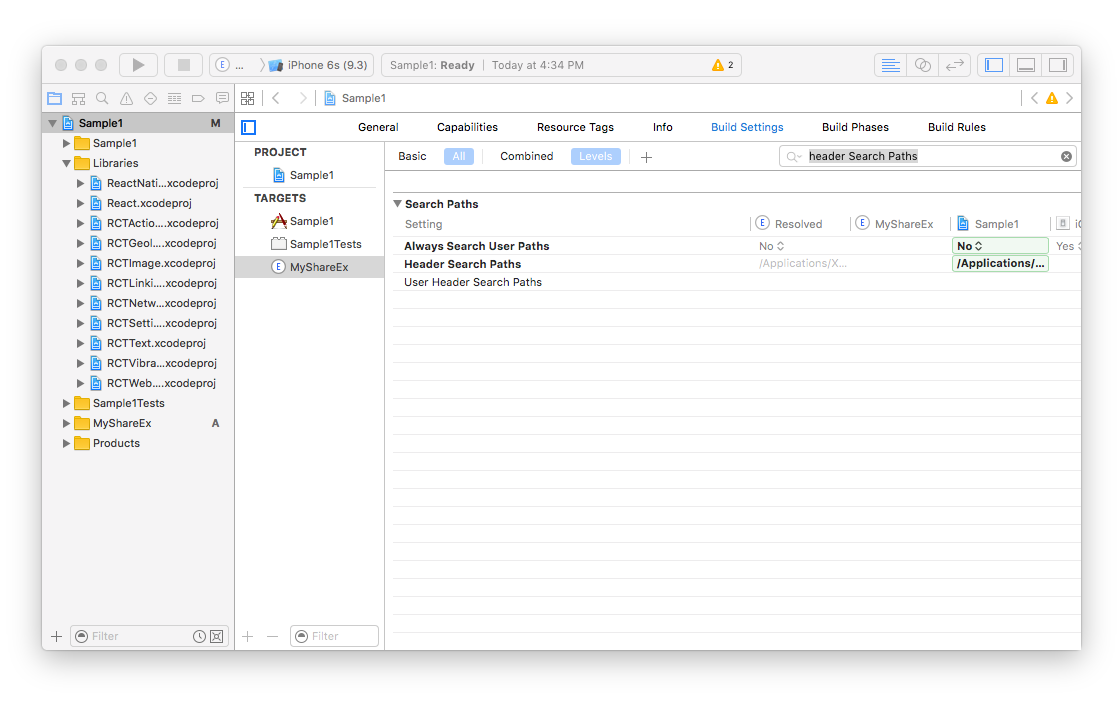
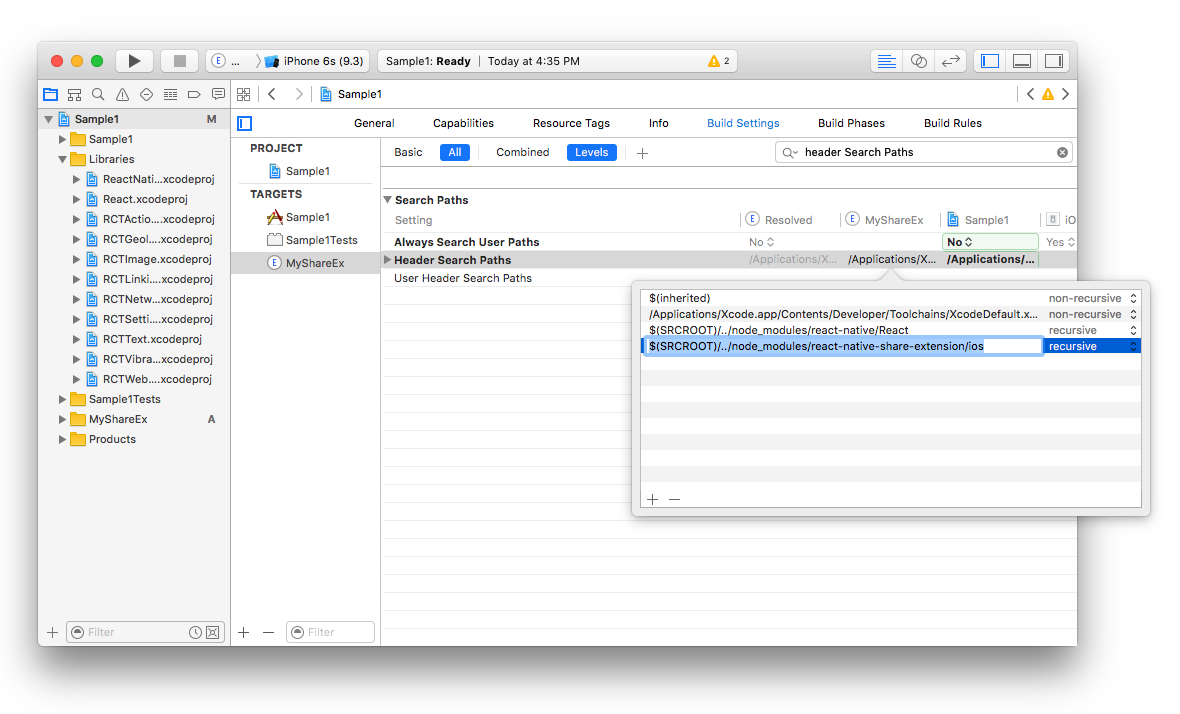
- add the new path
$(SRCROOT)/../node_modules/@freiraum/react-native-share-extension/ioswithrecursiveselected.
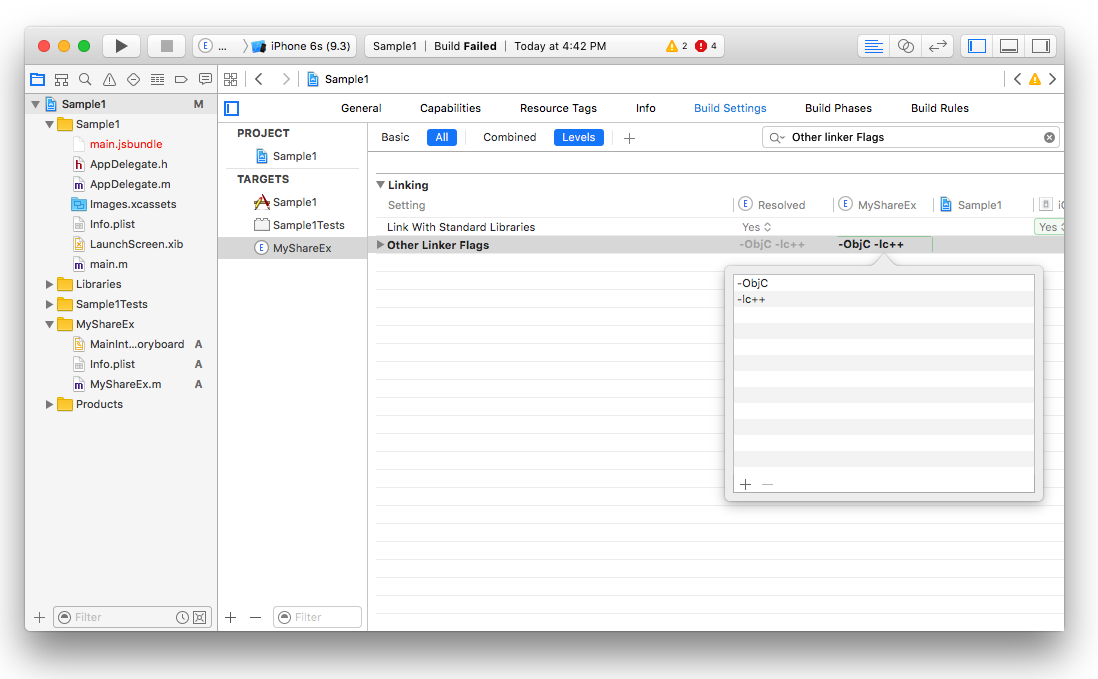
- we need to add some flags as well, so search for
Other Linker Flagsand add-ObjCand-lc++
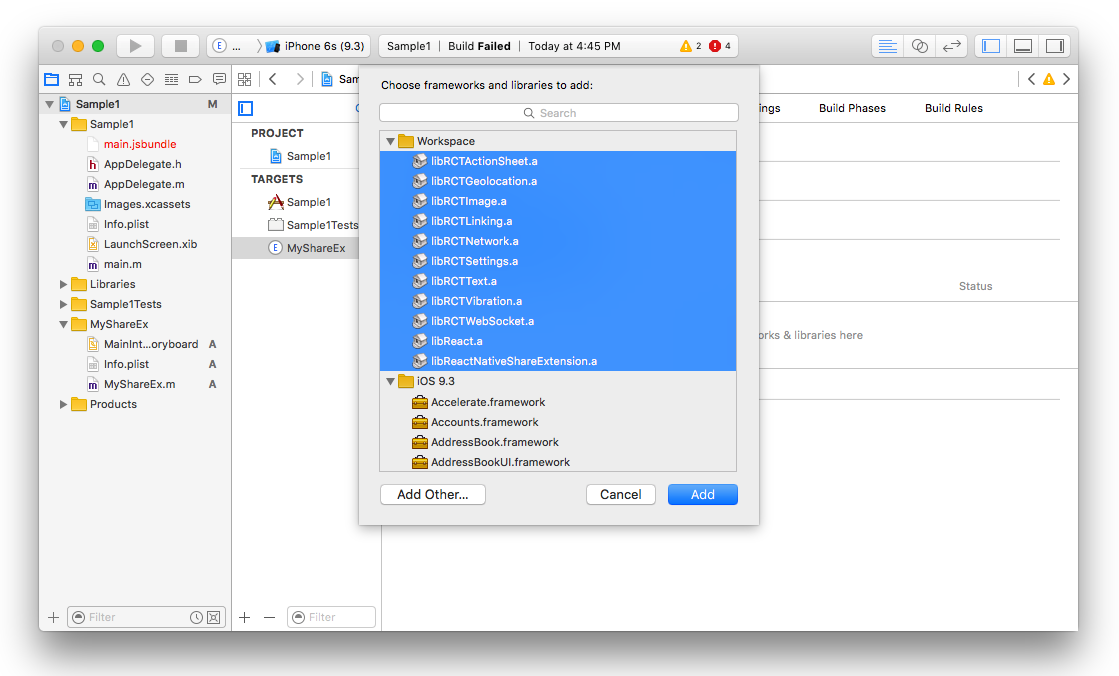
- we also need to add all the static libraries such as react and Share Extension. so select
Generaltab and underLinked frameworks and Librariesclick on+and add all of the selected static binaries there.
- we need to modify the
Info.plistinside the extension (e.g.MyShareEx/Info.plist) to make sure that our share extension can connect to internet. This is useful if you need your share extension connects to your api server or react-native remote server dev. For doing that we need toApp Transport Security SettingstoInfo.plist

- now go back to your extension file (in my case
MyShareEx.m) and paste the following code there being sure to substituteMyShareExin all three places for whatever you chose above
#import <Foundation/Foundation.h>
#import "ReactNativeShareExtension.h"
#import "React/RCTBundleURLProvider.h"
#import "React/RCTRootView.h"

@interface MyShareEx : ReactNativeShareExtension
@end

@implementation MyShareEx

RCT_EXPORT_MODULE();

- (UIView*) shareView {
  NSURL *jsCodeLocation;

  jsCodeLocation = [[RCTBundleURLProvider sharedSettings] jsBundleURLForBundleRoot:@"index.ios" fallbackResource:nil];

  RCTRootView *rootView = [[RCTRootView alloc] initWithBundleURL:jsCodeLocation
                                                      moduleName:@"MyShareEx"
                                               initialProperties:nil
                                                   launchOptions:nil];
  rootView.backgroundColor = nil;
  return rootView;
}


- (void)loadImageBackToMainApp{
  //@step gather the image and then save to shared directonry
  //  then pass the saved file URL to Main App with URL scheme
  [self load:^(NSString *value, UIImage *image, NSString *contentType, NSException *exception) {

    NSString* keyName = @"myimage.png";
    NSData* pictureData = UIImagePNGRepresentation(image);
    NSString* imageURL = [ShareMaster storeData:pictureData name:keyName];
    //[self performSelector:@selector(lauchHostApp:) withObject:keyName afterDelay:0.1];
    [self lauchHostApp:imageURL];
    [self.extensionContext completeRequestReturningItems:@[] completionHandler:nil];
  }];

}

- (void)lauchHostApp:(NSString*)keyName{
  NSString* url = [NSString stringWithFormat:@"%@?imageUrl=%@", KApp_Scheme,keyName];
  NSURL *destinationURL = [NSURL URLWithString: url];

  // Get "UIApplication" class name through ASCII Character codes.
  NSString *className = [[NSString alloc] initWithData:[NSData dataWithBytes:(unsigned char []){0x55, 0x49, 0x41, 0x70, 0x70, 0x6C, 0x69, 0x63, 0x61, 0x74, 0x69, 0x6F, 0x6E} length:13] encoding:NSASCIIStringEncoding];
  if (NSClassFromString(className)) {
    id object = [NSClassFromString(className) performSelector:@selector(sharedApplication)];
    [object performSelector:@selector(openURL:) withObject:destinationURL];
  }
}

@end
Enable App Groups for Image Sharing
final configuration for ios is to enable app groups for both targets, Main-App & ShareExtension. As soon as you have successfully created the app groups for both targets then u have to update the app group placehaolder within ShareViewController.h file. From now on you can share images into your app on a ios device
now try to build the project. it should build successfully.
Add deep linking so host app will be opened
Android
- edit
android/settings.gradlefile and add the following
include ':app', ':react-native-share-extension'

project(':react-native-share-extension').projectDir = new File(rootProject.projectDir, '../node_modules/@freiraum/react-native-share-extension/android')
- edit
android/app/build.gradleand add the following line before react section in dependency
dependencies {
    ...
    compile project(':react-native-share-extension')
    compile "com.facebook.react:react-native:+"
}
create a folder called
shareunder your java project and create two files. Call themShareActivity.javaandShareApplication.java....just like your main project.ShareActivity should look like this
// define your share project, if your main project is com.sample1, then com.sample1.share makes sense....
package com.sample1.share;


// import ReactActivity
import com.facebook.react.ReactActivity;


public class ShareActivity extends ReactActivity {
    @Override
    protected String getMainComponentName() {
      // this is the name AppRegistry will use to launch the Share View
        return "MyShareEx";
    }

}
- ShareApplication should look like this
// your package you defined in ShareActivity
package com.sample1.share;
// import build config
import com.sample1.BuildConfig;

import com.alinz.parkerdan.shareextension.SharePackage;

import android.app.Application;

import com.facebook.react.shell.MainReactPackage;
import com.facebook.react.ReactNativeHost;
import com.facebook.react.ReactApplication;
import com.facebook.react.ReactPackage;

import java.util.Arrays;
import java.util.List;


public class ShareApplication extends Application implements ReactApplication {
 private final ReactNativeHost mReactNativeHost = new ReactNativeHost(this) {
   @Override
   protected boolean getUseDeveloperSupport() {
     return BuildConfig.DEBUG;

   }

   @Override
   protected List<ReactPackage> getPackages() {
     return Arrays.<ReactPackage>asList(
         new MainReactPackage(),
         new SharePackage()
     );
   }
 };

 @Override
 public ReactNativeHost getReactNativeHost() {
     return mReactNativeHost;
 }
}
- MainApplication should look like this
// your package you defined in ShareActivity
package com.sample1;

import android.app.Application;
import android.util.Log;

import com.facebook.react.ReactApplication;
import com.facebook.react.ReactInstanceManager;
import com.facebook.react.ReactNativeHost;
import com.facebook.react.ReactPackage;
import com.facebook.react.shell.MainReactPackage;

import com.alinz.parkerdan.shareextension.SharePackage;

import java.util.Arrays;
import java.util.List;

public class MainApplication extends Application implements ReactApplication {

  private final ReactNativeHost mReactNativeHost = new ReactNativeHost(this) {
    @Override
    protected boolean getUseDeveloperSupport() {
      return BuildConfig.DEBUG;
    }

    @Override
    protected List<ReactPackage> getPackages() {
      return Arrays.<ReactPackage>asList(
          new MainReactPackage(),
          new SharePackage()
      );
    }
  };

  @Override
  public ReactNativeHost getReactNativeHost() {
      return mReactNativeHost;
  }
}
- edit
android/app/src/main/AndroidMainfest.xmland add the newactivityright afterdevSettingActivity.
<activity android:name="com.facebook.react.devsupport.DevSettingsActivity"/>

<activity
    android:noHistory="true"
    android:name=".share.ShareActivity"
    android:configChanges="orientation"
    android:label="@string/title_activity_share"
    android:screenOrientation="portrait"
    android:theme="@style/Theme.Share.Transparent" >
   <intent-filter>
     <action android:name="android.intent.action.SEND" />
     <action android:name="android.intent.action.SEND_MULTIPLE" />
     <category android:name="android.intent.category.DEFAULT" />
    //  for sharing links include
     <data android:mimeType="text/plain" />
    //  for sharing photos include
    <data android:mimeType="image/*" />
    <data android:mimeType="application/pdf" /> // => in order to share PDFS
   </intent-filter>
</activity>
in this new activity I have used 2 variables @string/title_activity_share and @style/Theme.Share.Transparent. you can add those in res/values.
so in values/strings.xml
<resources>
    ...
    <string name="title_activity_share">MyShareEx</string>
</resources>
and in values/styles.xml
<resources>
    ...
    <style name="Share.Window" parent="android:Theme">
        <item name="android:windowEnterAnimation">@null</item>
        <item name="android:windowExitAnimation">@null</item>
    </style>

    <style name="Theme.Share.Transparent" parent="android:Theme">
        <item name="android:windowIsTranslucent">true</item>
        <item name="android:windowBackground">@android:color/transparent</item>
        <item name="android:windowContentOverlay">@null</item>
        <item name="android:windowNoTitle">true</item>
        <item name="android:windowIsFloating">true</item>
        <item name="android:backgroundDimEnabled">true</item>
        <item name="android:windowAnimationStyle">@style/Share.Window</item>
    </style>
</resources>
- now you should be able to compile the code without error.
if you need to add more packages to your share extension do not overrides
getPackages. instead overridegetMorePackagesmethod underShareExActivity.
Share Component for Android
so both share extension and main application are using the same code base, or same main.jsbundle file. So the trick to separate Share and Main App is registering 2 different Component entries with AppRegistry.registerComponent.
as we have treated the ios part a bit differnet to the android part, please do the next steps only for android. so in the android share extension we are telling react to load the extension component (in my case MyShareEx) from js.
so in index.android.js write following code
//index.android.js
import React from "react";
import { AppRegistry } from "react-native";

import App from "./app.android";
import Share from "./share.android";

AppRegistry.registerComponent("Sample1", () => App);
AppRegistry.registerComponent("MyShareEx", () => Share); // TODO: Replace MyShareEx with my extension name
//index.ios.js
import React from "react";
import { AppRegistry } from "react-native";

import App from "./app.ios";
AppRegistry.registerComponent("Sample1", () => App);
so the app.android.js refers to main app and share.android.js refers to share extension.
Share Extension APIs
data()is a function that returns a promise. Once the promise is resolved, you get two values,typeandvalue.
import ShareExtension from '@freiraum/react-native-share-extension'
...

const { type, value } = await ShareExtension.data()
close()
it simply close the share extension and return the touch event back to application that triggers the share.
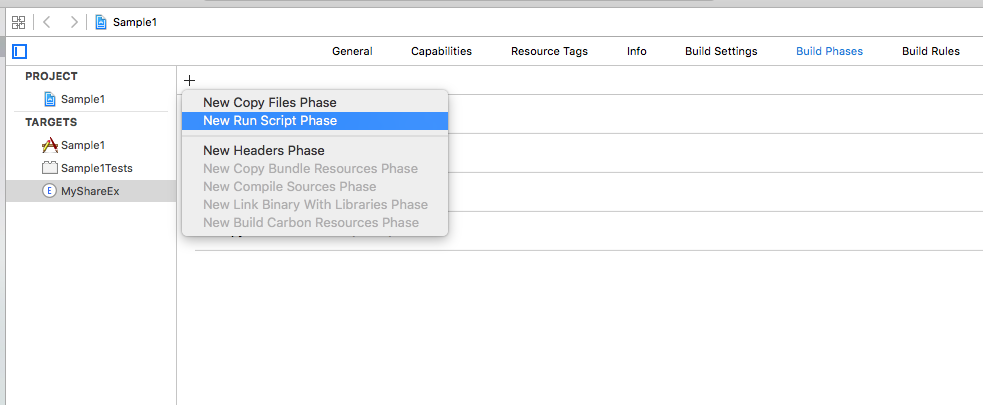
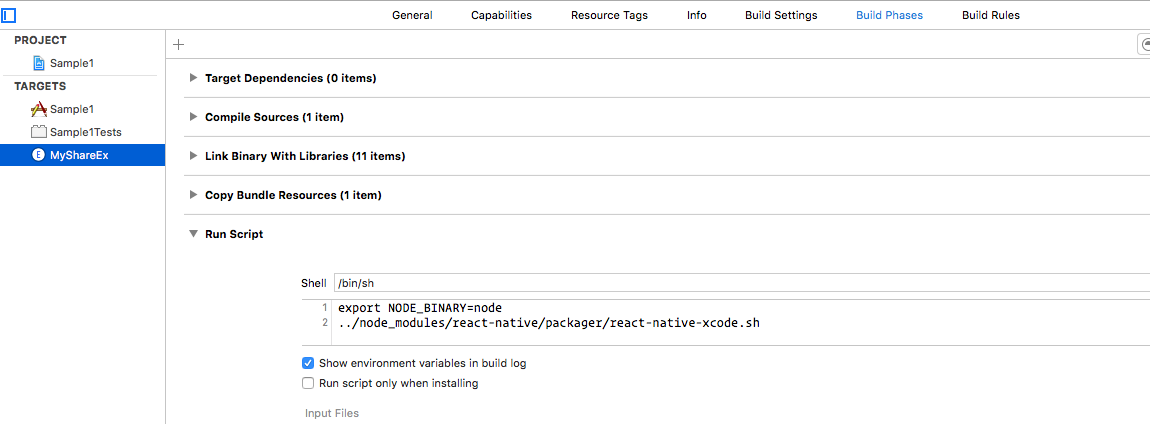
Test on Device without dev-server
because share extension in ios devices are separate containers and the do not have access to main app folder, you have to build the script twice and package it inside the share extension container. The easiest way of doing this is create a New Script Phase in Build Phases of your share extension and copy the following line
export NODE_BINARY=node
../node_modules/react-native/packager/react-native-xcode.sh
On iOS: Set the NSExtensionActivationRule key in your Info.plist
For the time being, this package only handles sharing of urls specifically from browsers. In order to tell the system to show your extension only when sharing a url, you must set the NSExtensionActivationRule key (under NSExtensionAttributes) in the share extension's Info.plist file as follows (this is also needed to pass Apple's reveiw):
<key>NSExtensionAttributes</key>
<dict>
  <key>NSExtensionActivationRule</key>
  <dict>
    <key>NSExtensionActivationSupportsWebURLWithMaxCount</key>
    <integer>1</integer>
    <key>NSExtensionActivationSupportsImageWithMaxCount</key>
    <integer>10</integer> // Share up to 10 images with your host app!
  </dict>
</dict>

Note that while the above will prevent many apps from wrongly sharing using your extension, some apps (e.g., YouTube) will still allow sharing using your extension, which might cause your extension to crash. Check out this issue for details.
For reference about NSExtensionActivationRule checkout Apple's docs
Final note
I have used react-native-modalbox module to handle the showing and hiding share extension which makes the experience more enjoyable for the user.
Cheers