README
Jenkins JS Builder
Table of Contents:
-
Overview
Features
Install
General Usage
Predefined Gulp Tasks
Redefining one of the predefined Gulp tasks
Bundling Options
Setting 'src' and 'test' (spec) paths
Command line options
Maven Integration
Sample Plugins (Jenkins - HPI)
JIRA
CLI
Without a `gulpfile.js`
Managing bundle size
Overview
NPM utility for building CommonJS module bundles (and optionally making them js-modules compatible).
See js-modules.
The following diagram illustrates the basic flow (and components used) in the process of building a CommonJS module bundle. It uses a number of popular JavaScript and maven tools (CommonJS/node.js, Browserify, Gulp, frontend-maven-plugin and more).
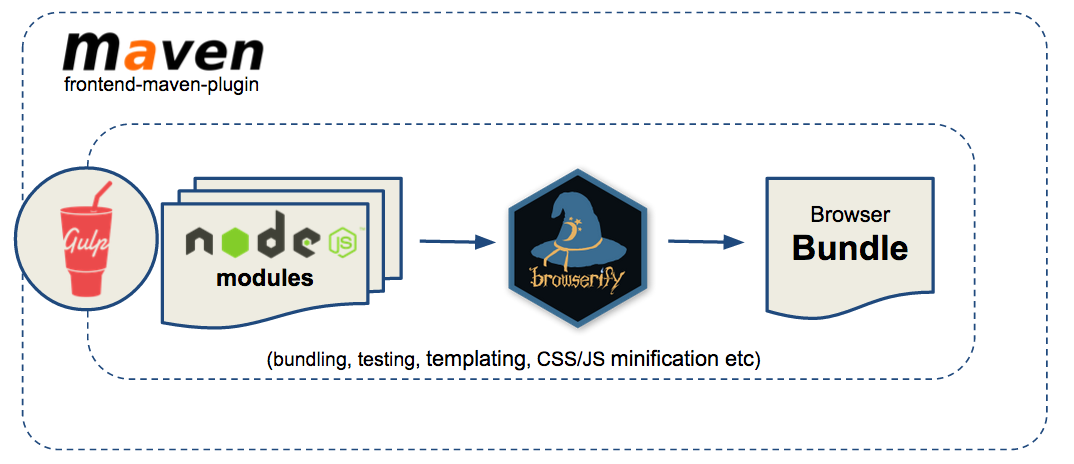
The responsibilities of the components in the above diagram can be summarized as follows:
- CommonJS: JavaScript module system (i.e. the expected format of JavaScript modules). This module system works with the nice/clean synchronous
requiresyntax synonymous with node.js (for module loading) e.g.var mathUtil = require('../util/mathUtil');. This allows us to tap into the huge NPM JavaScript ecosystem. - Browserify: A build time utility (NPM package - executed as a Gulp "task") for "bundling" a graph of CommonJS style modules together, producing a single JavaScript file (bundle) that can be loaded (from a single request) in a browser. Browserify ensures that the
requirecalls (see above) resolve properly to the correct module within the bundle. - Gulp: A JavaScript build system (NPM package), analogous to what Maven is for Java i.e. executes "tasks" that eventually produce build artifacts. In this case, a JavaScript bundle is produced via Gulps execution of a Browserify "task".
- frontend-maven-plugin: A Maven plugin that allows us to hook a Gulp "build" into a maven build e.g. for a Jenkins plugin. See Maven Integration below.
Features
js-builder does a number of things:
- Runs Jasmine tests/specs and produce a JUnit report that can be picked up by a top level Maven build.
- Uses Browserify to produce a CommonJS module bundle file from a "main" CommonJS module (see the
bundletask below). The bundle file is typically placed somewhere on the filesystem that allows a higher level Maven build to pick it up and include it in e.g. a Jenkins plugin HPI file (so it can be loaded by the browser at runtime). - Pre-process a LESS fileset to a
.cssfile that can be picked up by the top level Maven build and included in the e.g. a Jenkins plugin HPI file. See the Bundling Options section below.
Install
npm install --save-dev @jenkins-cd/js-builder
This assumes you have node.js (minimum v4.0.0) installed on your local development environment.
Note this is only required if you intend developing js-modules compatible module bundles. Plugins using this should automatically handle all build aspects via maven (see later) i.e. simple building of a plugin should require no machine level setup.
Note you can also install
js-builderglobally and use it's CLI.
General Usage
Add a gulpfile.js (see Gulp) in the same folder as the package.json. Then use js-builder as follows:
var builder = require('@jenkins-cd/js-builder');

builder.bundle('./src/main/js/myappbundle.js');
After running the the gulp command from the command line, you will see an output something like the following.
[17:16:33] Javascript bundle "myappbundle" will be available in Jenkins as adjunct "org.jenkins.ui.jsmodules.myappbundle".
Or if run from a maven project where the artifactId is (e.g.) jenkins-xyz-plugin.
[17:16:33] Javascript bundle "myappbundle" will be available in Jenkins as adjunct "org.jenkins.ui.jsmodules.jenkins_xyz_plugin.myappbundle".
From this, you can deduce that the easiest way of using this JavaScript bundle in Jenkins is via the <st:adjunct> jelly tag.
<st:adjunct includes="org.jenkins.ui.jsmodules.jenkins_xyz_plugin.myappbundle"/>
The best place to learn how to use this utility as part of building Jenkins plugins is to see the Sample Plugins repository.
Predefined Gulp Tasks
The following sections describe the available predefined Gulp tasks.
Note: If no task is specified (i.e. you just type
gulpon its own), then thebundleandtesttasks are auto-installed (i.e. auto-run) as the default tasks.
'bundle' Task
Run the 'bundle' task. See detail on this in the dedicated section titled "Bundling" (below).
gulp bundle
'test' Task
Run tests. The default location for tests is the spec folder. The file names need to match the
pattern "*-spec.js". The default location can be overridden by calling builder.tests(<new-path>).
gulp test
See jenkins-js-test for more on testing. See command line options for
--skipTestoption. See command line options for--testoption (for running a single test spec).
'bundle:watch' Task
Watch module source files (index.js, ./lib/**/*.js and ./lib/**/*.hbs) for change, auto-running the
bundle task whenever changes are detected.
Note that this task will not be run by default, so you need to specify it explicitly on the gulp command in order to run it e.g.
gulp bundle:watch
'test:watch' Task
Watch module source files changes (including test code) and rerun the tests e.g.
gulp test:watch
'lint' Task
Run linting - ESLint or JSHint. ESlint is the default if no .eslintrc or .jshintrc file is found
(using eslint-config-jenkins) in the working
directory (.eslintrc is also searched for in parent directories).
gulp lint
See command line options for
--skipLint,--continueOnLintand--fixLintoptions.
Redefining one of the predefined Gulp tasks
There are times when you need to break out and redefine one of the predefined gulp tasks (see previous section).
To redefine a task, you simply call defineTask again e.g. to redefine the test task to use mocha:
builder.defineTask('test', function() {
    var mocha = require('gulp-mocha');
    var babel = require('babel-core/register');

    builder.gulp.src('src/test/js/*-spec.js')
        .pipe(mocha({
            compilers: {js: babel}
        })).on('error', function(e) {
            if (builder.isRetest()) {
                // ignore test failures if we are running test:watch.
                return;
            }
            throw e;
        });
});
Bundling Options
The following sections outline some options that can be specified on a bundle instance.
Bundling CSS and LESS
Note that bundling of CSS or LESS is also supported through a similar syntax e.g.
builder.bundle('src/main/css/bootstrap336/bootstrap.css');
Or via LESS:
builder.bundle('src/main/css/bootstrap336/bootstrap_tweaked.less');
The above commands will add all resources under src/main/css/bootstrap336 to the plugin classpath, making
them available as adjuncts e.g. using the bundled bootstrap.css referenced above would be as simple as
adding the following to the relevant .jelly file (check the build output for the correct adjunct):
<st:adjunct includes="org.jenkins.ui.jsmodules.bootstrap336.bootstrap"/>
Generating a bundle to a specific directory
By default, the bundle command will output the bundle to the target/classes/org/jenkins/ui/jsmodules, making
the bundle loadable in Jenkins as an adjunct. See the General Usage section earlier
in this document.
Outputting the generated bundle to somewhere else is just a matter of specifying it on the bundle instance
via the inDir function e.g.
bundleSpec.inDir('<path-to-dir>');
Minify bundle JavaScript
This can be done by calling minify on js-builder:
bundleSpec.minify();
Or, by passing --minify on the command line. This will result in the minification of all generated bundles.
$ gulp --minify
onPreBundle listeners
There are times when you will need access to the underlying Browserify bundler just before the
bundling process is executed (e.g. for adding transforms etc).
To do this, you call the onPreBundle function. This function takes a listener function as an argument.
This listener function, when called, receives the bundle as this and the bundler as the only argument to
the supplied listener.
var builder = require('@jenkins-cd/js-builder');

builder.onPreBundle(function(bundler) {
    var bundle = this;

    console.log('Adding the funky transform to bundler for bundle: ' + bundle.as);
    bundler.transform(myFunkyTransform);
});
Setting 'src' and 'test' (spec) paths
The default paths depend on whether or not running in a maven project.
For a maven project, the default source and test/spec paths are:
- src:
./src/main/jsand./src/main/less(used primarily by thebundle:watchtask, watching these folders for source changes) - test:
./src/test/js(used by thetesttask)
Otherwise, they are:
- src:
./jsand./less(used primarily by thebundle:watchtask, watching these folders for source changes) - test:
./spec(used by thetesttask)
Changing these defaults is done through the builder instance e.g.:
var builder = require('@jenkins-cd/js-builder');

builder.src('src/main/js');
builder.tests('src/test/js');
You can also specify an array of src folders e.g.
builder.src(['src/main/js', 'src/main/less']);
Command line options
A number of js-builder options can be specified on the command line. If you are looking for
--h (or --help)
Get a link to this documentation.
$ gulp --h
--minify
Passing --minify on the command line will result in the minification of all generated bundles.
$ gulp --minify
--test
Run a single test.
$ gulp --test configeditor
The above example would run test specs matching the **/configeditor*-spec.js pattern (in the test source directory).
Skip options: --skipTest, --skipLint, --skipBundle
Skip one or more of the tasks/phases e.g.
$ gulp --skipTest --skipLint
Lint options: --skipLint, --continueOnLint, --fixLint
Many of the more irritating formatting rule errors/warnings can be fixed automatically by running
with the --fixLint option, making them a little less irritating e.g.
$ gulp --fixLint
Or if you are just running the lint task on it's own (explicitly):
$ gulp lint --fixLint
Alternatively, if you wish to run lint and see all of the lint errors, but not fail the build:
$ gulp --continueOnLint
And to skip linting completely:
$ gulp --skipLint
Maven Integration
Hooking a Gulp based build into a Maven build involves adding a few Maven <profile>s to the
Maven project's pom.xml. For Jenkins plugins, the easiest way to get this integration is to simply
have the plugin pom.xml depend on the Jenkins plugin-pom. For other project types, you'll need
to copy those profiles locally (see plugin-pom).
These integrations hook the Gulp build into the maven build lifecycles. A few mvn build
switches are supported, as described in the following sections.
-DcleanNode
Cleans out the local node and NPM artifacts and resource (including the node_modules folder).
$ mvn clean -DcleanNode
-DskipTests
This switch is a standard mvn switch and is honoured by the profiles defined in the plugin-pom.
$ mvn clean -DskipTests
-DskipTests also skips linting. See -DskipLint
-DskipLint
Skip linting.
$ mvn clean -DskipLint
CLI
You can install js-builder globally and then use it as command-line tool.
sudo npm install -g @jenkins-cd/js-builder
Once installed, you do not need a globally installed Gulp in order to run js-builder builds. Instead, you can execute build tasks via
the jjsbuilder command (or aliases jjsbuild and jjsb).
E.g. to run a full build, simply run jjsbuilder with no args (equivalent to running gulp with no args).
jjsbuilder
To run specific tasks e.g. test and lint.
jjsbuilder --tasks test,lint
To run specific tasks and specify a switch e.g. the lint task with the --fixList switch.
jjsbuilder --tasks lint --fixLint
So as you can see, the CLI operates more or less the same as when executing via gulp.
Without a gulpfile.js
The introduction of the CLI has allowed us to remove the gulpfile.js in a lot of situation
because the CLI has it's own built in gulpfile.js.
If your gulpfile.js is as simple as:
var builder = require('@jenkins-cd/js-builder');

//
// Create a bundle.
// See https://github.com/jenkinsci/js-builder
//
builder.bundle('src/main/js/rollbar.js');
This gulpfile.js can be deleted and the bundling command moved to the jenkinscd.bundle section of the package.json e.g.
{

  "jenkinscd": {
    "bundle": [
      "src/main/js/rollbar.js"
    ]
  }
}
Then you can add scripts to the package.json for executing build tasks. This allows the tasks to be executed without
installing js-builder globally (which you would not want to require for e.g. a CI/CD build agent) e.g from a
package.json generated by generator-blueocean-usain.
{

  "scripts": {
    "build": "jjsbuilder",
    "bundle": "jjsbuilder --tasks bundle",
    "test": "jjsbuilder --tasks test",
    "lint": "jjsbuilder --tasks lint",
    "lint:fix": "jjsbuilder --tasks lint --fixLint",
    "bundle:watch": "jjsbuilder --tasks bundle:watch",
    "mvnbuild": "jjsbuilder --tasks bundle",
    "mvntest": "jjsbuilder --tasks test,lint"
  }
}
Managing bundle size
Generated JavaScript bundles can become very big very fast if you don't manage them properly. This is a constant challenge and something you need to keep an eye on. We constantly do battle against this problem on Blue Ocean.
Once it has been identified that a bundle has become very large, then you need to analyse the bundle to find out what modules/packages are causing the bloat and if there's an opportunity to externalize modules/packages that are in use across a number of bundles.
Note: browserify-tree is a tool that we developed to help analyse Browserify generated bundles. Note: disc is another useful tool for analysing Browserify generated bundles. See this Jenkins Dev list thread for some details on how we've used it in the past.