README
JvM Contentful Migrations
JvM Contentful Migrations offers additional functionality on top of the existing migration functionality of the Contentful CLI. It makes it easy and safe to deploy changes to your content model in a way that can be reviewed and tested before being deployed to production. With migrations you can do almost everything with you content and your content model. See the official documentation for more information.
Getting started
Install
npm i @jungvonmatt/contentful-migrations
Initialize
After installation we only need a few bits of information to get you started. To help you configure contentful-migrations just run the init command.
npx migrations init
This initializes migrations and stores the config values in the package.json or the .migrationsrc file.
You can also use this command if you want to switch from managing migrations in Contentful with a single Tag to the recommended approach using a dedicated Content type for migrations
Configuration values
| Name | Default | Description |
|---|---|---|
| accessToken | undefined |
Contentful Management Token. Just run npx contentful login and you're done. |
| spaceId | undefined |
Contentful Space id. Will fallback to process.env.CONTENTFUL_SPACE_ID if not set. |
| environmentId | undefined |
Contentful Environment id. Will fallback to process.env.CONTENTFUL_ENVIRONMENT_ID if not set.If neither environmentId nor CONTENTFUL_ENVIRONMENT_ID is available we search for environment whose id matches the current git branch |
| storage | undefined |
We need to keep a hint to the executed migrations inside Contentful. You can choose between *content and tag. Content will add a new content type to your Contentful environment and stores the state of every migration as content entry (recommended approach) tag Will only store the latest version inside a tag. You need to preserve the right order yourself. When you add a new migration with an older version number it will not be executed. |
| fieldId | 'migration' |
Id of the tag where the migration version is stored (only used with storage tag) |
| migrationContentTypeId | 'contentful-migrations' |
Id of the migration content-type (only used with storage content) |
| directory | './migrations' |
Directory where the migration files are stored |
Handling contentful environments
It is recommended that you develop and test your migrations in a separate environment before executing them on production content. You can handle environments using the environment command:
# Add a new environment and activate it for API usage
npx migrations environment <environment-id> --create

# Remove an environment
npx migrations environment <environment-id> --remove

# Reset an environment
npx migrations environment <environment-id> --reset
Generating blank migrations
To generate a blank migration you can use the generate command:
npx migrations generate
Generate a migration from an existing content-type
Sometimes you may not want to start a migration from scratch. You can create a new Content type in the contentful web app and import it using the fetch command.
When you want to use the contentful web app to configure your content types you should do so in a separate environment because the migration will fail if the content-type is already present at the time you run the migration script
# Generate migration scripts for all content types from the current environment
npx migrations fetch

# Generate migration scripts only for specific content types from the current environment
npx migrations fetch -c <content-type> -c <another-content-type>

# Generate migration script for single content type from a custom environment
npx migrations fetch -c <content-type> -e <environment-id>
Executing multiple migrations
You can execute all "new" migrations using the migrate command.
# Run all 'new' migrations in the current environment
npx migrations migrate

# Run all 'new' migrations in a custom environment
npx migrations migrate -e <environment-id>
Executing single migrations
You may want to just execute a single migration. You can do this with the execute command:
# Execute single migration in the current environment
npx migrations execute <path/to/migration.js>

# Execute single migration in a custom environment
npx migrations execute <path/to/migration.js> -e <environment-id>
Managing the migration versions stored in contentful
Sometimes you may need to manually mark a migration as migrated or not. You can use the version command for this.
Use caution when using the version command. If you delete a version from the table and then run the migrate command, that migration version will be executed again.
This command is only available when using the content storage
# Add a migration entry to Contentful
npx migrations version <path/to/migration.js> --add

# Delete a migration entry from Contentful
npx migrations version <path/to/migration.js> --remove

# Add a migration entry to Contentful in a custom environment
npx migrations version <path/to/migration.js> --add -e <environment-id>

# Delete a migration entry from Contentful in a custom environment
npx migrations version <path/to/migration.js> --remove -e <environment-id>
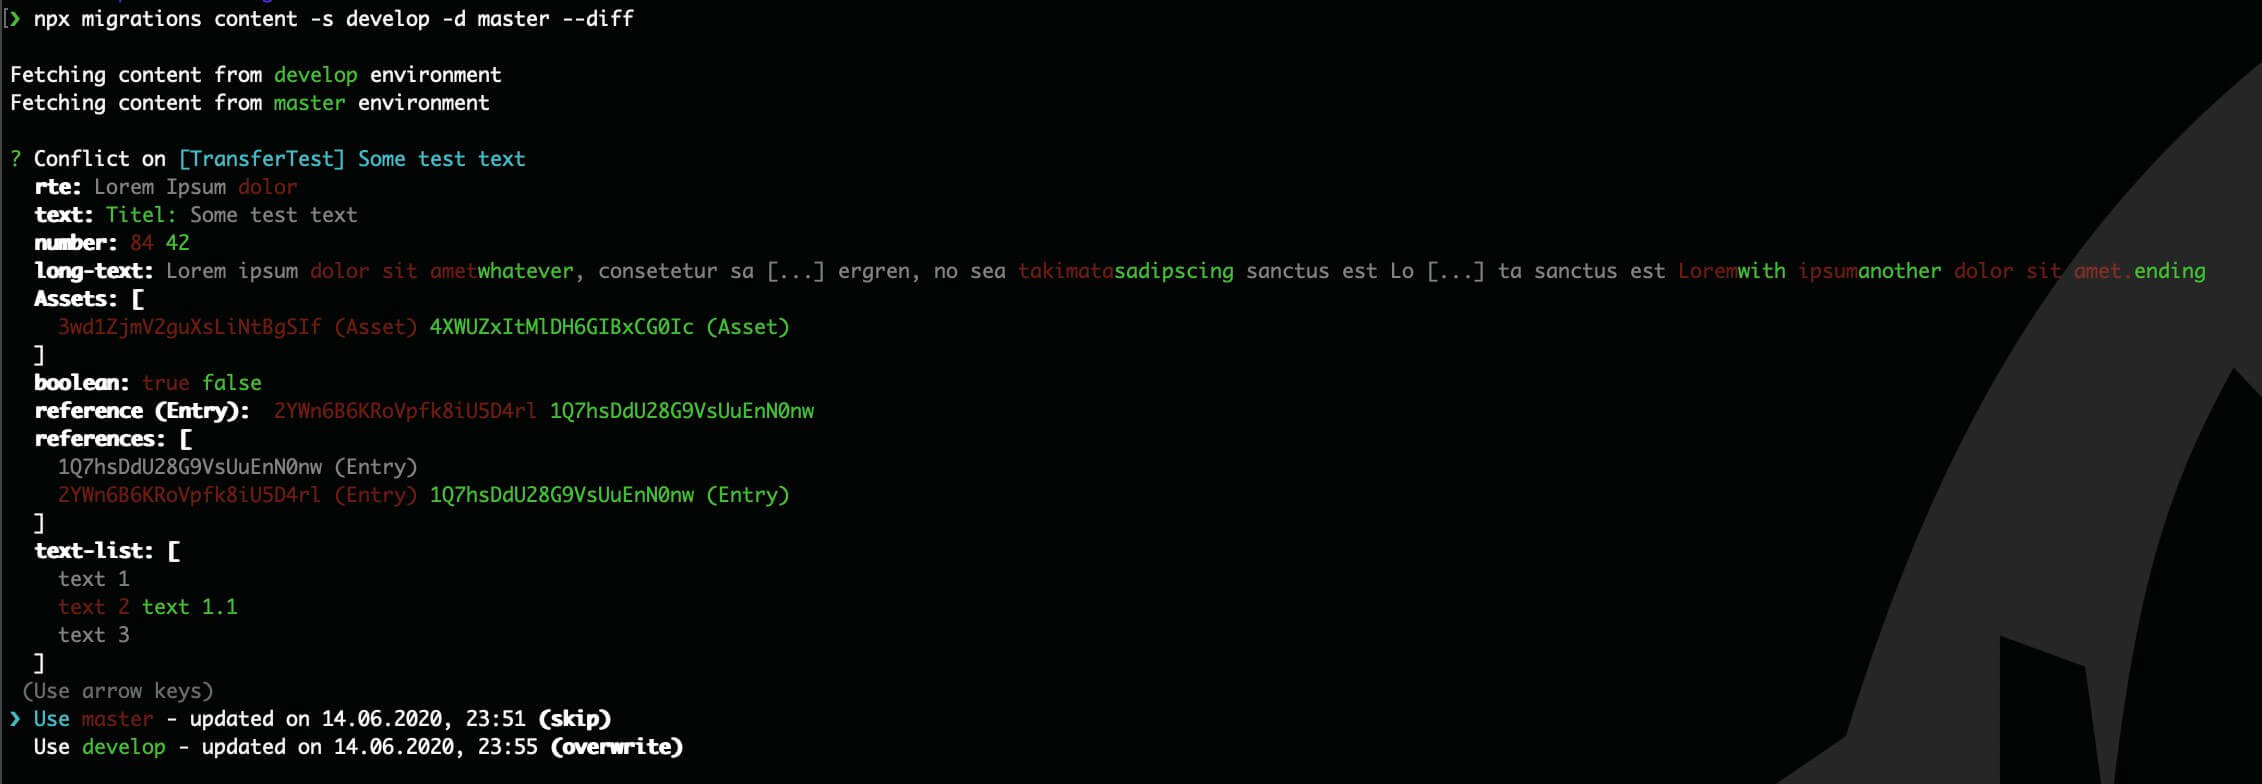
Migrating content between environments
In some workflows it may be required to create and test content in a dedicated environment and 'copy' it after an approval process to your production environment.
You can do this using the content command.
# Transfer content from one Contentful environment to another.
# This command will not overwrite existing content unless you say so.
npx migrations content --source-env <environment>  --dest-env <environment>
Optional Arguments
--content-type: Limit to specific content-type and it's dependencies.
--diff: Manually choose skip/overwrite for every conflicting content.
--force: No manual diffing. Overwrites all conflicting entries/assets.
--verbose: Show tree of entries/assets which should be migrated.
Generating documentation for your content types
You may want to have some markdown documentation for your content-types. With the doc command you can auto-generate the documentation. You can use the default template or you can specify a custom template using either a Javascript file or a mustache template.
npx migrations doc -e <environment> -p <path/to/docs>
Optional Arguments
--template: Use a custom template for docs. .js with default export or .mustache is allowed
--extension: Use a custom file extension (default is .md)
Can I contribute?
Of course. We appreciate all of our contributors and welcome contributions to improve the project further. If you're uncertain whether an addition should be made, feel free to open up an issue and we can discuss it.