README
data-streams/osc-bridge
An OSC bridge server, enabling bi-directional OSC messaging between Websocket <-> UDP.
It is meant to be used by client apps, that use a Web Socket client to receive/send OSC messages from/to a remote OSC controller, which would only send/receive UDP datagrams.
Setup
$ npm install
$ npm link
Usage
$ osc-bridge [ --auto-ping ]
Configuration
OSC bridge server
Before starting the OSC bridge server, you might want to tweak its configuration;
add following NPM environment variables in the config section of your package.json:
{
  …,
  "config": {
    "osc-bridge": {
      "udp-server": {
        "host": "0.0.0.0",
        "port": "7400"
      },
      "udp-client": {
        "host": "192.168.xxx.yyy",
        "port": "7500"
      },
      "ws-server": {
        "host": "0.0.0.0",
        "port": "8080"
      }
    }
  },
  "devDependencies": {
    "osc-bridge": "latest",
    …
  }
  …
}
See the package.json at the root of this monorepo for an example.
OSC remote controller
To send and receive OSC messages to/from the OSC bridge server, you will also need to configure your remote OSC controller app.
Use the IP address of the network adapter listed by the OSC bridge server
upon start. For instance, if you get following output, your computer and
the OSC bridge server will be reachable at IP 192.168.178.47:
$ npm run dev:osc

> @petitatelier/data-streams@ dev:osc …
> osc-bridge & npm run dev && fg

OSC Websocket <-> UDP bridge server
Bridging OSC over Web Socket to/from `ws://0.0.0.0:8080`
Listening for OSC over UDP on `0.0.0.0:7400`
Broadcasting OSC over UDP to `192.168.178.29:7500`
Local host reachable at: [ en0: `192.168.178.47` ]
…
If you were using the popular TouchOSC
remote OSC controller app, you would consequently configure its Host and
Port (outgoing) fields with IP 192.168.178.47 and port 7400, as shown
in screencopy hereafter:
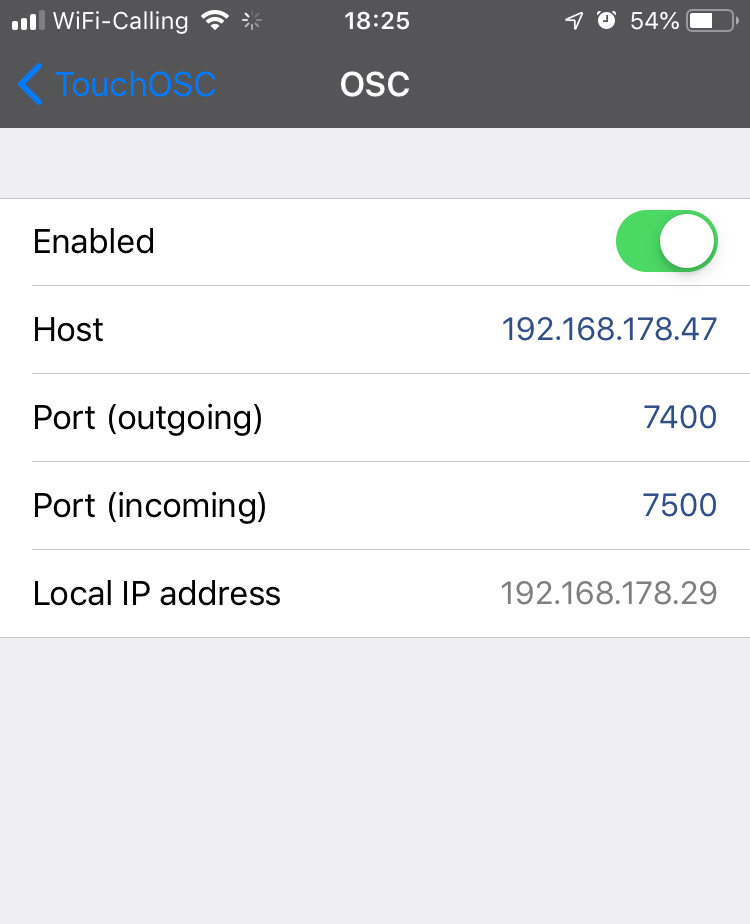
Back to your package.json, to forward OSC messages from the bridge server
to the remote controller, you would adjust the udp-client.host field to
the Local IP address 192.168.178.29 shown by TouchOSC; and the
udp-client.port field to the value shown in the Port (incoming) field
of TouchOSC:
{
  …
  "config": {
    "osc-bridge": {
      …
      "udp-client": {
          "host": "192.168.178.29",
          "port": "7500"
      }
      …
    …
  …
}