README
data-streams/osc-stream
A readable- and writable stream of OSC Messages, wrapping an underlying OSC Websocket client (from the @adzialocha/osc-js library).
Prequisites
Requires an OSC bridge server running on your local network, to enable bi-directional messaging between the OSCStream class instance and a remote OSC controller. You can use the @petitatelier/osc-bridge command-line utility to start one. See demo instructions hereafter.
Usage
  <script type="module">
    import { OSCStream , OSCMessageHTMLFormatter } from "@petitatelier/osc-stream";
    const oscStream = new OSCStream({ host: "0.0.0.0", port: 8080 });

    oscStream.readable
      .pipeThrough( OSCMessageHTMLFormatter)
      .pipeTo( streamingElement.writable)
      .catch( err => console.error( "Something went wrong!", err));

    const oscWriter = oscStream.writable.getWriter();
    oscWriter.write( new self.OSC.Message( "/ping"))
      .catch( err => console.error( "Something went wrong!", err));
  </script>
Demo

Run following command and navigate to http://127.0.0.1:8081/demos/osc-stream.html:
$ npm run dev:osc
Prerequisite
OSC bridge server
The npm run dev:osc command will start an OSC bridge server, along with the local
dev HTTP server, enabling bi-directional messaging between a remote OSC controller
and the OSCStream class instance of the demo.
Before starting the OSC bridge server, you might want to tweak its configuration;
see the config section of the package.json at the root of
this monorepo.
{
  …
  "config": {
    "http-server": {
      "host": "0.0.0.0",
      "port": "8081"
    },
    "osc-bridge": {
      "udp-server": {
        "host": "0.0.0.0",
        "port": "7400"
      },
      "udp-client": {
        "host": "192.168.178.29",
        "port": "7500"
      },
      "ws-server": {
        "host": "0.0.0.0",
        "port": "8080"
      }
    }
  },
  …
}
OSC remote controller
You will also need to configure your remote OSC controller app, to send its outgoing messages to the OSC bridge server.
Use the IP address of the network adapter listed by the OSC bridge server
upon start. For instance, if you get following output, your computer and
the OSC bridge server will be reachable at IP 192.168.178.47:
$ npm run dev:osc

> @petitatelier/data-streams@ dev:osc …
> osc-bridge & npm run dev && fg

OSC Websocket <-> UDP bridge server
Bridging OSC over Web Socket to/from `ws://0.0.0.0:8080`
Listening for OSC over UDP on `0.0.0.0:7400`
Broadcasting OSC over UDP to `192.168.178.29:7500`
Local host reachable at: [ en0: `192.168.178.47` ]
…
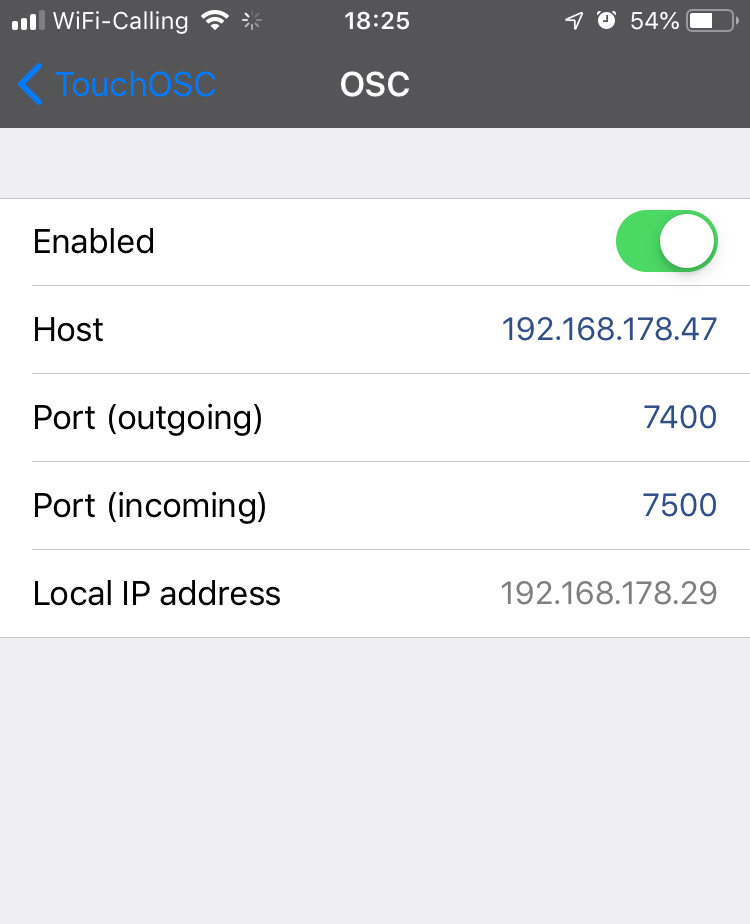
And if you were using the popular TouchOSC
remote OSC controller app, you would consequently configure its Host and
Port (outgoing) fields with IP 192.168.178.47 and port 7400, as shown
in screencopy hereafter: