README
Custom Metadata Plugin
Tools for working with custom metadata types and their records.


This plugin is bundled with the Salesforce CLI. For more information on the CLI, read the getting started guide.
We always recommend using the latest version of these commands bundled with the CLI, however, you can install a specific version or tag if needed.
Install
sfdx plugins:install custom-metadata@x.y.z
Issues
Please report any issues at https://github.com/forcedotcom/cli/issues
Contributing
- Please read our Code of Conduct
- Create a new issue before starting your project so that we can keep track of what you are trying to add/fix. That way, we can also offer suggestions or let you know if there is already an effort in progress.
- Fork this repository.
- Build the plugin locally
- Create a topic branch in your fork. Note, this step is recommended but technically not required if contributing using a fork.
- Edit the code in your fork.
- Write appropriate tests for your changes. Try to achieve at least 95% code coverage on any new code. No pull request will be accepted without unit tests.
- Sign CLA (see CLA below).
- Send us a pull request when you are done. We'll review your code, suggest any needed changes, and merge it in.
CLA
External contributors will be required to sign a Contributor's License Agreement. You can do so by going to https://cla.salesforce.com/sign-cla.
Build
To build the plugin locally, make sure to have yarn installed and run the following commands:
# Clone the repository
git clone git@github.com:salesforcecli/plugin-custom-metadata

# Install the dependencies and compile
yarn install
yarn build
To use your plugin, run using the local ./bin/run or ./bin/run.cmd file.
# Run using local run file.
./bin/run force:cmdt
There should be no differences when running via the Salesforce CLI or using the local run file. However, it can be useful to link the plugin to do some additional testing or run your commands from anywhere on your machine.
# Link your plugin to the sfdx cli
sfdx plugins:link .
# To verify
sfdx plugins
Commands
sfdx force:cmdt:create -n <string> [-l <string>] [-p <string>] [-v PackageProtected|Protected|Public] [-d <directory>] [--json] [--loglevel trace|debug|info|warn|error|fatal|TRACE|DEBUG|INFO|WARN|ERROR|FATAL]sfdx force:cmdt:field:create -n <string> -f Checkbox|Date|DateTime|Email|Number|Percent|Phone|Picklist|Text|TextArea|LongTextArea|Url [-p <array>] [-s <number>] [-l <string>] [-d <directory>] [--json] [--loglevel trace|debug|info|warn|error|fatal|TRACE|DEBUG|INFO|WARN|ERROR|FATAL]sfdx force:cmdt:generate -n <string> -s <string> [-l <string>] [-p <string>] [-v PackageProtected|Protected|Public] [-i] [-d <directory>] [-r <directory>] [-u <string>] [--apiversion <string>] [--json] [--loglevel trace|debug|info|warn|error|fatal|TRACE|DEBUG|INFO|WARN|ERROR|FATAL]sfdx force:cmdt:record:create [name=value...] -t <string> -n <string> [-l <string>] [-p <string>] [-i <directory>] [-d <directory>] [--json] [--loglevel trace|debug|info|warn|error|fatal|TRACE|DEBUG|INFO|WARN|ERROR|FATAL]sfdx force:cmdt:record:insert -f <string> -t <string> [-i <directory>] [-d <directory>] [-n <string>] [--json] [--loglevel trace|debug|info|warn|error|fatal|TRACE|DEBUG|INFO|WARN|ERROR|FATAL]
sfdx force:cmdt:create -n <string> [-l <string>] [-p <string>] [-v PackageProtected|Protected|Public] [-d <directory>] [--json] [--loglevel trace|debug|info|warn|error|fatal|TRACE|DEBUG|INFO|WARN|ERROR|FATAL]
creates a new custom metadata type in the current project
USAGE
  $ sfdx force:cmdt:create -n <string> [-l <string>] [-p <string>] [-v PackageProtected|Protected|Public] [-d
  <directory>] [--json] [--loglevel trace|debug|info|warn|error|fatal|TRACE|DEBUG|INFO|WARN|ERROR|FATAL]

OPTIONS
  -d, --outputdir=outputdir                                                         directory to store the newly-created
                                                                                    custom metadata type files

  -l, --label=label                                                                 label for the custom metadata type

  -n, --typename=typename                                                           (required) unique object name for
                                                                                    the custom metadata type

  -p, --plurallabel=plurallabel                                                     plural version of the label value;
                                                                                    if blank, uses label

  -v, --visibility=(PackageProtected|Protected|Public)                              [default: Public] visibility of the
                                                                                    custom metadata type

  --json                                                                            format output as json

  --loglevel=(trace|debug|info|warn|error|fatal|TRACE|DEBUG|INFO|WARN|ERROR|FATAL)  [default: warn] logging level for
                                                                                    this command invocation

EXAMPLES
  Create a custom metadata type with developer name 'MyCustomType'; this name will also be used as the label:
       $ sfdx force:cmdt:create --typename MyCustomType
  Create a protected custom metadata type with a specific label:
       $ sfdx force:cmdt:create --typename MyCustomType --label "Custom Type" --plurallabel "Custom Types" --visibility
  Protected
See code: src/commands/force/cmdt/create.ts
sfdx force:cmdt:field:create -n <string> -f Checkbox|Date|DateTime|Email|Number|Percent|Phone|Picklist|Text|TextArea|LongTextArea|Url [-p <array>] [-s <number>] [-l <string>] [-d <directory>] [--json] [--loglevel trace|debug|info|warn|error|fatal|TRACE|DEBUG|INFO|WARN|ERROR|FATAL]
generate a custom metadata field based on the field type provided
USAGE
  $ sfdx force:cmdt:field:create -n <string> -f
  Checkbox|Date|DateTime|Email|Number|Percent|Phone|Picklist|Text|TextArea|LongTextArea|Url [-p <array>] [-s <number>]
  [-l <string>] [-d <directory>] [--json] [--loglevel
  trace|debug|info|warn|error|fatal|TRACE|DEBUG|INFO|WARN|ERROR|FATAL]

OPTIONS
  -d, --outputdir=outputdir
      directory to store newly-created field definition files

  -f, --fieldtype=(Checkbox|Date|DateTime|Email|Number|Percent|Phone|Picklist|Text|TextArea|LongTextArea|Url)
      (required) type of field

  -l, --label=label
      label for the field

  -n, --fieldname=fieldname
      (required) unique name for the field

  -p, --picklistvalues=picklistvalues
      comma-separated list of picklist values; required for Picklist fields

  -s, --decimalplaces=decimalplaces
      number of decimal places to use for Number or Percent fields

  --json
      format output as json

  --loglevel=(trace|debug|info|warn|error|fatal|TRACE|DEBUG|INFO|WARN|ERROR|FATAL)
      [default: warn] logging level for this command invocation

EXAMPLES
  Create a metadata file for a custom checkbox field:
       $ sfdx force:cmdt:field:create --fieldname MyField --fieldtype Checkbox
  Create a metadata file for a custom picklist field:
       $ sfdx force:cmdt:field:create --fieldname MyField --fieldtype Picklist --picklistvalues "A,B,C"
  Create a metadata file for a custom number field:
       $ sfdx force:cmdt:field:create --fieldname MyField --fieldtype Number --decimalplaces 2
See code: src/commands/force/cmdt/field/create.ts
sfdx force:cmdt:generate -n <string> -s <string> [-l <string>] [-p <string>] [-v PackageProtected|Protected|Public] [-i] [-d <directory>] [-r <directory>] [-u <string>] [--apiversion <string>] [--json] [--loglevel trace|debug|info|warn|error|fatal|TRACE|DEBUG|INFO|WARN|ERROR|FATAL]
generates a custom metadata type and all its records for the provided sObject
USAGE
  $ sfdx force:cmdt:generate -n <string> -s <string> [-l <string>] [-p <string>] [-v PackageProtected|Protected|Public]
  [-i] [-d <directory>] [-r <directory>] [-u <string>] [--apiversion <string>] [--json] [--loglevel
  trace|debug|info|warn|error|fatal|TRACE|DEBUG|INFO|WARN|ERROR|FATAL]

OPTIONS
  -d, --typeoutputdir=typeoutputdir                                                 [default:
                                                                                    force-app/main/default/objects/]
                                                                                    directory to store newly-created
                                                                                    custom metadata type files

  -i, --ignoreunsupported                                                           ignore unsupported field types

  -l, --label=label                                                                 label for the custom metadata type

  -n, --devname=devname                                                             (required) name of the custom
                                                                                    metadata type

  -p, --plurallabel=plurallabel                                                     plural version of the label value;
                                                                                    if blank, uses label

  -r, --recordsoutputdir=recordsoutputdir                                           [default:
                                                                                    force-app/main/default/customMetadat
                                                                                    a/] directory to store newly-created
                                                                                    custom metadata record files

  -s, --sobjectname=sobjectname                                                     (required) API name of the sObject
                                                                                    source for custom metadata
                                                                                    generation

  -u, --targetusername=targetusername                                               username or alias for the target
                                                                                    org; overrides default target org

  -v, --visibility=(PackageProtected|Protected|Public)                              [default: Public] visibility of the
                                                                                    custom metadata type

  --apiversion=apiversion                                                           override the api version used for
                                                                                    api requests made by this command

  --json                                                                            format output as json

  --loglevel=(trace|debug|info|warn|error|fatal|TRACE|DEBUG|INFO|WARN|ERROR|FATAL)  [default: warn] logging level for
                                                                                    this command invocation

EXAMPLES
  Generate a custom metadata type from an sObject in the default target org:
       $ sfdx force:cmdt:generate --devname MyCMDT --sobjectname MySourceObject__c
  Generate a custom metadata type from an sObject in the specified target org; ignore unsupported field types instead of
  converting them to text:
       $ sfdx force:cmdt:generate --devname MyCMDT --sobjectname MySourceObject__c  --ignoreunsupported --targetusername
  'alias or user email of the org containing the source type'
  Generate a protected custom metadata type from an sObject in the default target org:
       $ sfdx force:cmdt:generate --devname MyCMDT --sobjectname SourceCustomObject__c  --visibility Protected
  Generate a protected custom metadata type with a specific label from an sObject in the default target org:
       $ sfdx force:cmdt:generate --devname MyCMDT --label "My CMDT" --plurallabel "My CMDTs" --sobjectname
  SourceCustomSetting__c  --visibility Protected
  Generate a custom metadata type from an sObject in the default target org; put the resulting type metadata file in the
  specified directory:
       $ sfdx force:cmdt:generate --devname MyCMDT --sobjectname SourceCustomSetting__c --typeoutputdir
  'path/to/my/cmdt/directory'
  Generate a custom metadata type from an sObject in the default target org; put the resulting record metadata file(s)
  in the specified directory:
       $ sfdx force:cmdt:generate --devname MyCMDT --sobjectname SourceCustomSetting__c --recordsoutputdir
  'path/to/my/cmdt/record/directory'
See code: src/commands/force/cmdt/generate.ts
sfdx force:cmdt:record:create [name=value...] -t <string> -n <string> [-l <string>] [-p <string>] [-i <directory>] [-d <directory>] [--json] [--loglevel trace|debug|info|warn|error|fatal|TRACE|DEBUG|INFO|WARN|ERROR|FATAL]
create a new record for a given custom metadata type in the current project
USAGE
  $ sfdx force:cmdt:record:create [name=value...] -t <string> -n <string> [-l <string>] [-p <string>] [-i <directory>]
  [-d <directory>] [--json] [--loglevel trace|debug|info|warn|error|fatal|TRACE|DEBUG|INFO|WARN|ERROR|FATAL]

OPTIONS
  -d, --outputdir=outputdir                                                         [default:
                                                                                    force-app/main/default/customMetadat
                                                                                    a] directory to store newly-created
                                                                                    custom metadata record files

  -i, --inputdir=inputdir                                                           [default:
                                                                                    force-app/main/default/objects]
                                                                                    directory to pull the custom
                                                                                    metadata type definition from

  -l, --label=label                                                                 label for the new record

  -n, --recordname=recordname                                                       (required) name for the new record

  -p, --protected=true|false                                                        [default: false] protect the record
                                                                                    when it is in a managed package

  -t, --typename=typename                                                           (required) API name of the custom
                                                                                    metadata type to create a record for

  --json                                                                            format output as json

  --loglevel=(trace|debug|info|warn|error|fatal|TRACE|DEBUG|INFO|WARN|ERROR|FATAL)  [default: warn] logging level for
                                                                                    this command invocation

EXAMPLES
  Create a record metadata file for custom metadata type 'MyCMT' with values specified for two custom fields:
       $ sfdx force:cmdt:record:create --typename MyCMT__mdt --recordname MyRecord My_Custom_Field_1=Foo
  My_Custom_Field_2=Bar
  Create a protected record metadata file for custom metadata type 'MyCMT' with a specific label and values specified
  for two custom fields:
       $ sfdx force:cmdt:record:create --typename MyCMT__mdt --recordname MyRecord --label "My Record" --protected true
  My_Custom_Field_1=Foo My_Custom_Field_2=Bar
See code: src/commands/force/cmdt/record/create.ts
sfdx force:cmdt:record:insert -f <string> -t <string> [-i <directory>] [-d <directory>] [-n <string>] [--json] [--loglevel trace|debug|info|warn|error|fatal|TRACE|DEBUG|INFO|WARN|ERROR|FATAL]
create new custom metadata type records from a CSV file
USAGE
  $ sfdx force:cmdt:record:insert -f <string> -t <string> [-i <directory>] [-d <directory>] [-n <string>] [--json]
  [--loglevel trace|debug|info|warn|error|fatal|TRACE|DEBUG|INFO|WARN|ERROR|FATAL]

OPTIONS
  -d, --outputdir=outputdir                                                         [default:
                                                                                    force-app/main/default/customMetadat
                                                                                    a] directory to store newly-created
                                                                                    custom metadata record files

  -f, --filepath=filepath                                                           (required) path to the CSV file

  -i, --inputdir=inputdir                                                           [default:
                                                                                    force-app/main/default/objects]
                                                                                    directory to pull the custom
                                                                                    metadata type definition from

  -n, --namecolumn=namecolumn                                                       [default: Name] column that is used
                                                                                    to determine the name of the record

  -t, --typename=typename                                                           (required) API name of the custom
                                                                                    metadata type

  --json                                                                            format output as json

  --loglevel=(trace|debug|info|warn|error|fatal|TRACE|DEBUG|INFO|WARN|ERROR|FATAL)  [default: warn] logging level for
                                                                                    this command invocation

EXAMPLES
  Create record metadata files for type 'My_CMDT_Name' (from your local project) based on values in a CSV file, using
  'Name' as the column that specifies the record name:
       $ sfdx force:cmdt:record:insert --filepath path/to/my.csv --typename My_CMDT_Name
  Create record metadata files for type 'My_CMDT_Name' (from the specified directory) based on values in a CSV file,
  using 'PrimaryKey' as the column that specifies the record name:
       $ sfdx force:cmdt:record:insert --filepath path/to/my.csv --typename My_CMDT_Name --inputdir
  "path/to/my/cmdt/directory" --namecolumn "PrimaryKey"
See code: src/commands/force/cmdt/record/insert.ts
Debugging your plugin
We recommend using the Visual Studio Code (VS Code) IDE for your plugin development. Included in the .vscode directory of this plugin is a launch.json config file, which allows you to attach a debugger to the node process when running your commands.
To debug the hello:org command:
- Start the inspector
If you linked your plugin to the sfdx cli, call your command with the dev-suspend switch:
$ sfdx hello:org -u myOrg@example.com --dev-suspend
Alternatively, to call your command using the bin/run script, set the NODE_OPTIONS environment variable to --inspect-brk when starting the debugger:
$ NODE_OPTIONS=--inspect-brk bin/run hello:org -u myOrg@example.com
- Set some breakpoints in your command code
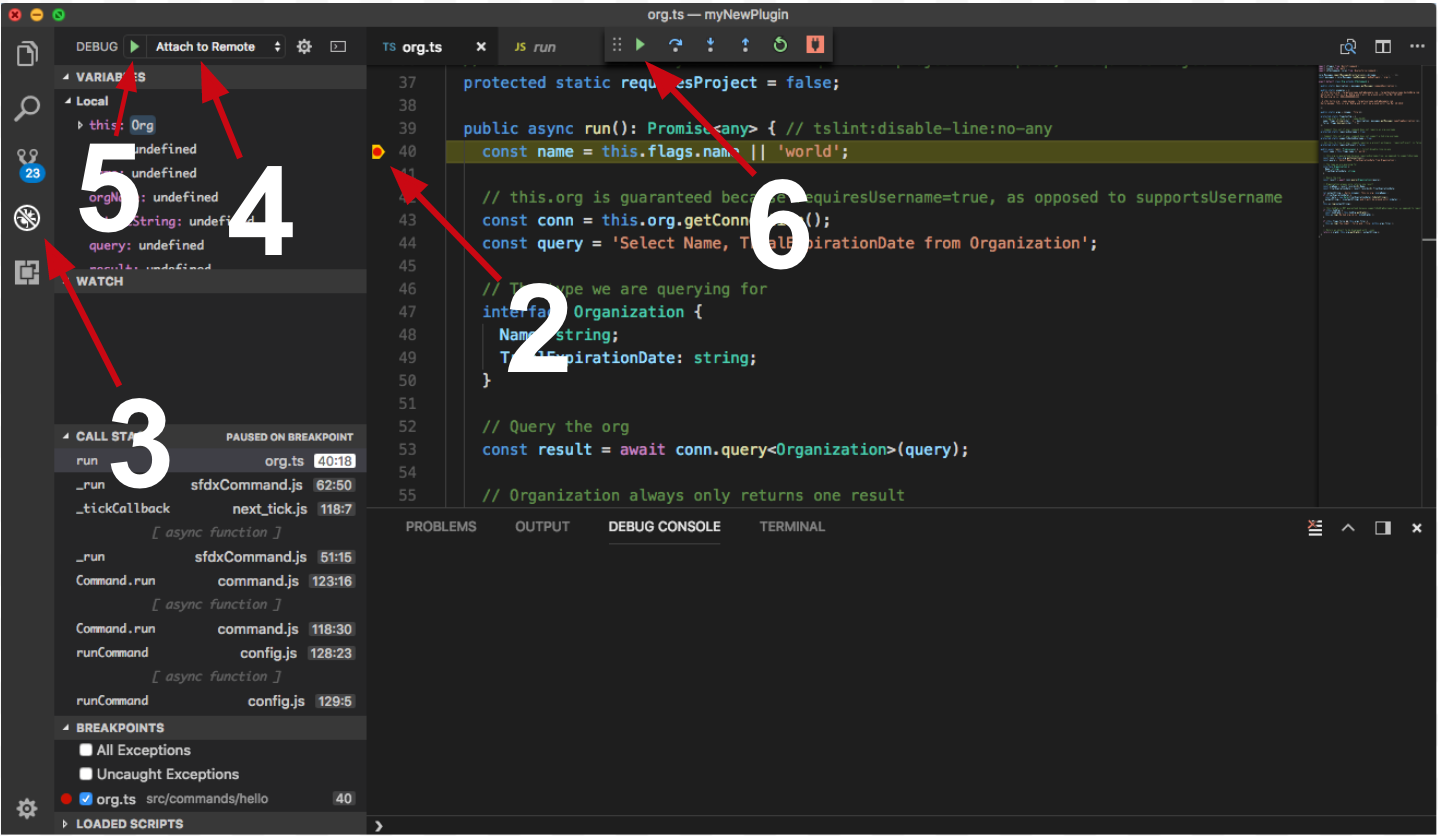
- Click on the Debug icon in the Activity Bar on the side of VS Code to open up the Debug view.
- In the upper left hand corner of VS Code, verify that the "Attach to Remote" launch configuration has been chosen.
- Hit the green play button to the left of the "Attach to Remote" launch configuration window. The debugger should now be suspended on the first line of the program.
- Hit the green play button at the top middle of VS Code (this play button will be to the right of the play button that you clicked in step #5).
Congrats, you are debugging!