README

The static site generator for SharePoint
![]()


Doctor is a tool created and provided by Valo. Initially, we started doctor as an internal tool to dogfood our products and keep documentation in one place. For our team, this is SharePoint.
As we understand that it is not the best experience for developers to write documentation on SharePoint, we created this tool to simplify the process. Doctor allows developers to use tools/applications they are used to, like VSCode and Markdown, and still provide the information on your SharePoint environment.
Doctor follows the concept of many Static Site Generators. These generators make it possible to write your articles/documentation in Markdown and convert them to HTML files.
Doctor is a bit different, as instead of creating HTML files, it makes SharePoint pages instead.
Under the hood, it makes use of the CLI for Microsoft 365.
Installation
Thank you for your interest in the doctor. The following information will help you install doctor.
Start by installing doctor as follows via npm:
npm i -g @valo/doctor
If you are using yarn, you can do it as follows:
yarn global add @valo/doctor
To quickly get started, we provided a sample repository which allows you to test out all the functionalities of Doctor.
Pages
You start by creating pages as Markdown files (.md) in the source folder (./src is the default, but you can change this). The markdown pages should contain the following front matter.
---
title: <title>
---

Your article content starts here.
- title:
string- The title of the page.
Info: Front Matter is the page its metadata.
Optional Front Matter properties are:
- slug:
string- If a slug is not defined, the title and current folder struture will be used. You can add the slug with our without.aspxfile extension. The tool will automatically add it. - draft:
boolean- defines if you want to publish the article during the publishing phase. Default: if not defined, the page will always be published. - description:
string- the page description to add. Be aware: description is limited to 255 characters. - comments:
boolean- with this setting you can enable/disable page commenting. By default this is disabled. - layout:
Article|Home- defines which page layout you want to use. Default layout type isArticle. - template:
string- specify the title of the page template which you want to use for the current page. - header:
HeaderOptions- defines how you want to render the header on the page.- type: Use one of the following values:
None|Default|Custom. Default:Default. - image: Path to the image file you want to use in your page header.
- altText: The image description.
- translateX: X focal point of the header image.
- translateY: Y focal point of the header image.
- layout: Layout to use in the header. Allowed values
FullWidthImage|NoImage|ColorBlock|CutInShape. Default:FullWidthImage. - textAlignment: How to align text in the header. Allowed values
Center|Left. Default:Left. - showTopicHeader: Specify if you want to show the topic header above the title. Default:
false. - topicHeader: Topic header text to show.
- showPublishDate: Show the publish date in the header. Default:
false.
- type: Use one of the following values:
- menu:
Menu- defines where the page gets added to the navigation structure. Check: menu section. - metadata:
Metadata- with this object you can set extra metadata for your page. Check: Metadata section.
When you want to create page to page links, you can provide the relative path from the current markdown file to the other markdown file (with or without the .md extension).
Menu
The menu property allows you to create a navigation structure for you static content. The Menu object has the following properties:
- menu
QuickLaunchORTopNavigationBar- Default isQuickLaunch- id:
string(required) - Navigation id. This can be used to create a hierarchy in your navigation. - name:
string(optional) - When this property is defined, it will be used for the navigation item title, otherwise the page title will be used. - weight:
number(optional) - The weight of the navigation item. If you want to have it first or last. - parent:
string(optional) - Defines the hierarchy of you page in the menu. If not provided, the items will be added to the root of the navigation. When defined, it should contain theidvalue of the parent page. You can also add multi-level navigation like:<parent-id>/<sub-parent-id>.
- id:
Important 1: During the publishing process, the navigation will be re-created each time.
Important 2: When using
QuickLaunchyou can only have three levels of navigation:Root/sub/sub-sub.
Example 1
The following page will be added to the root of the QuickLaunch after the already defined links.
---
title: Documentation
slug: documentation.aspx
draft: false

menu:
  QuickLaunch:
    id: documentation
    weight: 1
---

Write here the Doctor page content.
Example 2
The following page adds a subpage underneath the documentation link in the navigation.
---
title: Tools
slug: documentation/tools.aspx
draft: false

menu:
  QuickLaunch:
    id: tools
    weight: 1
    parent: documentation
---

Write here the tools page content.
Example 3
Defines a new page under the tools section:
---
title: Doctor
slug: documentation/doctor.aspx
draft: false

menu:
  QuickLaunch:
    id: doctor
    weight: 1
    parent: documentation/tools
---

Write here the Doctor page content.
Metadata
Adding metadata for a page is fairly simple. You can do this by specifying the metadata object with corresponding field name and its value.
metadata:
  <field name>: <value>
Example
---
title: Home
slug: home.aspx
layout: Article
description: "The Valo Doctor documentation homepage"

metadata:
  Category: "Choice 1"
  SingleLineText: "Single line of text value"
---
Commands
Version
This command returns the installed version number of the tool.
doctor version
Init
This command creates the initial folder structure for your documentation project (Check #Options to see which arguments you can pass to the command).
Examples
Initialize a standard project:
doctor init
Initialize a project with your own options:
doctor init --auth password --username <username> --password <password>
Publish
The publish command starts the creation process of your static content in SharePoint. It will upload all referenced images and creates the navigation structure if provided (Check #Options to see which arguments you can pass to the command).
Examples
When using a doctor.json file, you can just run the doctor publishing command:
doctor publish
If you want to manually pass your arguments, you can do this as follows:
doctor publish --url https://<tenant>.sharepoint.com/sites/<documentation>
Options
Options are specified via command arguments, or within a doctor.json file (automatically gets created on initialization doctor init).
-a, --auth <auth>
: Specify the authentication type to use. Values can be deviceCode (default) or password or certificate.
Info: Check out the Certificate Authentication section for more information about using the
certificateapproach.
--username <username>
: When using password authentication, you need to pass the username and password.
--password <password>
: When using password authentication, you need to pass the username and password.
-f, --folder <folder>
: The folder location in where you will create your markdown files.
-u, --url <url>
: The URL of the site collection to use.
--library <library>
: Specified the library which you want to use in SharePoint to store your referenced images.
--webPartTitle <webPartTitle>
: This defined the title of the markdown web part to be created/updated on the page. Default value is: doctor-placeholder.
Important: if you would change this value, be sure to keep this in the
doctor.jsonfile.
--overwriteImages
: Specifies if you allow doctor to overwrite the images in the SharePoint library that are referenced in the markdown files.
--debug
: Provides more information of what is happening during command execution.
--outputFolder <outputFolder>
: When providing this option, the processed markdown files will be generated in this folder.
--cleanStart
: Removes all pages before creation. This ensures that you that all changes made to your documentation get removed.
--confirm
: Don't prompt for confirming removing the files when you specified to clean up pages and assets before publishing.
--skipExistingPages
: Will not overwrite pages if they already existed on the site.
--continueOnError
: Continue when an error occurs during the publishing process.
--commandName <commandName>
: In case you want to use the locally installed CLI for Microsoft 365, you can use this flag. By default, it uses the version specified in the doctor tool. You can use the a locally installed version as follows: --commandName m365.
doctor.json
You can provide the same flags and values like in the parameters. Parameters can override what is defined in the doctor.json. Be sure to use the whole argument names, and not the shortcodes.
{
  "folder": "./src",
  "url": "https://<tenant>.sharepoint.com/sites/<documentation>",
  ...
}
You can also define a static navigation structure in the doctor.json file. Example:
{
  "menu": {
    "QuickLaunch": {
      "items": [{
        "id": "documentation",
        "name": "Documentation",
        "url": ""
      }]
    }
  }
}
The menu property can contain a QuickLaunch and/or TopNavigationBar elment with their corresponding static navigation links under the items property. More information about navigation items can be found in the menu section.
Important: If you specify arguments during command execution, they will be used instead of the values defined in the
doctor.jsonfile.
Certificate authentication
If you want to use certificate authentication, you will need to follow the next steps before you can use doctor.
- Go to your Azure Portal
- Open your Azure Active Directory
- Click on App registrations
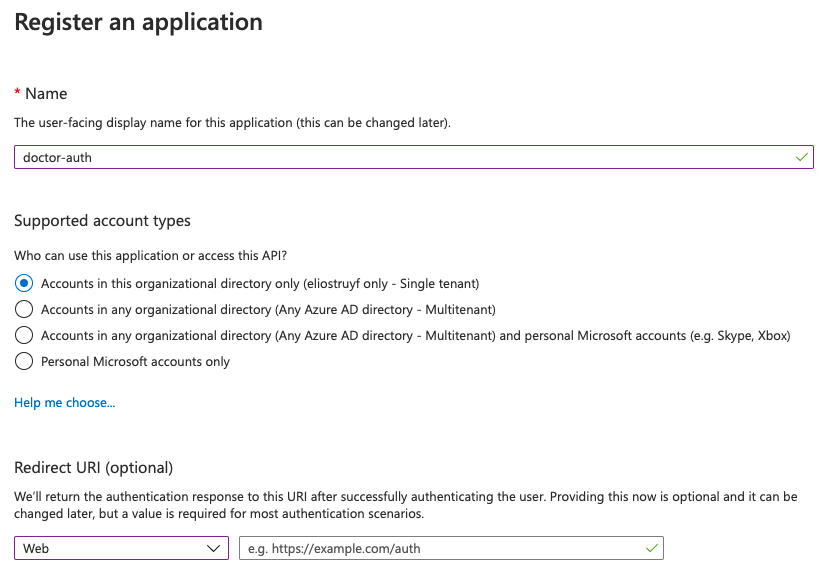
- Click on New registration
- Specify a name for your new Azure AD app
- Once the app is created, click on API Permissions and add the Sites.FullControl.All application permission scope from SharePoint
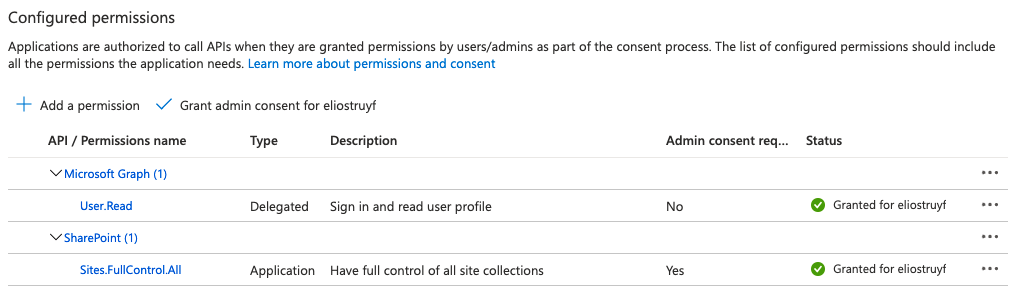
- Click on Grant admin consent for
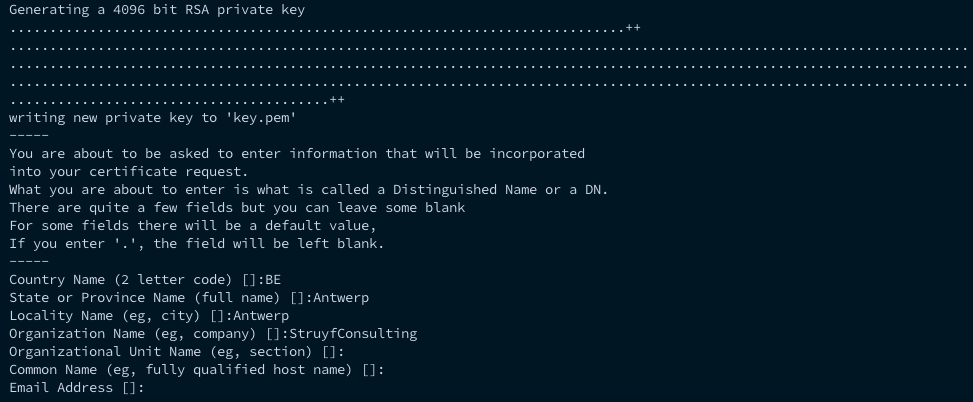
, and accept - Open a command prompt, and run the following command in order to generate a certificate:
openssl req -x509 -newkey rsa:4096 -keyout key.pem -out cert.pem -days 366 -nodes
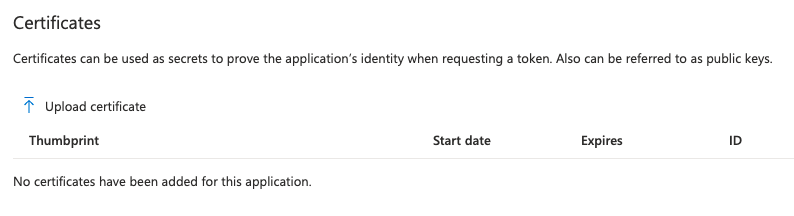
- Upload the cert.pem file to the Azure AD App under Certificates & secrets
- Converted the certificate into the
PKCSformat usingopenssl pkcs12 -export -out cert.pfx -inkey key.pem -in cert.pem- It will ask for a password. This is yours to pick. Be aware, if you specify a password, you will also need to pass it to the
doctorcommand with the--password <password>argument. - Use the
Base64output as the input for the--certificateBase64Encoded <certificateBase64Encoded>argument.
- It will ask for a password. This is yours to pick. Be aware, if you specify a password, you will also need to pass it to the
Once you did the previous steps, you are ready to make use of the doctor tool. You can run doctor with the certificate authentication as follows: doctor publish --auth certificate --certificateBase64Encoded <certificateBase64Encoded> --appId <appId> --tenant <tenant> --url <url>.
Info: You can also store these
certificateBase64Encoded,appId, andtenantsettings in thedoctor.jsonfile. More information can be found under the doctor.json section.
Todo
All ideas can be found in our issue list tagged with enhancement.
Found an issue?
Please add all your issues to the project issue list.
Feedback / Contribute
If you want to contribute to the project, feel free to do so. Best is to start a discussion in the discussion list and let us know what you want to implement.
Feedback can also be provided to the discussion list.
Disclaimer
THIS CODE IS PROVIDED AS IS WITHOUT WARRANTY OF ANY KIND, EITHER EXPRESS OR IMPLIED, INCLUDING ANY IMPLIED WARRANTIES OF FITNESS FOR A PARTICULAR PURPOSE, MERCHANTABILITY, OR NON-INFRINGEMENT.