README

Byte-VitePress-CLI
English | 简体中文
Introduction
Due to some unknown error, please use limited version vitepress@0.13.2 template temporarily.
This is a lightweight CLI for VitePress,you can select the language template you want with the parameters. What is distinctive is that supports ByteDance's InspireCloud page deployment, and supports for Byte-Web-Monitor page monitoring. What's more, it also supports the Chinese template under the convention route generation.
Installation
$ npm install byte-vitepress-cli -g
Usage
Run the following command line to create the zh-CN project:
$ byte-vitepress-cli init myproject
Run the following command line to create the multilanguage support project:
$ byte-vitepress-cli init myproject -e
Parameter
init <PROJECT_NAME> [LANGUAGE_OPTIONS]
Create the Chinese VitePress project:
$ byte-vitepress-cli init myproject
or in both Chinese and English:
$ byte-vitepress-cli init myproject -e
refresh
Use this command to automatically generate the sidebar routes for your VitePress project. Currently, only the convention routes under the Chinese template are supported.
Go to your VitePress project root directory and type the following command to automatically configure your sidebar article routing information.
$ byte-vitepress-cli refresh
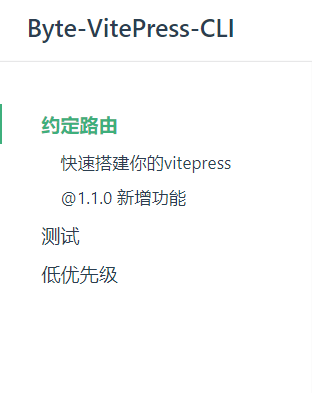
The convention route format is as follows:
xxx-{weight}.md
Where xxx is the name of the file and the name of the sidebar displayed on the page, {weight} is the priority of the article, the smaller the higher the priority.
Here's an example:
- Example file naming:
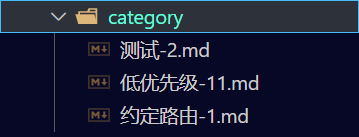
- Examples of practical effects:
upgrade
Check the new version is available or not:
$ byte-vitepress-cli upgrade
service <service_ID> <credentials>
You can use this command to record your InspireCloud service configuration.
The service_ID can be viewed in your cloud service configuration item.
For the configuration of credentials, you can see the following url: personal_ credentials
$ byte-vitepress-cli service aaabbb abcdefxyz
monitor <APP_ID>
Add the app_id information to facilitate page monitoring.
You can apply for an app_ID on the Byte-Web-Monitor and use this command to generate your monitoring configuration information
$ byte-vitepress-cli monitor example123
addMonitor
Add page monitoring to your project, which is supported by Byte-Web-Monitor.
Before entering this command, make sure you have configured your monitoring configuration via the monitor command.
In addition, you must run the npm run build command to build your project.
Note that to use this feature, type this command on your command line before deploying your page.
$ byte-vitepress-cli addMonitor
deploy
Deploy your project to InspireCloud.
Before deploying, make sure you use the service Command to set up your service information.
In addition, you must run the npm run build command to build your project.
$ byte-vitepress-cli deploy
mirror <TEMPLATE_MIRROR>
You can also set the template mirror like this:
$ byte-vitepress-cli mirror https://moonstarimg.oss-cn-hangzhou.aliyuncs.com/template/
NOTE
You can customize the template mirror link by youself, but the template file name must be template.zip or template-en.zip, and the mirror link should be / ending.
For example, the full link to your custom template mirror is https://example.com/mirror/template.zip or https://example.com/mirror/template-en.zip, the mirror link that vitepress-cli can recognize should be https://example.com/mirror/.
You can download the VitePress template from byte-vitepress-cli.