README
Ceruleoscope: Playwright + Azure Functions + Application Insights Availability Testing
Abstract
Ceruleoscope is an open source JavaScript library that facilitates custom web app availability testing by combining Playwright and Application Insights, and allowing tests to run as a scheduled Azure Function, with minimal effort.
This article will cover:
- How to create an Azure Function with a Playwright test
- How to deploy the function
- How to observe the Availability telemetry
- How to use secrets in tests
- How to configure Storage
For feedback, feature requests and access to code please use Ceruleoscope github repository
Short Version
The Short Version below is intended for a quick overview and requires some familiarity with Azure and VSCode. Below that is a Detailed Version of the same steps for those new to these environments.
Create Azure Function App:
It must be Serverless Linux/Node.js app and Application Insights must be enabled.
Add this config setting to the function app:
PLAYWRIGHT_BROWSERS_PATH=/home/site/wwwroot/node_modules/playwright-chromium/.local-browsers/Add Managed Identity and Key Vault, configure the function to access they Key Valut for storing test secrets
Add config settings to store variable data, access it via
process.env["config_name"]in test
Using VSCode, create a new Functions project with javascript and Timer trigger
Add this line in .vscode/settings.json:
scmDoBuildDuringDeployment=trueRemove "test" and add "node_modules" in .funcignore
Add these packages to the project (npm install):
playwright,playwright-chromium,@playwright/testandceruleoscopeGenerate a test script by running this command in VSCode's terminal:
npx playwright codegen yourwebsite.comSave the test script in a new folder in the VSCode project with *.spec.js filename
Replace the require statement in the test with
const { test, expect } = require("ceruleoscope");If necessary, modify the test code to retrieve secrets and config values
Replace the function's index.js with this snippet:
        module.exports = async function (context, myTimer) {
          try{
            const { PlaywrightTestLauncher } = require("ceruleoscope");

            let responseMessage = await PlaywrightTestLauncher.Run();

            context.log("Playwright tests console output: " + responseMessage); // optional
          } catch(ex){
            context.log("Failed to run Playwright tests: " + ex);
          }
        };
Deploy the function app to Azure
In Azure Portal (after the function has been deployed and triggered):
Navigate to the Function's Application Insights:
- View Availability results and End-to-end transactions
- Create alerts based on the test
- Find links to Playwright's Trace files
Navigate to the Function's Storage account,
playwright-insightscontainer- Find Playwright Trace files
- Configure container accessibility. For example set container accessibility to "Blob" so the Trace links can be downloaded in the browser
- Configure blob lifespan to maintain a balance of cost and usability
Detailed guide
Create Linux/Node.js Function App in Azure Portal
Open portal.azure.com in a browser, sign in.
Your subscription must allow you to create and modify the resources mentioned in this guide.
Additional information about creating an Azure Function app can be found here.
- Click "Create a resource" in Azure Portal home page
- Select "Function App"
- Select/create the resource group and function app name suitable for you
- Select Node.js as the Runtime stack
- Version 14LTS+ or later
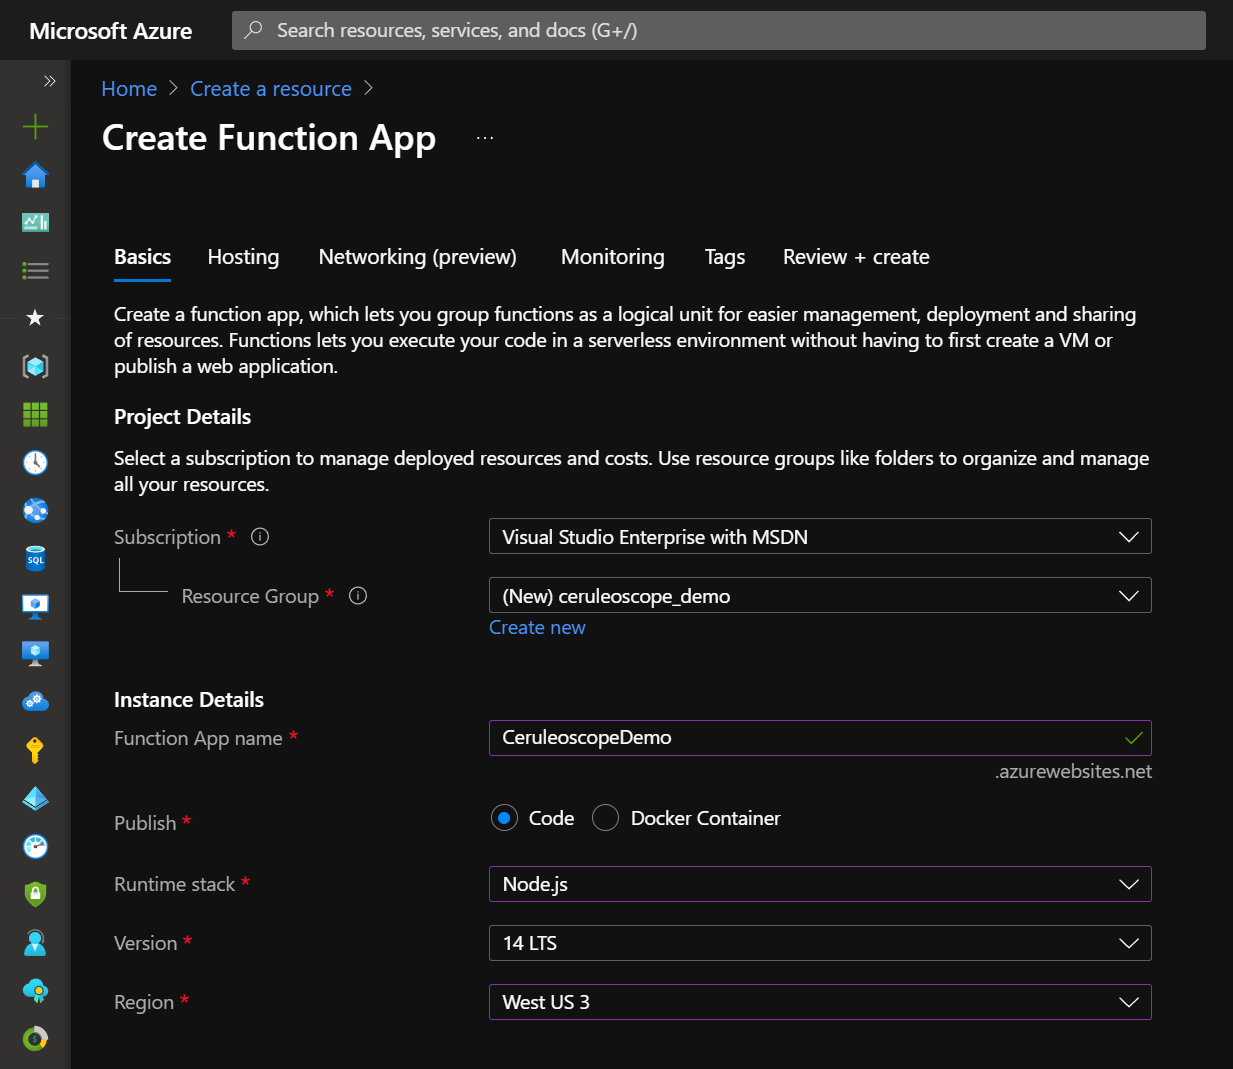
- Select Linux as the operating system (the package doesn't work on Windows as it assumes some file structure)
- Plan type should remain "Consumption (Serverless)"
- Enable Application Insights must be "yes"
Customize the Function App in Azure Portal
Navigate to the Function App created above in Azure Portal
- Add a new application setting from the "Configuration"
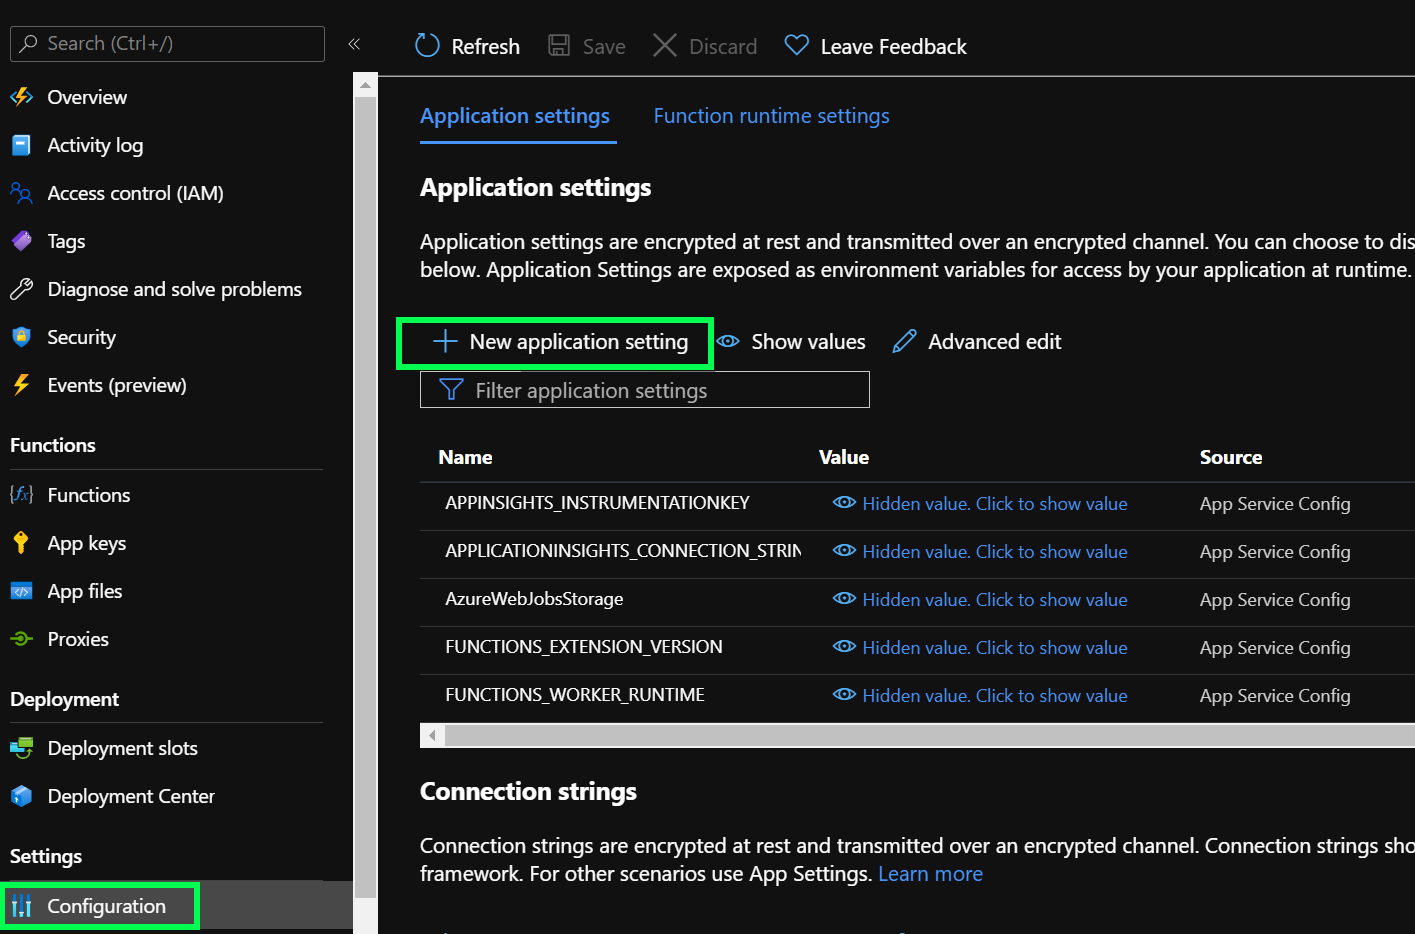
- Create a setting
PLAYWRIGHT_BROWSERS_PATH
with value
home/site/wwwroot/node_modules/playwright-chromium/.local-browsers/
Without this setting Playwright/Test will complain it can't find its browser engine LOCATIONcan be used to override the default location reported in the availability test (it region)TESTNAMEcan be used to override the default availability test name (the function app name)- Click OK in the setting editing panel, it will close
- Click "Save" above the settings
Create Azure Functions Project in VSCode
VSCode offers the easiest to use environment, although it is possible to use other tools to create the function code. Make sure Azure Functions extension is installed in VSCode as well (CTRL-Shift-X, search, install)
- Open the Azure extension panel and expand the Functions to find the function app created in Portal
- You can extend the Application Settings node to confirm the
PLAYWRIGHT_BROWSERS_PATHsetting is there and correct - Click the "Create New Project" icon It only shows up when the mouse pointer is inside the Azure/Functions panel
- Select "JavaScript" for the language
- Select "Timer trigger". (for development purposes HTTP trigger may be easier to use)
- Enter a name for the function. Each Function App can host several functions
- Configure a cron expression. The default one
(0 */5* \* \* \*)is for every 5 minutes.
Customize the Functions Project in VSCode
- Replace the contents of
.vscode/settings.jsonwith
{
  "azureFunctions.deploySubpath": ".",
  "azureFunctions.projectLanguage": "JavaScript",
  "azureFunctions.projectRuntime": "~3",
  "azureFunctions.scmDoBuildDuringDeployment": true,
  "debug.internalConsoleOptions": "neverOpen"
}
scmDoBuildDuringDeployment=trueis important, as it instructs VSCode/Azure Functions extension to package the function app locally such thatnpm installwill run remotely and Playwright install script will download its browser engine binaries. Without this setting Playwright won't find its browser binaries.Edit
.funcignorefile in the project- Remove
test- if it's present, tests may not be deployed and run - Add
node_modules- it it's not present, the local copy of node_modules may get deployed and not have the correct browser binaries that Playwright otherwise downloads.
- Remove
Open a new Terminal in VSCode (CTRL-`) and run these commands:\
npm install playwright
npm install playwright-chromium
npm install @playwright/test
npm install ceruleoscope
- Replace the contents of
index.jsfor the function with:\
    module.exports = async function (context, myTimer) {
        try{
            const { PlaywrightTestLauncher } = require("ceruleoscope");
            let responseMessage = await PlaywrightTestLauncher.Run();
            context.log("Playwright tests console output: " + responseMessage);
        } catch(ex){
            context.log("Failed to run Playwright tests: " + ex);
        }
    };
Generate a Playwright Test in VSCode
Create a new folder in the function's folder (not the project root folder) - GenTest
Create a new file with ".spec.js" extension (ex: gentest.spec.js)
The ".spec.js" part of the file name is important as it is used by @playwright/test as a filename filter to find testsIn the Terminal type this command:
npx playwright codegen yourwebsite.comA browser opens and shows a "Playwright Inspector" panel on the side
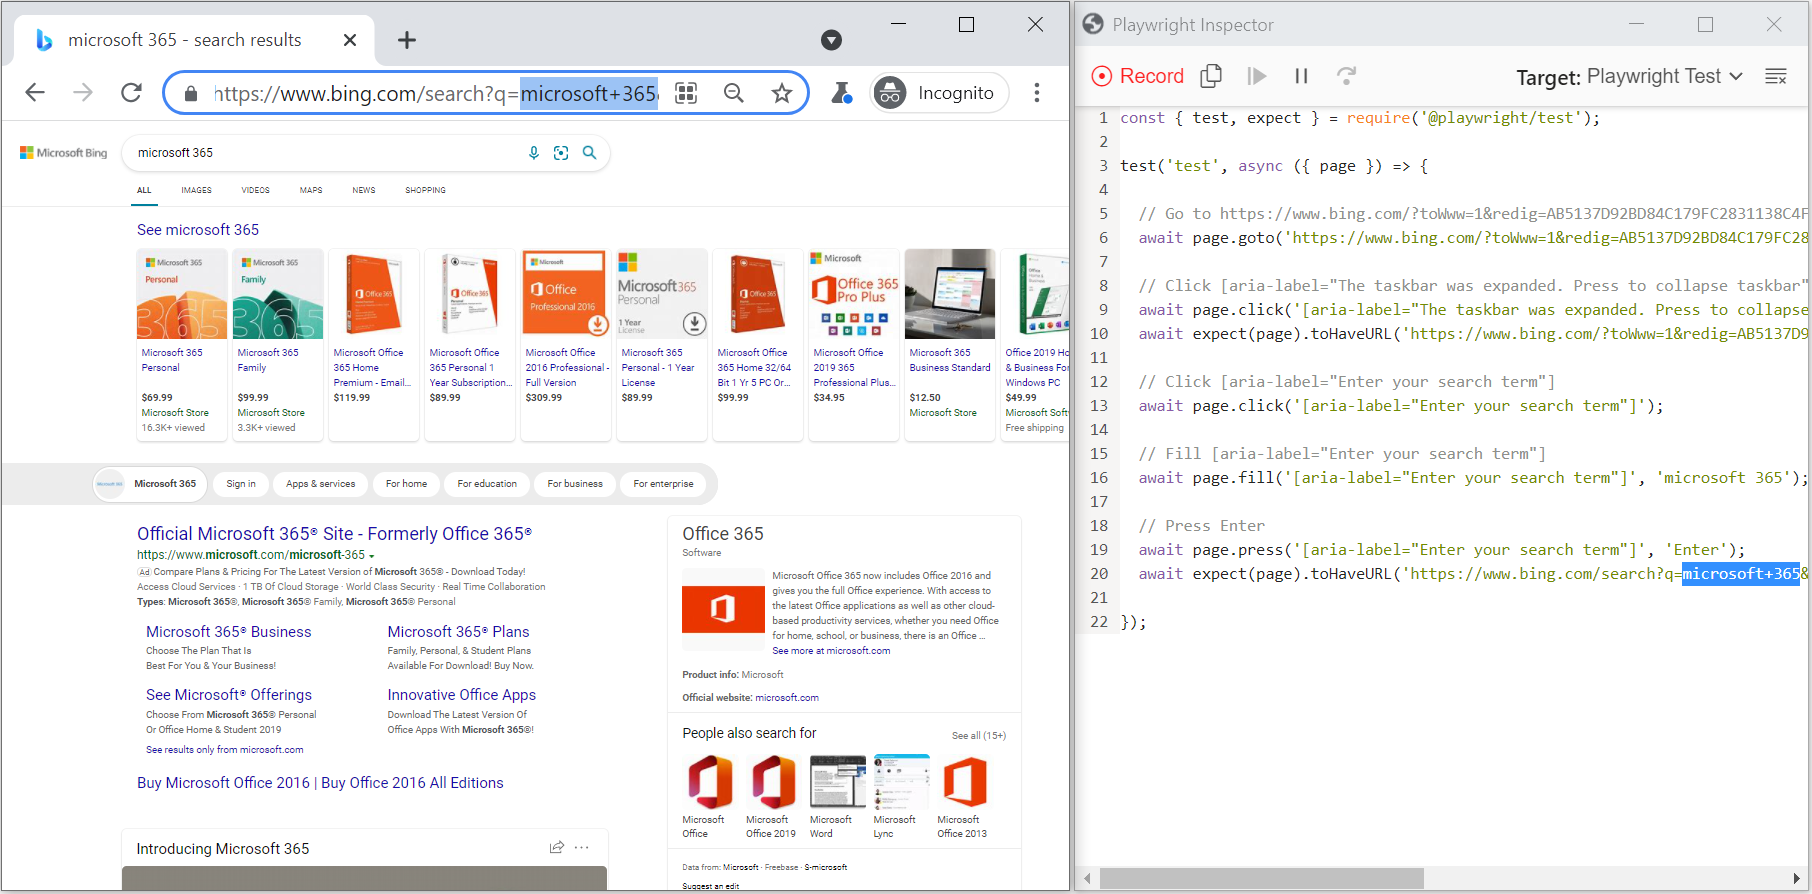
Exercise the feature that needs availability testing by navigating your web site
AVOID USING REAL PASSWORDS, DO NOT LEAVE THEM IN THE TEST CODE- Consider using KeyVault and Managed Identities to store your secrets.
- Alternatively, use configuration settings in your Azure Functions app, if the secrets are not very sensitive.
- Configure a dedicated identity/user in the app under test that is only used for this test and nothing else.
- There is always a chance that secrets used to access the app under test are recorded in logs or trace files.
Copy the generated test code from Playwright Inspector (must be JavaScript) into gentest.spec.js, as described above.
The first line of gentest.spec.js will be
const { test, expect } = require('@playwright/test');
Replace the require statement with:
const { test, expect } = require("ceruleoscope");The test can be further customized as needed, for example to obtain secrets or add various assertions.
Save the file
Run the test locally with this command in VSCode's Terminal:
npx playwright test --headed
where the--headedoption instructs Playwright to show the browser.Test parameters that are provided in Azure Function's configuration can be emulated locally by adding them to local.settings.json.
Deploy the Function App from VSCode
- In VSCode open the Azure extension and click "Deploy to Function App..." icon

- A drop-down appears to select a function app to deploy to, make sure to select the one created with node.js/Linux
- Click "Deploy" in the confirmation popup
- Monitor the deployment in the Output window (optional)
- The output window will show if Playwright downloaded its browser binaries with a few lines similar to this:
Playwright build of chromium v920619 downloaded to /home/site/wwwroot/node_modules/playwright-chromium/.local-browsers/chromium-920619 - The download location will be the same as the
PLAYWRIGHT_BROWSERS_PATHconfig value - If there are no such lines in the output and the app doesn't appear to work,
check if
.vscode/settings.jsonand.funcignorehave been modified as described above, and all the npm packages are installed.
- The output window will show if Playwright downloaded its browser binaries with a few lines similar to this:
Verify the Function App in Azure Portal
Navigate to the Function App in Azure Portal
Click on the Log stream blade
- It may take a few minutes for the next execution to start (depending on the timer trigger settings)
- The logs should contain
Playwright tests console output: done
Click the Application Insights blade, navigate to the configured Application Insights resource
The "Overview" blade of that Application Insights resource should show no Failed requests, and some Server requests (depending on the frequency configured for the time trigger)
Check if there are failing or successful executions.
If there only failing executions, make sure all packages are included and the code runs locally in VSCodeClick the Availability blade.
If the Availability telemetry is not found, but there are no failed executions, then make sure therequirestatement in the generated test is replaced.
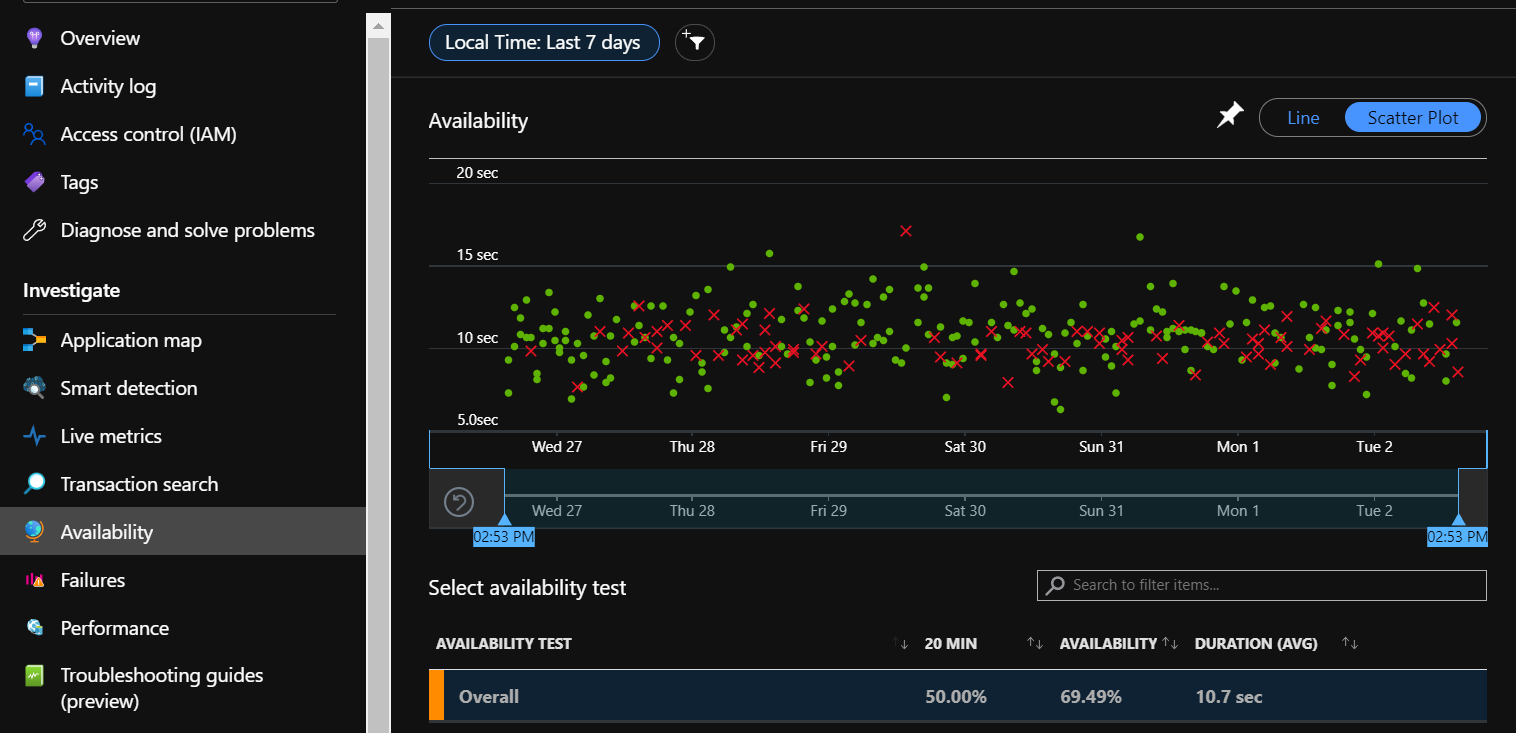
Click the Availability blade to see the results of the availability test(s)
- When the chart is in Line mode, the line represents the percentage of successful tests (higher is better)
- When the chart is in Scatter Plot mode, the points represent individual test runs. Duration is the height of the dot, color indicates outcome (green is success) In Scatter Plot mode the points are clickable
Click a point on the chart in Scatter Plot mode to see the test's End-to-End transaction.
- The top entry (globe icon) represents the availability test
- Subsequent entries represent each page opened by the test and the connections that page made
- Click the availability item (globe icon) to show properties associated with it.
In the Custom Properties section there is a propertytraceFileLink, which has a link to a Playwright trace file in Storage
Download the file and execute this command in VSCode's terminal:
npx playwright show-trace traceFileName.zip
Refer to Playwright's documentation for Trace Viewer details.
"View all telemetry" will show all logs associated with this availability test and can be useful for troubleshooting
Availability alerts can be configured in the Alerts blade
Browse Trace Files, Configure Access and Lifecycle
This step is optional and may depend on the security considerations of your organization.
Ceruleoscope uses a Storage account container playwright-insights.
The container is private and only accessible via Storage Explorer, Azure Portal etc.
The link in the availability test won't download via browser by default.
- Navigate to the storage account used by the Function App
- Click the Containers blade
- Double-click the "playwright-insights" container, select a trace file and download it
If the security constraints allow it, the container access level can be set to "Blob" to allow downloading directly from a browser. "Public" access if generally not a good practice.
It is recommended to create a lifecycle policy for the Storage container, so that old Trace files are automatically deleted.
- Click the Storage account's Lifecycle management blade
- Add a rule "playwright-insights-expiration"
- Select "Limit blobs with filters"
- "Block blobs"
- "Base blobs"
- In the workflow (Base blobs tab), set the condition to be
If Base blobs were last modified more than 90 days ago, then Delete the blob - In the Filter set, add a blob prefix
playwright-insights/to manage all blobs in the container
This policy will ensure the Storage account doesn't continuously grow.