README
Devis

A microservices framework for Node.js


You will find in this documentation the principles of Devis framework and also, detailed explanations with examples on its use.
Table of Contents
- Introduction
- pattern matching
- Transport independence using protocoles for connectivity
- Devis Framework
Introduction
In the world of development, there are several architectures used for building applications. The 3 most popular are monolithic architecture, service oriented architecture and microservice architecture.
what is monolithic architecture?
According to wikipedia, monolithic application describes a single-tiered software application in which the user interface and data access code are combined into a single program from a single platform.
Tightly coupled software presents the biggest difficulty when teams are looking to extend or change systems. As systems get larger, coupling limits the scope of change and self perpetuates. The easiest way to extend tightly coupled code is often to weave in even more interdependence.
One can think of coupling as the measure of effort to separate a logical module from its reliance on another. Languages and frameworks provide a means of abstraction that help to manage the cost of this effort. Object-oriented languages generally provide some methodologies to organise and segregate functionality – viz. classes, interfaces, modules, etc. The protection they offer developers against logical coupling is weak, and the barrier to entry for introducing coupled code is very low.
Traditional monolithic design tends to amplify and enable coupling. While it’s possible - with good software design, testing, and great rigour - to avoid increasing coupling over time, it is rarely seen in practice. read more
what is service oriented architecture (SOA)?
SOA defines 4 basic service types as depicted below.
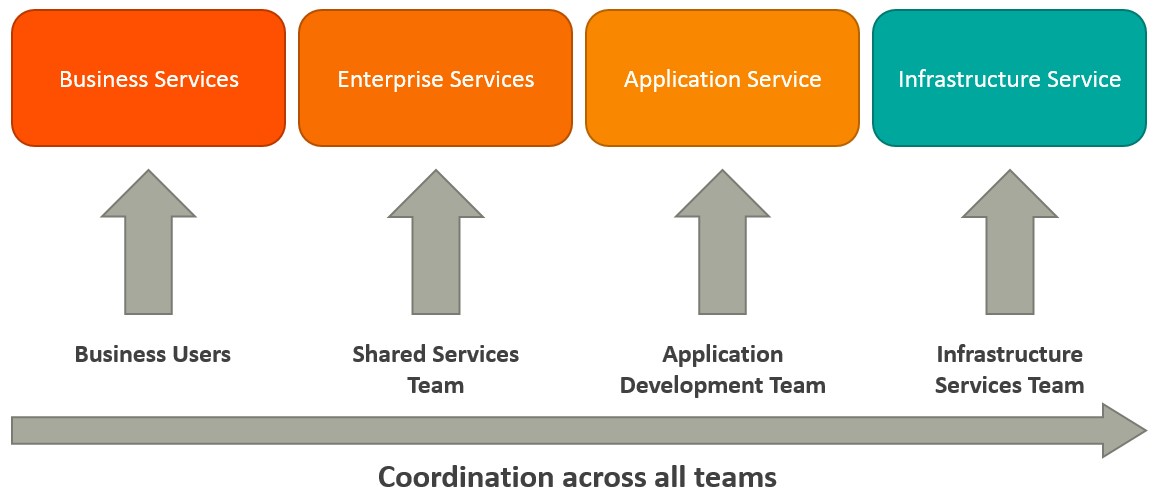 Picture source
Business services are coarse-grained services that define core business operations. They are usually represented through XML, Web Services Definition Language (WSDL) or Business Process Execution Language (BPEL).
Enterprise services implement the functionality defined by business services. They rely on application services and infrastructure services to fulfill business requests.
Application services are fine-grained services that are bound to a specific application context. These services can be invoked directly through a dedicated user interface.
Infrastructure services implement non-functional tasks such as authentication, auditing, security, and logging. They can be invoked from either application services or enterprise services.
Solution : microservices
In its simplest form, the Microservices design approach refers to a decoupled federation of services, with independent modifications for each, and defined communication standards. A decomposition of the global application into independent scenario-based services is a better long-term approach for large-scale applications.
A Microservice is an autonomous work unit that can perform a task without interfering with other parts of the system, similar to a workstation in a company. This has a number of advantages that can be used in favor of the engineering team to help scale a company's systems.
Today, hundreds of systems are built using Microservices oriented architectures which led the company Wakanda to integrate Node.js into its development interface and offer the necessary tools to build fast and powerful Microservices.
Microservices must meet the following criteria:
Resistance: Resilience is defined as the ability of a system to cope with change.Decentralization: One of the biggest problems of the monolithic is centralization. The microservices aim at decentralization. Instead of having a huge database, the data is divided according to the activity of the units.Scalability.The heterogeneity of technology: Architectural oriented Microservices allow this to be done as long as integration technologies are standard. As we have seen before, a microservice is a small piece of independent software that can work on its own.Replacability: Replaceability is the ability to modify a component of a system without interfering with the behavior of the system.independence.
microservices architecture vs monolithic architecture
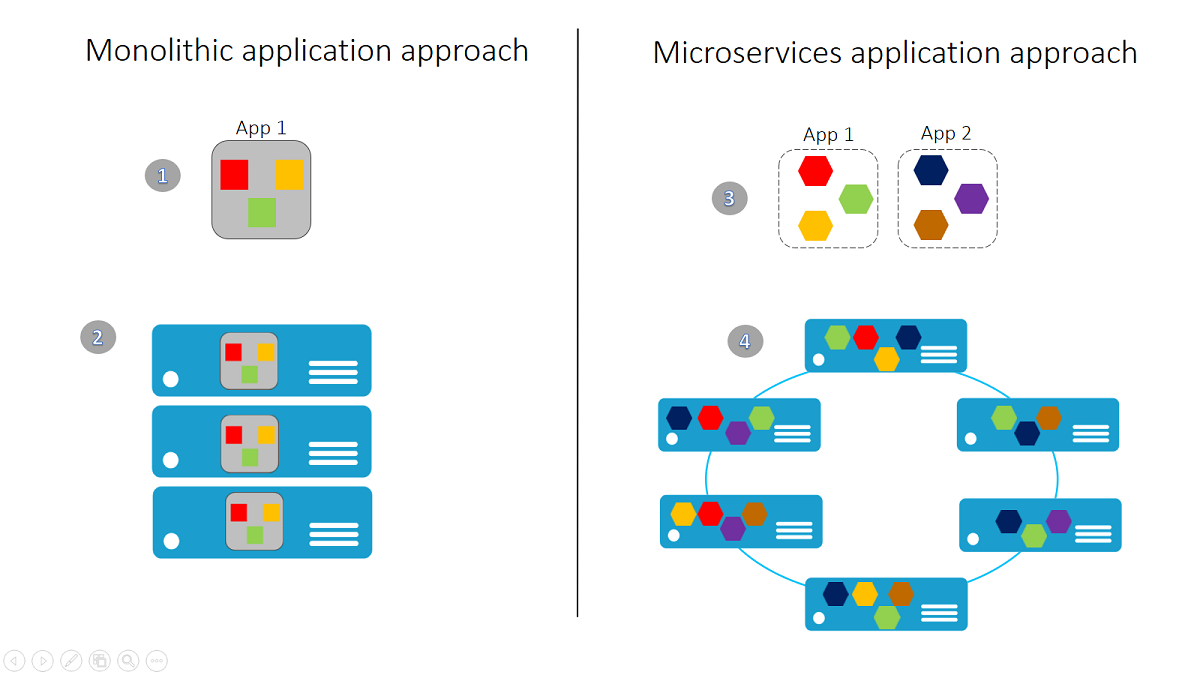 Picture source
Figure 1: A monolithic application contains features specific to a domain. It is normally divided into functional layers: web, business and data.
Figure 2: Scaling a monolithic application involves cloning it across multiple servers, virtual machines, or containers.
Figure 3: A micro-services application aims at separating its functionalities on smaller and distinct services.
Figure 4: This approach expands by deploying each service independently, which creates instances of these services on servers, virtual machines, or containers.
microservices architecture vs SOA
Microservices Architecture (MSA) and Service-Oriented Architecture (SOA) both rely on services as the main component. But they vary greatly in terms of service characteristics.
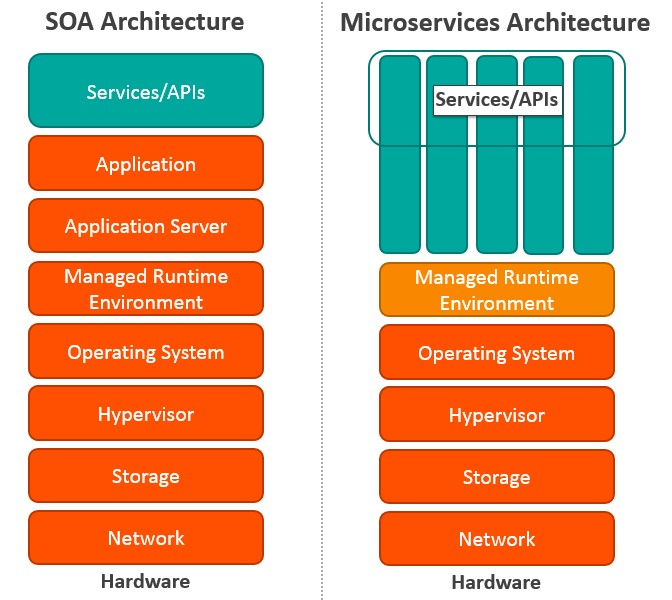 Picture source
| SOA | MSA |
|---|---|
| Built on the idea of “share-as-much-as-possible” architecture approach | Built on the idea of “share-as-little-as-possible” architecture approach |
| More importance on business functionality reuse | More importance on the concept of “bounded context” |
| DevOps / Continuous Delivery is becoming popular, but not yet mainstream | Strong focus on DevOps / Continuous Delivery |
| A systematic change requires modifying the monolith | A systematic change is to create a new service |
| Maximizes application service reusability | More focused on decoupling |
| Uses traditional relational databases more often | Uses modern, non-relational databases |
In my personal opinion, decoupling is the most important point in the architecture of microservices and users must completely exit the monolithic logic.
Indeed, the intercommunication of microservices should be close to zero, each Microservice must be strictly independent of others. The only tolerable communication between microservices is done only through the database and nothing else, because the malfunction of a Microservice shall in no way affect the operation of others.
pattern matching
Definition
According to wikipedia, pattern matching is the act of checking a given sequence of tokens for the presence of the constituents of some pattern. In contrast to pattern recognition, the match usually has to be exact. The patterns generally have the form of either sequences or tree structures. Uses of pattern matching include outputting the locations (if any) of a pattern within a token sequence, to output some component of the matched pattern, and to substitute the matching pattern with some other token sequence (i.e., search and replace).
Sequence patterns are often described using regular expressions and matched using techniques such as backtracking.
Why using pattern matching in microservices?
Why not use pattern-matching? If a message is something you are interested in as a component, you can tell by looking at. Have a pattern (some template of JSON structure) that you can match the message against. It turns out that is it sufficient to be really really simple - just match against the literal values of the top level properties. That is more than enough to build entire systems with. And it gives you a component model that makes composition easy.
devisPattern
C++ Addons
Node.js Addons are dynamically-linked shared objects, written in C++, that can be loaded into Node.js using the require() function, and used just as if they were an ordinary Node.js module. They are used primarily to provide an interface between JavaScript running in Node.js and C/C++ libraries.
devisPattern
DevisPattern is a very fast Matcher Pattern written in C++ that uses the JavaScript javascript v8 engine applied on properties of JavaScript objects and basedon the "query-by-example" method for sets of properties.
It can be used separately or integrated as a kernel in a framework like Devis.
Transport independence using protocoles for connectivity
Message-oriented middleware
Message-oriented middleware (MOM) is software or hardware infrastructure supporting sending and receiving messages between distributed systems. MOM allows application modules to be distributed over heterogeneous platforms and reduces the complexity of developing applications that span multiple operating systems and network protocols. The middleware creates a distributed communications layer that insulates the application developer from the details of the various operating systems and network interfaces. APIs that extend across diverse platforms and networks are typically provided by MOM.
TCP
The Transmission Control Protocol (TCP) is one of the main protocols of the Internet protocol suite. It originated in the initial network implementation in which it complemented the Internet Protocol (IP). Therefore, the entire suite is commonly referred to as TCP/IP. TCP provides reliable, ordered, and error-checked delivery of a stream of octets between applications running on hosts communicating by an IP network. Major Internet applications such as the World Wide Web, email, remote administration, and file transfer rely on TCP. Applications that do not require reliable data stream service may use the User Datagram Protocol (UDP), which provides a connectionless datagram service that emphasizes reduced latency over reliability.
HTTP
The Hypertext Transfer Protocol (HTTP) is an application protocol for distributed, collaborative, and hypermedia information systems.HTTP is the foundation of data communication for the World Wide Web.
unix socket
A Unix domain socket or IPC socket (inter-process communication socket) is a data communications endpoint for exchanging data between processes executing on the same host operating system. Like named pipes, Unix domain sockets support transmission of a reliable stream of bytes (SOCK_STREAM, compare to TCP). In addition, they support ordered and reliable transmission of datagrams (SOCK_SEQPACKET, compare to SCTP), or unordered and unreliable transmission of datagrams (SOCK_DGRAM, compare to UDP). The Unix domain socket facility is a standard component of POSIX operating systems.
named pipes
A named pipe (also known as a FIFO for its behavior) is an extension to the traditional pipe concept on Unix and Unix-like systems, and is one of the methods of inter-process communication (IPC). The concept is also found in OS/2 and Microsoft Windows, although the semantics differ substantially. A traditional pipe is "unnamed" and lasts only as long as the process. A named pipe, however, can last as long as the system is up, beyond the life of the process. It can be deleted if no longer used. Usually a named pipe appears as a file, and generally processes attach to it for IPC.
Devis Framework
After defining the microservices architecture and defining the pillars of Devis framework namely, its use of a matcher pattern and the fact that it supports the most used protocols we will move to the technical part of Devis.
Installation
prerequisites
Before you can use Devis you have to be able to install it on your machine. We must not forget that Devis is based on DevisPattern, which is a c++ addon, so you need to install tools according to your operating system.
On Microsoft Windows
- Visual studio :
- A recent version of visual studio (you have to add visual c++ during the installation), the free Community version works well.
- Cmake :
- .msi version for windows: You must check the addition of the path for all users.
- restart the computer
On Unix/GNU-Linux
On MacOS
- Xcode :
- Install or update to the last version of xcode disponible dans l'app store.
- Install the xcode command line tools by typing the following command string :
$ xcode-select --install
Installation of Devis
congratulations! now after configuring your machine you can install Devis by running the following command:
$ npm install --save devis
Microservice architecture
In this part I will show you how to create, configure your microservices and also connect to microservices
Create a microservice
Nothing is simpler than creating a Microservice! just with require.
- Syntax :
let devisMicroservice = require("devis");
Add a function to the microservice
After calling the module Devis, you must add functions to your microservice, by calling the method push that takes two arguments, the first are the pattern of the function and the second is the handler.
The pattern is an object that usually takes two parameters, the first represents the name of the microservice and the second the name of the function.
The handler is a function, it is here where you will put the heart of the latter. The handler contains two arguments, the first will take the arguments that the client of your microservices should pass using your function and the last one represents the callback of your function, using the principle of error first, the first argument of this callback concerns the errors returned when using the function and the second the desired result.
- Syntax :
push(pattern, (arguments, doneFunction)=>{
    doneFunction(errors, result)
});
Deploy the microservice
After adding your functions you have to deploy the microservice, so here you have the choice to be able to deploy it locally or by using a protocol.
locally
simply using the exports functionality.
- Syntax :
module.exports = devisMicroservice;
using network
To be able to deploy the microservice using a protocol, it is enough to use the method listen of Devis, it takes an object with several parameters according to the protocol used.
Sometimes you will need to do some processing only after starting your server, in which case you will simply use the callback function of the listen method.
- syntax :
listen({parameters},callback);
- Examples :
- TCP :
listen({
       host: "127.0.0.1"
       port: 3030
});
* Unix Socket :
listen({
       path: "/tmp/mysoscket.sock"
   }, (err, result) => {
       //do something
});
* named pipes :
listen({
    path: "\\\\\.\\pipe\\mynamedpipe"
});
Running a PM2 instance with Devis
PM2 is a production process manager for Node.js applications with a built-in load balancer. It allows you to keep applications alive forever, to reload them without downtime and to facilitate common system admin tasks.
- Install PM2 :
$ npm install pm2 -g
Running a microservice using PM2 :
- Syntaxe :
$ pm2 start devisMicroservice;
- Commands overview
# General
$ npm install pm2 -g            # Install PM2
$ pm2 start app.js              # Start, Daemonize and auto-restart application (Node)
$ pm2 start app.py              # Start, Daemonize and auto-restart application (Python)
$ pm2 start npm -- start        # Start, Daemonize and auto-restart Node application

# Cluster Mode (Node.js only)
$ pm2 start app.js -i 4         # Start 4 instances of application in cluster mode
                                # it will load balance network queries to each app
$ pm2 reload all                # Zero Second Downtime Reload
$ pm2 scale [app-name] 10       # Scale Cluster app to 10 process

# Process Monitoring
$ pm2 list                      # List all processes started with PM2
$ pm2 monit                     # Display memory and cpu usage of each app
$ pm2 show [app-name]           # Show all informations about application

# Log management
$ pm2 logs                      # Display logs of all apps
$ pm2 logs [app-name]           # Display logs for a specific app
$ pm2 logs --json               # Logs in JSON format
$ pm2 flush
$ pm2 reloadLogs

# Process State Management
$ pm2 start app.js --name="api" # Start application and name it "api"
$ pm2 start app.js -- -a 34     # Start app and pass option "-a 34" as argument
$ pm2 start app.js --watch      # Restart application on file change
$ pm2 start script.sh           # Start bash script
$ pm2 start app.json            # Start all applications declared in app.json
$ pm2 reset [app-name]          # Reset all counters
$ pm2 stop all                  # Stop all apps
$ pm2 stop 0                    # Stop process with id 0
$ pm2 restart all               # Restart all apps
$ pm2 gracefulReload all        # Graceful reload all apps in cluster mode
$ pm2 delete all                # Kill and delete all apps
$ pm2 delete 0                  # Delete app with id 0

# Startup/Boot management
$ pm2 startup                   # Detect init system, generate and configure pm2 boot on startup
$ pm2 save                      # Save current process list
$ pm2 resurrect                 # Restore previously save processes
$ pm2 unstartup                 # Disable and remove startup system

$ pm2 update                    # Save processes, kill PM2 and restore processes
$ pm2 generate                  # Generate a sample json configuration file

# Deployment
$ pm2 deploy app.json prod setup    # Setup "prod" remote server
$ pm2 deploy app.json prod          # Update "prod" remote server
$ pm2 deploy app.json prod revert 2 # Revert "prod" remote server by 2

# Module system
$ pm2 module:generate [name]    # Generate sample module with name [name]
$ pm2 install pm2-logrotate     # Install module (here a log rotation system)
$ pm2 uninstall pm2-logrotate   # Uninstall module
$ pm2 publish                   # Increment version, git push and npm publish
Example : Build a microservice
Now we will see a complete example for creating and deploying a microservice locally and remotely using PM2 and the unix socket protocol.
- locally : calculator.js
//Initialize a Devis instance
let calculatorMicroservice = require("devis");

// Add addition function to the calculator
calculatorMicroservice.push({
    action: "calculator",
    cmd: "add"
}, (args, done) => {
    let error;
    if (!args.number1 || !args.number2) {
        error = "you forgot to type a number!";
    } else if (typeof args.number1 !== "number" || typeof args.number2 !== "number") {
        error = "entries should be numbers!";
    }
    done(error, args.number1 + args.number2);
});

// Add multiplication function to the calculator
calculatorMicroservice.push({
    action: "calculator",
    cmd: "mult"
}, (args, done) => {
    let error;
    if (!args.number1 || !args.number2) {
        error = "you forgot to type a number!";
    } else if (typeof args.number1 !== "number" || typeof args.number2 !== "number") {
        error = "entries should be numbers!";
    }
    done(error, args.number1 * args.number2);
});

// Add substraction function to the calculator
calculatorMicroservice.push({
    action: "calculator",
    cmd: "sub"
}, (args, done) => {
    let error;
    if (!args.number1 || !args.number2) {
        error = "you forgot to type a number!";
    } else if (typeof args.number1 !== "number" || typeof args.number2 !== "number") {
        error = "entries should be numbers!";
    }
    done(error, args.number1 - args.number2);
});

// Add division function to the calculator
calculatorMicroservice.push({
    action: "calculator",
    cmd: "div"
}, (args, done) => {
    let error;
    if (!args.number1 || !args.number2) {
        error = "you forgot to type a number!";
    } else if (typeof args.number1 !== "number" || typeof args.number2 !== "number") {
        error = "entries should be numbers!";
    }
    done(error, args.number1 / args.number2);
});

//export the microservice
module.exports = calculatorMicroservice;
- using unix socket and pm2 : calculator.js
- create the microservice
//Initialize a Devis instance
let calculatorMicroservice = require("devis");

// Add addition function to the calculator
calculatorMicroservice.push({
    action: "calculator",
    cmd: "add"
}, (args, done) => {
    let error;
    if (!args.number1 || !args.number2) {
        error = "you forgot to type a number!";
    } else if (typeof args.number1 !== "number" || typeof args.number2 !== "number") {
        error = "entries should be numbers!";
    }
    done(error, args.number1 + args.number2);
});

// Add multiplication function to the calculator
calculatorMicroservice.push({
    action: "calculator",
    cmd: "mult"
}, (args, done) => {
    let error;
    if (!args.number1 || !args.number2) {
        error = "you forgot to type a number!";
    } else if (typeof args.number1 !== "number" || typeof args.number2 !== "number") {
        error = "entries should be numbers!";
    }
    done(error, args.number1 * args.number2);
});

// Add substraction function to the calculator
calculatorMicroservice.push({
    action: "calculator",
    cmd: "sub"
}, (args, done) => {
    let error;
    if (!args.number1 || !args.number2) {
        error = "you forgot to type a number!";
    } else if (typeof args.number1 !== "number" || typeof args.number2 !== "number") {
        error = "entries should be numbers!";
    }
    done(error, args.number1 - args.number2);
});

// Add division function to the calculator
calculatorMicroservice.push({
    action: "calculator",
    cmd: "div"
}, (args, done) => {
    let error;
    if (!args.number1 || !args.number2) {
        error = "you forgot to type a number!";
    } else if (typeof args.number1 !== "number" || typeof args.number2 !== "number") {
        error = "entries should be numbers!";
    }
    done(error, args.number1 / args.number2);
});

//use the network
calculatorMicroservice.listen({
    path: "/tmp/calculatorSocket.sock"
});
- run the microservice :
$ pm2 start calculator.js
That's it!.
Use a microservice
After showing how to create and deploy a microservice, now I will explain how to connect to a microservice locally or remotely.
locally
Just use the method use giving as argument the path of the microservice to use.
- Syntax :
use("/devisMicroservicePath");
Distant microservice
Connecting to a remote microservice is done using the connect method, which, like the listen method, takes as argument an object whose parameters change according to the protocol used, but you must necessarily add inside this object a unique identifier for each connection.
Sometimes, you will need to do a processing only after successful connectivity with the server, and in this case you will simply use the callback function of the method connect.
- Syntax :
connect({
    id: unique_id,
    [parameters]
}, callback);
Examples :
- TCP :
connect({ id: 1, host: "127.0.0.1" port: 3030 }, (err, result) => { //do something });- Unix Socket :
connect({ id: 2, path: "/tmp/mysoscket.sock" });- named pipes :
connect({
    id: 3,
    path: "\\\\\.\\pipe\\mynamedpipe"
});
Use microservice functions
Now you are connected to a microservice, locally or remotely, and you want to use its functions you will use the call method. It takes 3 arguments:
The pattern: This is an object that usually takes two to three parameters, the first (when using a remote microservice) is the identifier of the microservice to use, the one added in the method connect, the second argument represents the name of the microservice and the third the name of the function.Arguments: This is an object in which you will pass the values of the arguments necessary to the processing of the function (remember the example of the calculator).The Callback: Do you remember the syntax of the add method? and in particular the return function? exactly, the doneFunction (errors, result) this is our 3rd argument! which will allow us to handle the errors when using the function and to finally get the desired result.Syntax :
call(pattern, arguments, callback);
Example : use a microservice
Now we will see an example of using a microservice. We will resume the example of the calculator in both cases, when the microservice is hosted locally or remotely.
locally
//Initialize a Devis instance
let calculatorClient = require("devis");

//Use the local calculator microservice
calculatorClient.use(__dirname + "/calculator");

// Use the addition function
calculatorClient.call({
    action: "calculator",
    cmd: "add"
}, {
    number1: 3,
    number2: 5
}, (error, result) => {
    if (error) {
        console.log(error);
    } else {
        console.log("the addition of " + number1 + "and " + number2 + "is : " + result);
    }
});

// Use the multiplication function
calculatorClient.call({
    action: "calculator",
    cmd: "mult"
}, {
    number1: 3,
    number2: 5
}, (error, result) => {
    if (error) {
        console.log(error);
    } else {
        console.log("the multiplication of " + number1 + "and " + number2 + "is : " + result);
    }
});

// Use the substraction function
calculatorClient.call({
    action: "calculator",
    cmd: "sub"
}, {
    number1: 3,
    number2: 5
}, (error, result) => {
    if (error) {
        console.log(error);
    } else {
        console.log("the substraction of " + number1 + "and " + number2 + "is : " + result);
    }
});

// Use the division function
calculatorClient.call({
    action: "calculator",
    cmd: "div"
}, {
    number1: 3,
    number2: 5
}, (error, result) => {
    if (error) {
        console.log(error);
    } else {
        console.log("the division of " + number1 + "and " + number2 + "is : " + result);
    }
});
Distant microservice
We will use in this example, the Distantcalculator remote microservice, using the Unix Socket protocol:
//Initialize a Devis instance
let calculatorClient = require("devis");

//Use the distant calculator microservice
calculatorClient.connect({
    id: 1,
    path: '/tmp/calculatorSocket'
})

// Use the addition function for the microservice 1
calculatorClient.call({
    id: 1,
    action: "calculator",
    cmd: "add"
}, {
    number1: 3,
    number2: 5
}, (error, result) => {
    if (error) {
        console.log(error);
    } else {
        console.log("the addition of " + number1 + "and " + number2 + "is : " + result);
    }
});

// Use the multiplication function for the microservice 1
calculatorClient.call({
    id: 1,
    action: "calculator",
    cmd: "mult"
}, {
    number1: 3,
    number2: 5
}, (error, result) => {
    if (error) {
        console.log(error);
    } else {
        console.log("the multiplication of " + number1 + "and " + number2 + "is : " + result);
    }
});

// Use the substraction function for the microservice 1
calculatorClient.call({
    id: 1,
    action: "calculator",
    cmd: "sub"
}, {
    number1: 3,
    number2: 5
}, (error, result) => {
    if (error) {
        console.log(error);
    } else {
        console.log("the substraction of " + number1 + "and " + number2 + "is : " + result);
    }
});

// Use the division function for the microservice 1
calculatorClient.call({
    id: 1,
    action: "calculator",
    cmd: "div"
}, {
    number1: 3,
    number2: 5
}, (error, result) => {
    if (error) {
        console.log(error);
    } else {
        console.log("the division of " + number1 + "and " + number2 + "is : " + result);
    }
});
Fetch for a microservice
Suppose you want to view or retrieve the functionality of a microservice, you will use the getFunctions method which takes several arguments depending on the use case.
Locally :
- By giving the path of it if you know it.
//Example devis.getFunctions("local", "../../microservice.js", (res) => { //do something });- By giving just the name of the microservice, and the name of a folder that may encompass your microservice or encompassing other folders that may contain it, the last argument represents the type of search of the file that you thought it would contains your microservice:
- 1 for an ascending search.
- -1 for a descending search
//Example //Folder architecture : />root |_/>folderA |_________/>folderParent |_______________________/>folderD |________________________________/>microservice1.js |________________________________/>microservice2.js |_________/>folderC |_______________________/>folderE |_/>folderB //For example, if you are inside the folder folderA : devis.getFunctions("local", "microservice2.js", "folderParent", 1, (res) => { //do something }); //For example, if you are inside the folder folderE : devis.getFunctions("local", "microservice2.js", "folderParent", -1, (res) => { //do something });- First, he will find the location of the file, then find the location of your microservice in the microservice and return his functions as an object.
- In general, we give the name of the root folder of the project as an argument for a more optimal search.
Remotely :
- By giving as argument the connection parameters of the microservice.
//Example
devis.getFunctions("distant", {host: "127.0.0.1",port: 8080 }, (res) => {
   //do something
});
Use plugins
To be able to use a plug in official or created by a third, we have to call the plug method , after installing the plugin, by giving as argument the name of the plugin.
- Syntax :
plug(plugin_name);
Example : use the devis-mongo-client plugin
First, we will install devis and the plugin :
$ npm install --save devis
$ npm install --save devis-mongo-client
After, we will call our plugin :
//Initialize a Devis instance
let devisMongoClient = require("devis")

//use the devis-mongo-client plugin
        .plug("devis-mongo-client")

        //connect to the database
        .call({
        role: "mongodb",
        action: "connect"
    }, { url: "mongodb://localhost:27017/foo" }, (err, db) => {
        if (err) console.log(err);
        else {

            //call find function of the plugin by giving the collection and search conditions
            devisMongoClient.call({
                    role: "mongodb",
                    action: "find"
                }, {
                    collection: "foo",
                    params: {
                        "Acronym": "L"
                    }
                }, (err, result) => {
                    if (err) {
                        console.log(err);
                    } else {
                        console.log(result);
                    }
            });
    });