README
Earthstar Streaming RPC
Similar to JSON-RPC, but also supports streaming (soon). Written to be used in Earthstar (github, docs).
Table of Contents
Usage
Importing
To use in Deno you can import directly from Github using a specific git tag as a version number:
import {
    TransportHttpClient,
    TransportHttpServer,
} from 'https://raw.githubusercontent.com/earthstar-project/earthstar-streaming-rpc/v2.0.0/mod.ts';
To use with Node or apps built with NPM dependencies:
npm install earthstar-streaming-rpc
And then import in your code:
import { TransportHttpClient, TransportHttpServer } from 'earthstar-streaming-rpc';
Concepts
A Transport represents a certain kind of network connection. It's responsible for managing Connections with other devices. There are many flavors of Transport class, but only one kind of Connection class. A Transport can represent a client-server sort of network connection like HTTP, or a symmetrical p2p one like hyperswarm.
A Connection instance is a 1-to-1 relationship with another device, and gives you a way to call methods on the other device.
Connections are symmetrical, regardless of the underlying client-server nature of the network connection -- either side of the connection can call methods on each other.
API Example
Look in types.ts for more details.
Let's define some methods that you want to expose to other devices. Think carefully about security with these!
You can also use a class here instead of an object-of-functions. You can use sync or async functions.
NOTE: the arguments and return value must all be JSON-serializable. In particular this means you can't use undefined anywhere -- use null instead.
const methods = {
    add: (a: number, b: number) => a + b,
    greetSlowly: async (name: string) => {
        await sleep(1000);
        return 'Hello ' + name;
    },
};
Create a Transport for the kind of network connecton you want to use. You are responsible for coming up with a random deviceId. It can be different each time your code runs, but if you have several Transports running at the same time on your device, use the same deviceId on each one.
// Each kind of Transport has its own unique constructor
const transport = new TransportHttpClient({
    deviceId: 'o93idjodo2i3jd',
    methods,
});
Create a Connection to the other device.
// Each kind of Transport has its own way of doing this.
const conn = transport.addConnection('http://example.com/api/v1');

// Server-side transports don't let you create Connections on demand --
// they sit and wait for connections to arrive.
// You can grab the existing connections from the WatchableSet
// at transport.connections, or subscribe to changes
for (const conn of transport.connections) {
    /* ... */
}
transport.connections.onAdd((conn) => {/* ... */});
transport.connections.onDelete((conn) => {/* ... */});
transport.connections.onChange((conn) => {/* ... */});
Use the Connection to call methods on the other device. There are 3 ways to do this:
notify-- call the method but don't wait for the resultrequest-- call the method and wait for the result to come backstream-- TODO: start a stream (not implemented yet)
// This does not return an answer.
await conn.notify('greetSlowly', 'Suzy');

// This waits for the returned value.
const three = await conn.request('add', 1, 2);
Closing things
Connections have a status which can be CONNECTING, OPEN, ERROR, or CLOSED. The possible sequence of states is:
CONNECTING --> (OPEN | ERROR)* --> CLOSED

examples
CONNECTING --> CLOSED
CONNECTING --> OPEN --> CLOSED
CONNECTING --> ERROR --> CLOSED
CONNECTING --> OPEN --> ERROR --> OPEN --> ERROR --> CLOSED
ERROR means the network connection failed. It will try to reconnect and become OPEN again.
It won't become CLOSED until you ask it to; once CLOSED it can't be used anymore or re-opened (make a new one instead).
status is a Watchable -- you can subscribe to changes, and you have to use get() to get the value. Don't set it yourself.
// using the connection status

console.log(connection.status.get());

connection.status.onChange((oldVal, newVal) => {/* ... */});

connection.status.onChangeTo('CLOSED', (oldVal, newVal) => {/* ... */});

connection.close();
The Transport also has a status but it can only be OPEN or CLOSED.
It won't become CLOSED until you ask it to; once CLOSED it can't be used anymore or re-opened (make a new one instead).
OPEN --> CLOSED
When you're done, be sure to close the Transport. Otherwise it might have some timers running which will prevent Deno or Node from exiting. Closing the Transport will close all the Connections for you.
transport.close();
Error handling
If there's a network problem:
connection.statuswill becomeERRORconnection.notifyandconnection.requestwill throw errors, such asRpcErrorTimeoutorRpcErrorNetworkProblemor a built-in error type related to the network- The Connection will try to reconnect and become
OPENagain - The Transport will remain
OPEN(TODO?)
If you call a method name that does not exist on the other side:
connection.notifywill do nothingconnection.requestwill throw aRpcErrorUnknownMethod
If your method call crashes on the other side, because...
- ...the method threw an error on purpose
- ...the method crashed for some reason
- ...the arguments you provided did not make sense (note that nothing checks if you provided the correct number of arguments, it just tries to run the method as you asked)
then...
connection.notifywill do nothingconnection.requestwill throw aRpcErrorFromMethodwith a stringified version of the original error
If you try to do anything with a Connection or Transport that is CLOSED:
- a
RpcErrorUseAfterCloseerror will be thrown
Transport classes
HTTP
TransportHttpClient
TransportHttpServer (Any runtime / server with support for the Fetch API's Request and Response)
TransportHttpServerOpine (Deno)
TransportHttpServerExpress (Node)
This is a lazy way to get bidirectional communication over HTTP. We'll improve it later:
Client --> server: messages are POSTed in batches (arrays), currently one at a time, so the array always has length 1. This should be improved by batching up messages and sending them every 50 milliseconds.
Server --> client: The client does GET requests to poll for batches of messages that the server has accumulated for that particular client (by deviceId). It polls quickly until the server is empty, then it slows down and polls every couple of seconds. This should be converted to a single streaming GET.
Other
TransportLocal - A connection within one device, mostly useful for testing.
Future transport types, not written yet
- BroadcastChannel, for communicating between browser tabs
- Websockets
- Hyperswarm
Writing a new kind of Transport class
Behind the scenes, each method call (or response) is wrapped in an Envelope object which is then (de)serialized to JSON.
TODO: write more
Packaging & Building
This is a "Deno-first" package -- it's written for Deno, and then also converted and published to npm. It should also work from browsers -- typically you'd import it from your own separate npm project and use a bundler such as webpack to put everything together.
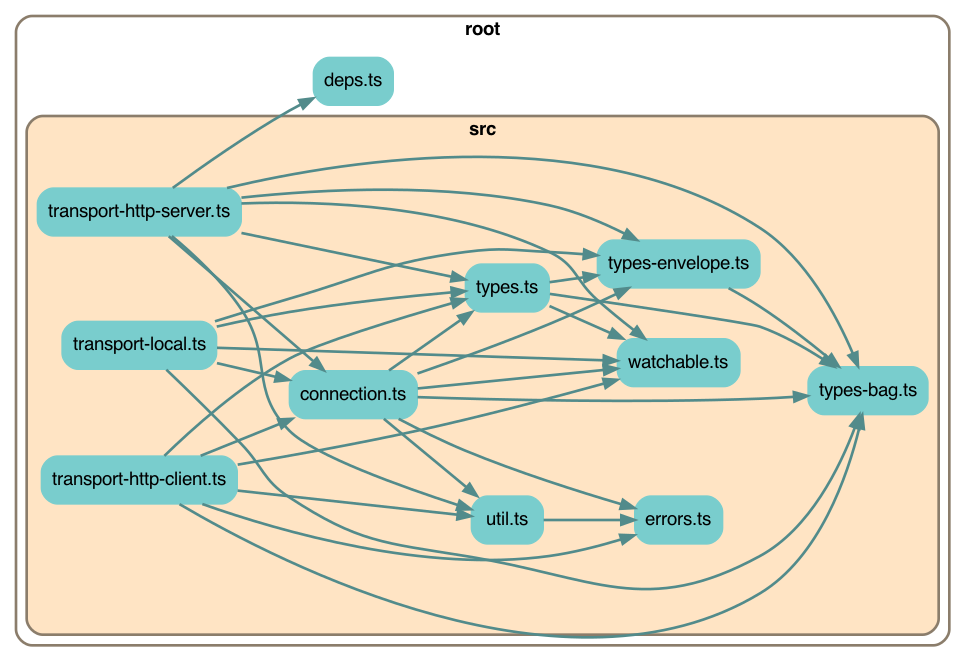
Code structure
Just the important things:
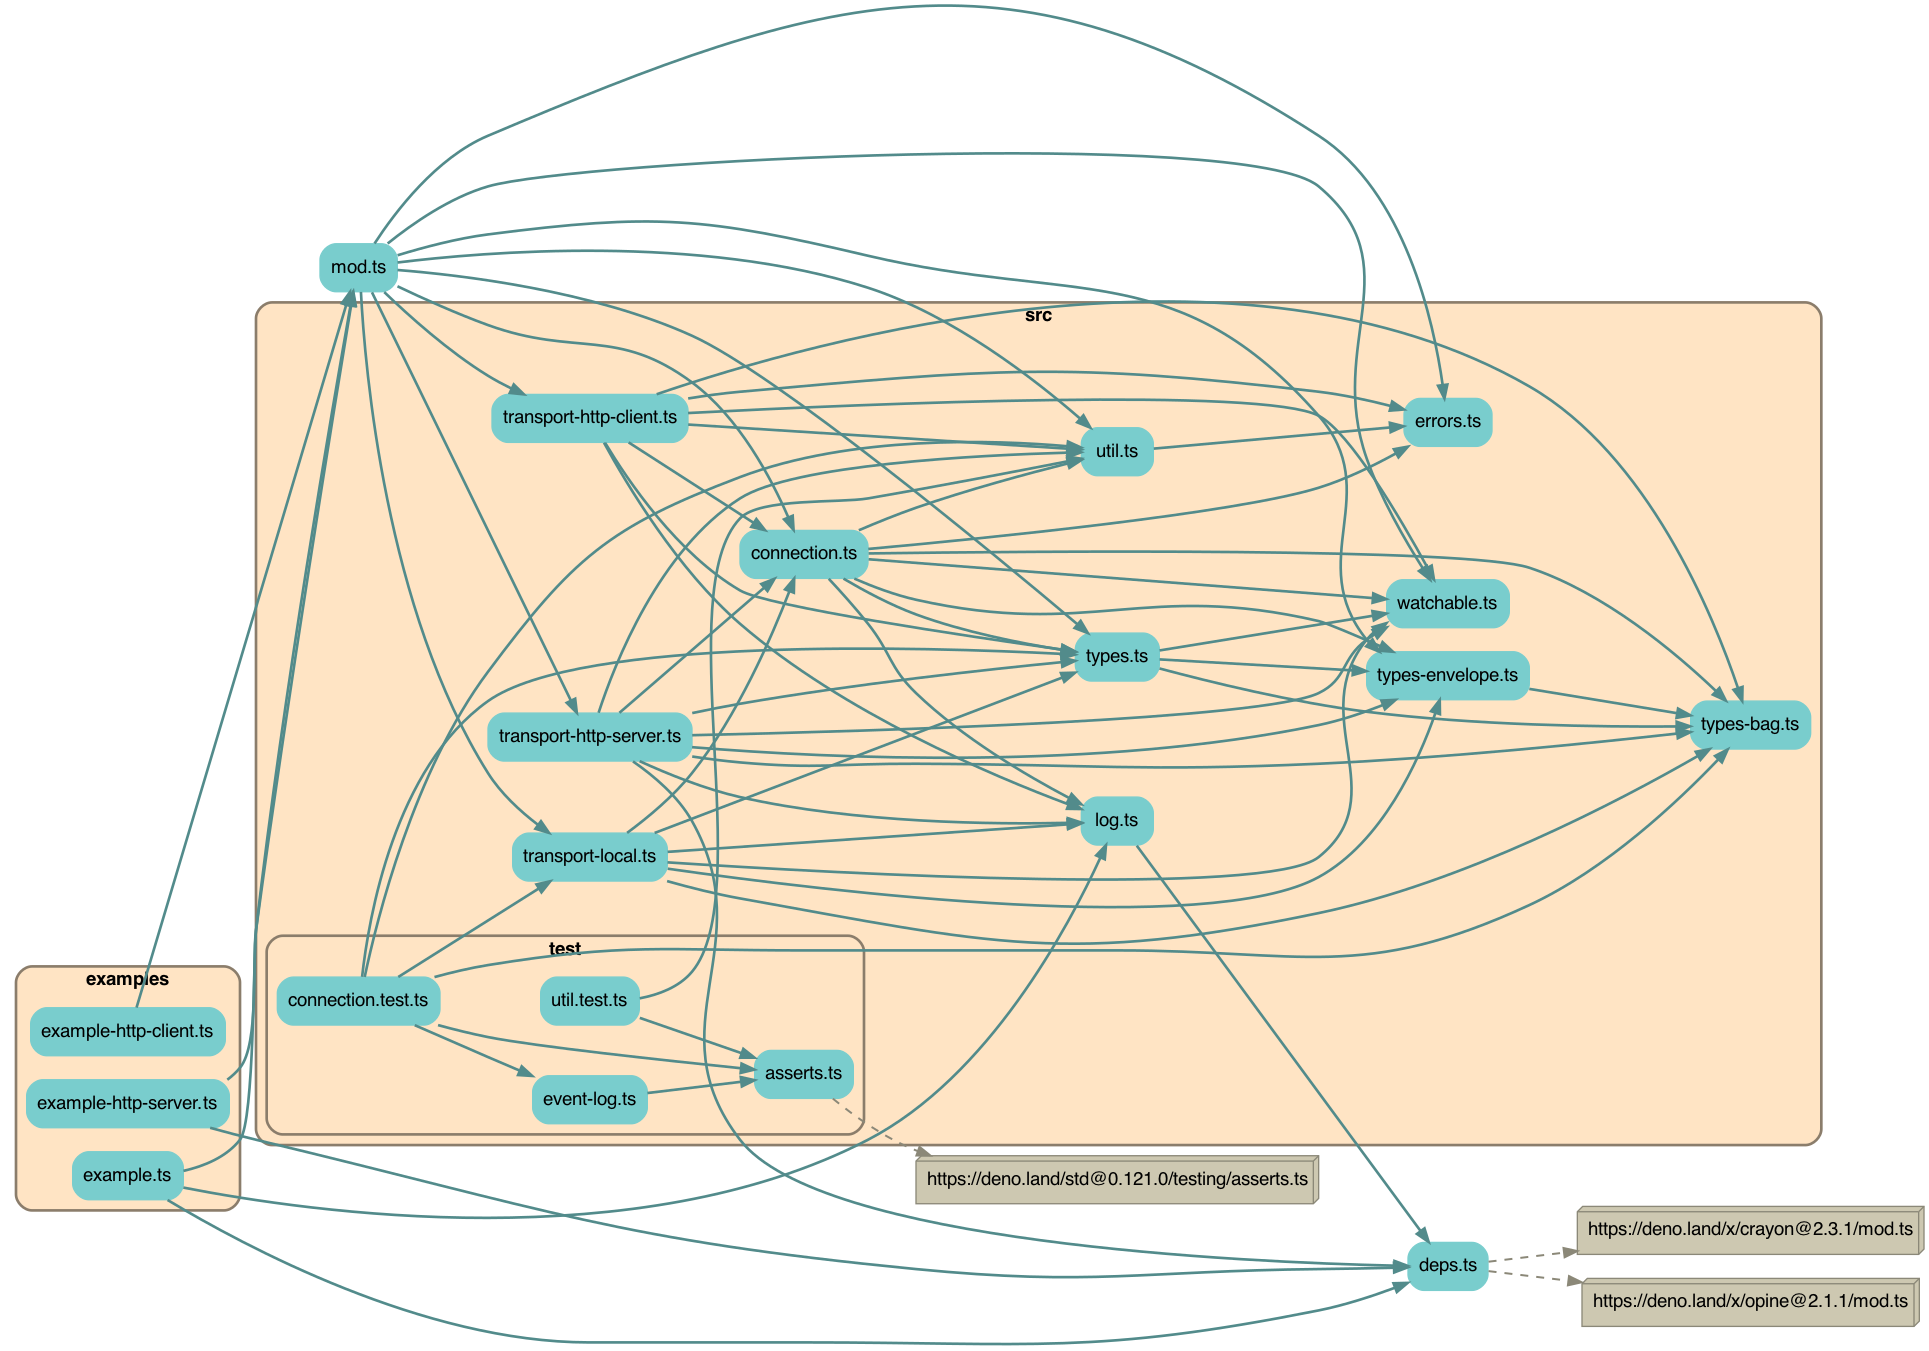
Everything:
Development
Setup
You will need Deno installed. Instructions for installation can be found here. You may also want type-checking and linting from Deno for your IDE, which you can get with extensions like this one for VSCode.
To check that you've got everything set up correctly:
make example
This will run the example script at example-app.ts, and you will see a lot of
colourful log messages from the app.
Scripts
Scripts are run with the make command.
make test- Run all testsmake test-watch- Run all tests in watch modemake fmt- Format all code in the codebasemake npm- Create a NPM package innpmand run tests against it (requires Node v14 or v16 to be installed).make bundle- Create a bundled browser script atearthstar.bundle.jsmake depchart- Regenerate the dependency chart imagesmake coverage- Generate code test coverage statisticsmake clean- Delete generated files
Where to find things
- The entry for the package can be found at
mod.ts. - Most external dependencies can be found in
deps.ts. All other files import external dependencies from this file. - Script definitions can be found in
Makefile. - Tests are all in
src/test/ - The script for building the NPM package can be found in
scripts/build_npm.ts
Publishing to NPM
- Run
make VERSION="version.number.here" npm, whereversion.number.hereis the desired version number for the package. cd npmnpm publish