README
Ember Interactivity">


Using Google's RAIL model, we learn to focus on the more critical aspects of a page or component in order to improve the user's perception application speed. We define Time to Interactivity to be the time it takes for the user to perceive that the application is ready for interaction.
Ember Interactivity allows us to generate latency metrics tailored to this definition; specifically, by identifying the critical components required to render a parent route or component, we can track load times and identify bottlenecks that are critical to the user experience. By focusing on perceived load times, we are able to reduce user bounce rates and churn through making the content appear to load faster. Some strategies for this involve adding placeholders for necessarily long content wait times, but often there is plenty of low-hanging fruit to make actual improvements if we have the proper instrumentation to locate these issues.
Check out the Demo!
Want to see this addon used in a real application?
www.JordanHawker.com is open-source, so you can see examples of how to use the features outlined below.
Table of Contents
Installation
ember install ember-interactivity
Usage
Ember Interactivity requires developers to instrument routes and critical components in order to report when they have completed rendering.
Routes
The route-interactivity mixin provides instrumentation for
route latency. This can be added to all routes:
// ext/route.js
import Route from '@ember/routing/route';
import RouteInteractivityMixin from 'ember-interactivity/mixins/route-interactivity';

Route.reopen(RouteInteractivityMixin);
// app.js
import './ext/route';
Alternatively, add the mixin only to the routes you want instrumented:
// routes/foo.js
import Route from '@ember/routing/route';
import RouteInteractivityMixin from 'ember-interactivity/mixins/route-interactivity';

export default Route.extend(RouteInteractivityMixin);
By default, routes will naively report that it is interactive by
scheduling an event in the afterRender queue. The instrumentation
will take latency of the model hook into account, as well as any
top-level render tasks This is an easy, but relatively inaccurate
method of instrumentation. It is only recommended for routes that
are either low priority for instrumentation or render only basic
HTML elements with no components.
For better instrumentation, read how to utilize the isInteractive method.
Note: The mixins in this addon rely on a number of lifecycle hooks,
such as beforeModel & didTransition. If you have any issues sending events,
please make sure you are calling this._super(...arguments) in your app when
utilizing these hooks.
Components
The component-interactivity mixin provides instrumentation for
component latency. This mixin should be added to all components that
are required for a route to be interactive. For the most accurate data,
instrument each top-level component's critical children as well. Non-critical
components can also be instrumented to understand their own latency,
even if they are not critical for a route or parent component to render.
Like routes above, we can implement a basic instrumentation strategy
via the afterRender queue. If a component renders only basic HTML elements
and does not depend on any asynchronous behavior to render, this is an ideal approach:
// templates/components/foo-bar.hbs
<p>I am a basic template with no child components.</p>
// components/foo-bar.js
import Component from '@ember/component';
import { run } from '@ember/runloop';
import ComponentInteractivity from 'ember-interactivity/mixins/component-interactivity';

export default Component.extend(ComponentInteractivity, {
  didInsertElement() {
    this._super(...arguments);
    run.scheduleOnce('afterRender', this, this.reportInteractive);
  }
});
If your component relies on asynchronous behavior (such as data loading),
you can delay your afterRender scheduling until after that behavior completes.
// components/foo-bar.js
import Component from '@ember/component';
import { run } from '@ember/runloop';
import ComponentInteractivity from 'ember-interactivity/mixins/component-interactivity';

export default Component.extend(ComponentInteractivity, {
  init() {
    this._super(...arguments);

    this.loadData().then(() => {
      run.scheduleOnce('afterRender', this, this.reportInteractive);
    });
  }
});
For components that rely on their child components to be interactive, read how to utilize the isInteractive method.
isInteractive
In order to instrument latency more accurately, we define the list of
components we expect to report as interactive in order to complete
the critical rendering path of the route/component (known as the "subscriber").
This is handled by implementing an isInteractive method
in each subscriber. This method is passed a function that will tell you if a reporter is interactive.
// routes/foo.js or components/foo-bar.js
isInteractive(didReportInteractive) {
  return didReportInteractive('first-component') && didReportInteractive('second-component');
}
Pass didReportInteractive the name of a component the subscriber renders
that is considered critical for interactivity. Once isInteractive
returns true, the relevant tracking events will be fired.
If you expect the subscriber to render multiple instances of the same component
(e.g. an #each loop), you can pass the expected number
to didReportInteractive:
// routes/foo.js or components/foo-bar.js
isInteractive(didReportInteractive) {
  let count = this.get('someData.length');
  return didReportInteractive('first-component', { count }) && didReportInteractive('second-component');
}
If there are multiple interactivity states to consider, simply add those
conditions to isInteractive:
// templates/foo.hbs or templates/components/foo-bar.hbs
{{if someState}}
  {{first-component}}
{{else}}
  {{second-component}}
{{/if}}
// routes/foo.js or components/foo-bar.js
isInteractive(didReportInteractive) {
  if (this.get('someState')) {
    return didReportInteractive('first-component');
  }
  return didReportInteractive('second-component');
}
Beacons
Often a template has multiple rendering states (e.g. a loading state),
which may or may not render child components. If such a situation occurs,
neither basic or complex instrumentation is a perfect fit. To address this,
Ember Interactivity provides an interactivity-beacon component. These
beacons are simple components that you can append to the end of a template
block in order to time the rendering of that block.
Provide the beacon with a beaconId to give it a unique identifier:
// routes/foo.js or components/foo-bar.js
{{#if isLoading}}
  <p>Loading...</p>
  {{interactivity-beacon beaconId='foo-loading'}}
{{else}}
  {{first-component}}
  {{second-component}}
{{/if}}
Each beaconId is appended with 'beacon:' for use in didReportInteractive:
// routes/foo.js or components/foo-bar.js
isInteractive(didReportInteractive) {
  if (this.get('isLoading')) {
    return didReportInteractive('beacon:foo-loading');
  }
  return didReportInteractive('first-component') && didReportInteractive('second-component');
}
Tracking
Ember Interactivity sends its events to the interactivity-tracking service.
Use this interface to implement your own integration points for sending data
to your favorite analytics service. For example, if you want to use ember-metrics
to send interactivity events to Mixpanel:
// app/services/interactivity-tracking.js
import { inject as service } from '@ember/service';
import InteractivityTrackingService from 'ember-interactivity/services/interactivity-tracking';

export default InteractivityTrackingService.extend({
  metrics: service(),

  trackComponent(data) {
    this.get('metrics').trackEvent('mixpanel', data);
  }

  trackRoute(data) {
    this.get('metrics').trackEvent('mixpanel', data);
  }
});
The interface is simple; it just passes through a data object for
various events, and you can handle them however you like. All data will
include an event name as detailed below; you can map these strings to
whatever names you prefer for sending to your analytics service.
trackRoute
This method is called whenever a route interactivity event is triggered.
There are three possible events: routeInitializing, routeActivating, & routeInitialized
These events are useful for segmenting your route latency numbers to know
if bottlenecks are caused by your APIs, the actual content rendering, or
some upstream app dependency (such as the CDN). Each trackRoute event
passes the following base data:
- event - The name of the event (e.g.
routeInitializing) - clientTime - The time the event occurred, formatted as a Float
- destination - The destination route for the transition
- routeName - The name of the route this event belongs to
- lostVisibility - Whether or not the app lost visibility
When routeName and destination are the same, you are on a leaf route
(as opposed to a parent route whose hooks trigger as part of the rendering process).
By default only leaf routes report interactivity, so while all routes will fire
routeInitializing & routeActivating events, only leaf routes
(or routes where isInteractive is defined) send routeInitialized.
Visibility Tracking
Ember Interactivity uses ember-is-visible
to track if the document loses visibility while the route is loading. This is
useful because the browser may de-optimize loading some part of your application
when a user switches tabs to another site. Using this data, we can identify events
where latency numbers may be increased due to visibility loss, as well as
track user behavior to know if they are frequently moving away from the site
while waiting for it to load.
routeInitializing
This event is called from the beforeModel hook of your route and
indicates the beginning of each route's loading phases.
routeActivating
This event is called when the activate hook is triggered, after the model hooks complete.
This is the point at which the route will begin scheduling its rendering tasks.
routeInteractive
This event is called when the route reports itself as interactive, per the definitions outlined above. In addition to the base data, two additional properties are added to this event:
- isAppLaunch - Boolean indicating if the app is launching for first time or if this is a transition from another route.
- timeElapsed - This indicates the time (in milliseconds) that the route
took to become interactive since the initial browser fetch. Only included
if
isAppLaunchis true.
timeElapsed is usually your primary data point for tracking the load times of your routes.
trackComponent
This method is called whenever a component interactivity event is triggered.
There are two possible events: componentInitializing & componentInteractive
Event data contains the following properties:
- event - The name of the event (e.g.
componentInteractive) - clientTime - The time the event occurred, formatted as a Float
- component - The name of the component
- componentId - A unique id for the component (to differentiate instances of the same component)
The componentInteractive event adds an additional property:
- timeElapsed - This indicates the time (in milliseconds) that the component took to become interactive since it began initializing. (Essentially subtracting the clientTimes for the two events)
isComponentInstrumentationDisabled
This method allows you to control whether components are instrumented in the application.
By default, it reads the configuration property tracking.disableComponents,
but you can override the method to add custom logic for when to disable instrumentation.
trackError (Experimental)
This method is called whenever an error occurs in Ember Interactivity.
Currently, no data is sent along with an error; please file issues if you
have requests for data to include! trackError is only hooked up for routes
at the moment, such as when a user has transitioned away from the route before completion.
Timeline Marking
Ember Interactivity automatically marks each route/component using the Performance Timeline standard. DevTools such as the Chrome Timeline can display the timings for easy visualization of the critical rendering waterfall. This can help developers identify bottlenecks for optimizing time to interactivity.
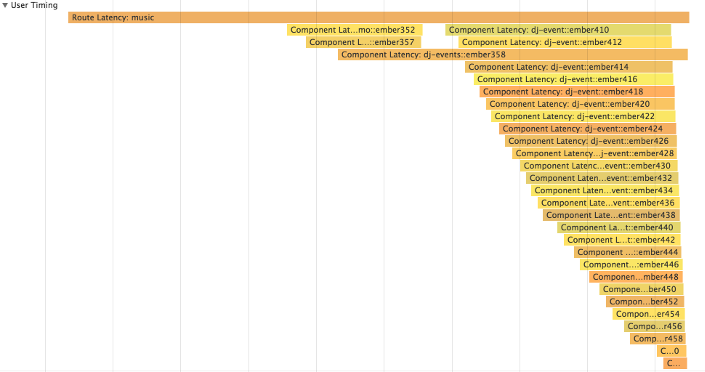
Note: It's important to realize that in some cases, components you may not have considered to be critical are creating rendering bottlenecks in your application. Look for suspicious gaps in the rendering visualization to identify these situations.
Configuration
Developers can toggle individual features of Ember Interactivity by
adding an interactivity object to their application's environment config.
This can be useful if you only want features run in certain environments,
or if you want to sample a percentage of your users to stay within data storage limits.
Three features can be configured:
instrumentation- Toggle instrumentation altogether (Note: Does not support leaf/parent configs below)timelineMarking- Toggle marking the performance timelinetracking- Toggle sending tracking events
Each feature can be configured for four subsets of the addon:
disableComponents- Set true to disable for all componentsdisableLeafComponents- Set true to disable for child components (those that do not implementisInteractive). This is useful if you only want a feature enabled for subscribers (parent routes/components).disableRoutes- Set true to disable for all routesdisableParentRoutes- Set true to disable for all non-leaf routes (those that are not the target of a transition). This is useful if you aren't trying to identify bottlenecks in your route chain and just want to collect latency numbers for each transition.
// config/environment.js
module.exports = function (environment) {
  let ENV = {
    interactivity: {
      tracking: {
        disableLeafComponents: true
      },
      timelineMarking: {
        disableRoutes: true
      }
    }
  };
  return ENV;
};
Overrides
TODO: Per-instance Overrides
Testing
Ember Interactivity provides a number of test helpers to support testing your application's latency instrumentation.
Mock Services
Mock service instances are provided for your use. It is recommended to register these mock services in each of the tests of your application.
import MockInteractivityService from 'ember-interactivity/test-support/mock-interactivity-service';
import MockInteractivityTrackingService from 'ember-interactivity/test-support/mock-interactivity-tracking-service';

module('foo', 'Integration | Component | foo', function (hooks) {
  setupRenderingTest(hooks);

  hooks.beforeEach(function () {
    this.owner.register('service:interactivity', MockInteractivityService);
    this.owner.register('service:interactivity-tracking', MockInteractivityTrackingService);
  });
});
To avoid writing this for every test in your application, you can write
a wrapper around module that handles registering any mock services for your tests.
Interactivity Assertions
The assert-interactivity helper provides methods to test that your routes/components
are correctly reporting latency events when rendering. As your tests exercise
these modules, these assertions will confirm the interactivity events get sent.
This helper relies on the MockInteractivityService being registered.
First, make the assertion available to your tests:
// tests/test-helper.js
import 'ember-interactivity/test-support/assert-interactivity';
Then, use the trackInteractivity assertion in your tests for routes and component subscribers:
// tests/acceptance/foo.js
import { module, test } from 'qunit';
import { click, fillIn, visit } from '@ember/test-helpers';
import { setupApplicationTest } from 'ember-qunit';

module('Acceptance | foo', function (hooks) {
  setupApplicationTest(hooks);

  test('should report interactive', async function (assert) {
    await visit('/foo');
    assert.trackInteractivity('foo');
  });
});
Let's say you want to simulate some async behavior and make sure interactivity
conditions aren't being fulfilled prematurely. The trackNonInteractivity
assertion can be used to test this scenario:
// tests/acceptance/foo.js
import { module, test } from 'qunit';
import { click, fillIn, visit } from '@ember/test-helpers';
import { setupApplicationTest } from 'ember-qunit';

module('Acceptance | foo', function (hooks) {
  setupApplicationTest(hooks);

  hooks.beforeEach(function () {
    this.resolveAsyncBehavior = () => {
      // Do stuff to resolve interactivity conditions
    };
  });

  test('should report interactive', async function (assert) {
    await visit('/foo');
    assert.trackNonInteractivity('foo');
    this.resolveAsyncBehavior();
    assert.trackInteractivity('foo');
  });
});
Contributing
Installation
git clone https://www.github.com/elwayman02/ember-interactivity.gitcd ember-interactivityyarn install
Linting
yarn lint:jsyarn lint:js --fix
Running tests
ember test– Runs the test suite on the current Ember versionember test --server– Runs the test suite in "watch mode"ember try:each– Runs the test suite against multiple Ember versions
Running the dummy application
ember serve- Visit the dummy application at http://localhost:4200.
For more information on using ember-cli, visit https://ember-cli.com/.
License
This project is licensed under the MIT License.