README
Grow.js


Grow.js helps you create and connect devices to a Grow-IoT instance.
Installation
npm install Grow.js
Usage
Grow.js is an extension of Thing.js which is an extension of the Node EventEmitter.
In addition, it also has some functionality for scheduling, registering and monitoring for alerts (temperature low, etc.), and easily and securely connecting to a Grow-IoT instance.
Connection options
The connect method takes a configuration object.
The host property is where the device will connect to a Grow-IoT instance. By default the host is set to localhost and the port is set to Meteor's standard of 3000. This works nicely for usb devices like Arduino.
For connecting over wifi, connect your device to wifi and set the host to the IP address where the Grow-IoT instance is running. Pass the options to the connect() method like so:
grow.connect({
    "host": "YOUR_IP_HERE"
})
Connecting over SSL
You can connect securely to our Grow-IoT alpha instance on https://grow.commongarden.org, or see the Grow-IoT repo to easily start your own IoT network locally or hosted on Meteor Galaxy.
SSL is supported though will require a bit more setup. If you are hosting your instance off a computer with a dedicated IP address pass the following the connect() method.
grow.connect({
    "host": "YOUR_IP_HERE",
    "port": 443,
    "ssl": true
})
If you are hosting on a cloud instance such as Meteor Galaxy, you might need specify the servername. The example below shows you how to connect securely to the instance at grow.commongarden.org:
grow.connect({
    "host": "grow.commongarden.org",
    "tlsOpts": {
        "tls": {
            "servername": "galaxy.meteor.com"
        }
    },
    "port": 443,
    "ssl": true
});
Connect to Grow-IoT Instance
In Grow-IoT, create a new device and take note of the device uuid and token.
In the examples folder checkout test-device.js. If you want to get started straight away with hardware, skip to the working with hardware section.
Replace the uuid and token properties of the config object with the credentials you generate.
// Import the latest build of the Grow.js library
var Thing = require('Grow.js');

// Create a new grow instance. Connects by default to localhost:3000
var testDevice = new Thing({
    // PUT YOUR UUID AND TOKEN HERE:
    uuid: 'PASTE_UUID_HERE',
    token: 'PASTE_TOKEN_HERE',

    // Specifies the component associated with the thing
    component: 'TestDevice',

    // Properties can be updated by the API
    properties: {
        state: 'off',
    },

    turn_on: function () {
        testDevice.set('state', 'on');
    },

    turn_off: function () {
        testDevice.set('state', 'off');
    },
});

// Connects to localhost:3000 by default.
testDevice.connect();
Run it with:
node examples/test-device.js
Working with hardware.
Grow.js works very well with the Johnny-Five robotics library, which has plugins for a large number of devices.
Note, with boards like the Tessel 2, Johnny-five is not required, but we're including it to make it easier to get started and support a wide variety of devices, sensors, and actuators.
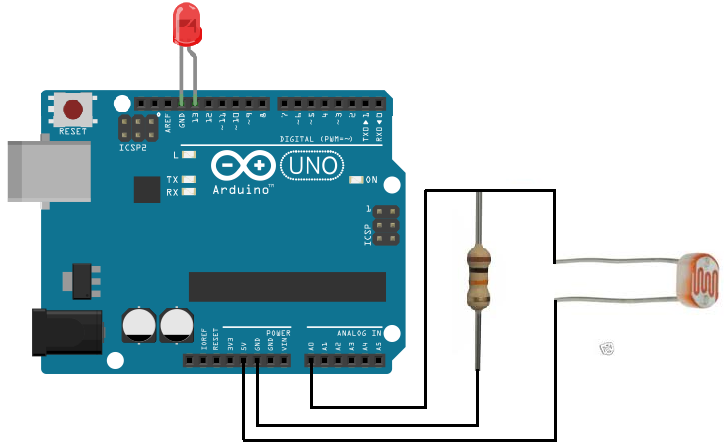
Wire up photo-resitor and led to arduino
Wire up your photo resistor and LED light like so:
To use Johnny-Five, you need to make sure that your arduino is flashed with Standard Firmata. Instructions for doing so can be found here. Once that's done you're ready for the next step!
Take a look at the smart-light example in the examples/arduino/ folder.
Create a new thing in the Grow-IoT ui and copy and paste the UUID and Token into the example below.
// Require the Grow.js build and johnny-five library.
var Thing = require('Grow.js');
var five = require('johnny-five');

// See http://johnny-five.io/ to connect devices besides arduino.
var board = new five.Board();

var emit_and_analyze;

// When board emits a 'ready' event run this start function.
board.on('ready', function start() {
    // Define variables
    var LED = new five.Pin(13),
        lightSensor = new five.Sensor('A0');

    // Create a new thing.
    var light = new Thing({
        uuid: 'PASTE_UUID_HERE',
        token: 'PASTE_TOKEN_HERE',

        component: 'smart-light',

        properties: {
            state: 'off',
            threshold: 300,
            interval: 1000,
            lightconditions: null
        },

        start: function () {
            var interval = this.get('interval');

            emit_and_analyze = setInterval(function () {
                light.call('light_data');
                light.call('check_light_data');
            }, interval);

            // Todo: implement clear interval function so we can adjust
            // the rate at which data is logged.
        },

        stop: function () {
            clearInterval(emit_and_analyze);
        },

        turn_on: function () {
            LED.high();
            light.set('state', 'on');
            console.log('light on');
        },

        turn_off:  function () {
            LED.low();
            light.set('state', 'off');
            console.log('light off')
        },

        light_data: function () {
            console.log(lightSensor.value);

            light.emit({
              type: 'light',
              value: lightSensor.value
            });
        },

        check_light_data: function () {
            var threshold = light.get('threshold');
            if ((lightSensor.value < threshold) && (light.get('lightconditions') != 'dark')) {
                light.set('lightconditions', 'dark');
            } else if ((lightSensor.value >= threshold) && (light.get('lightconditions') != 'light')) {
                light.set('lightconditions', 'light');
            }
        }
    });

    light.connect();
});
Run smart-light.js with:
node examples/arduino/smart-light/smart-light.js
Note: on certain opperating systems you may need to prefix that command with sudo to allow the script access to USB.
Developing
Code is written in ES6, and compiled using rollup.
npm run build builds the library.
npm run test builds the library, and runs tests in the test folder.
The documentation is written in jsdoc, built using Mr-Doc, and on the gh-pages branch of this repo.
License
Grow.js is released under the 2-Clause BSD License, sometimes referred to as the "Simplified BSD License" or the "FreeBSD License".