README
ionic-configuration-service
The dependencies used by the latest version are the same as needed for Ionic 3.9.0. For older versions use:
| ionic-configuration-service | Ionic | Angular |
|---|---|---|
| 6.0.0 | >= 3.9.0 | ^5.0.0 |
| 5.0.0 | >= 3.0.0 | ^4.0.0 |
| 4.0.0 | >= 2.2.0 | ^2.4.8 |
| 3.1.1 | >= 2.0.0 | ^2.2.1 |

![]()
![]()


![]()
![]()

This service encapsulates configuration functionalities for apps built with Ionic framework.
Most apps need some kind of configuration. And often, the configuration data is different between the environments:
- maybe you want to use different web services in test and production
- in test, you want to log everything, but in production only errors
- you want to have all configuration data in one place, so you are able to change something easily
- ...
The idea is:
- add one json file containing all the configuration data
- at build this file can be modified (par example you will use a different file in your release build)
- before the app really starts, the configuration gets loaded
- whereever you need the configuration data, you can get it via the injected configuration service
Settings file containing the configuration data
The settings file is just a JSON file. It contains some keys, whose values can be of any type (either scalar or complex):
{
  "helloWorld": "Hello World",
  "secretNumber": 42,
  "somethingComplex": {
    "backendUrl": "http://server.com/api"
  }
}
Replace settings file at build time
Now it gets a little bit tricky: you have a json file in a source directory (e.g. environments),
which should be copied to the www/assets directory. A good place to do this is using the copy step of Ionic's build.
You just need to add a copy statement to copy.config.js.
Unfortunately, the copied file should have always the same name. Otherwise you could not load it in your code. On the other side, you want to have several files (with different names) for the different environments. The solution is to have separate directories for every environment.
Folder structure
So, in the source, you have the following folder structure:
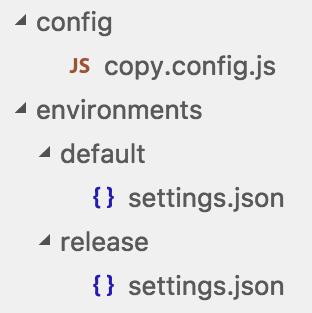
Just create a new folder below environments for every environment you want to support. Be aware that the filename itself
(settings.json) has to be always the same.
Copy correct environment
If you do not have an own copy.config.js, just create one. For details have a look at
Custom configuration of Ionic's app scripts.
There you can add your own copy step to module.exports:
module.exports = {
  copySettings: {
    src: ['{{ROOT}}/environments/' + envDirectory + "/settings.json"],
    dest: '{{WWW}}/assets'
  },
  ...
}
As you can see, it simply copies the settings.json from envDirectory to www/assets.
What is missing so far, is the right value of envDirectory, which has to be dynamic.
Fortunately, copy.config.js is just JavaScript. So we can add some logic at the beginning:
var envDirectory = process.env.env || "default";
process.stdout.write("using environment '" + envDirectory + "'\n");
As you see, envDirectory has a default value of default.
But if you specify a value for the environment variable env, you can set there another environment.
If you want to test the release environment in the emulator, you can use:
export env=release
ionic emulate --prod
Or even shorter:
env=release ionic emulate --prod
Side note: my former solution with --env argument does no longer work, since the Ionic
commands spawn internally new node processes which do not get the additional argument.
Load the configuration data
The loading of the configuration data is done in the AppModule, before the bootstrapping
of the IonicApp. This is done using Angular's APP_INITIALIZER:
import { HttpClientModule } from "@angular/common/http";
import { APP_INITIALIZER } from "@angular/core";
import { ConfigurationService } from "ionic-configuration-service";

export function loadConfiguration(configurationService: ConfigurationService): () => Promise<void> {
  return () => configurationService.load("assets/settings.json");
}

@NgModule({
  ...
  imports: [
    ...
    HttpClientModule,
  ],
  providers: [
    ConfigurationService,
    {
      provide: APP_INITIALIZER,
      useFactory: loadConfiguration,
      deps: [ConfigurationService],
      multi: true
    },
    ....
  ]
})
For APP_INITIALIZER, the factory function just loads the configuration data.
The multi parameter is important, because there can be more APP_INITIALIZERs.
The factory function loadConfiguration() is needed, since otherwise the angular compiler ngc
could not compile the module.
Access the configuration data
The access to the configuration data is quite easy. Just inject the ConfigurationService into your component.
And call configurationService.getValue() later on:
constructor(
  private configurationService: ConfigurationService) {
}

let secretNumber = this.configurationService.getValue<number>("secretNumber");
For more complex configuration, it's a good practise to define an interface describing your part of the configuration:
export interface LoggingConfiguration {
  logLevels?: {
    loggerName: string;
    logLevel: string;
   }[];
}

let configuration = this.configurationService.getValue<LoggingConfiguration>("logging");
API
getKeys(): string[]
Get all available keys.
Returns
- all available keys
getValue<T>(key: string): T
Get the configuration data for the given key.
Parameters
- T: type of the returned value (default: object)
- key: key of the configuration data
Returns
- configuration data for the given key
load(configurationUrl: string): Promise<void>
Loads the configuration from the given url.
Parameters
- configurationUrl url from which the configuration should be loaded
Returns
- promise which gets resolved as soon as the data is loaded; in case of an error, the promise gets rejected