README
Run multiple simulated Cloudflare Workers in your project with multiflare utilizing the amazing miniflare and its mount option 🚀
This is useful if you have a lot of workers to orchestrate; maybe even in a monorepo. The workers can have their individual configuration in their own wrangler.toml.
🤔 Motivation
Developing with multiple workers can be difficult, especially if you want to simulate near-production environment. Multiflare proxies requests from subdomains to a local worker.
Imagine having a project with a few workers looking like this:
www: Static landing pageblog: GraphQL powered blogchat: Live chat worker with durable objectapi: Some other endpoints
Now you are able to access the workers like so:
| Production via Cloudflare | Development via multiflare
|
|
|
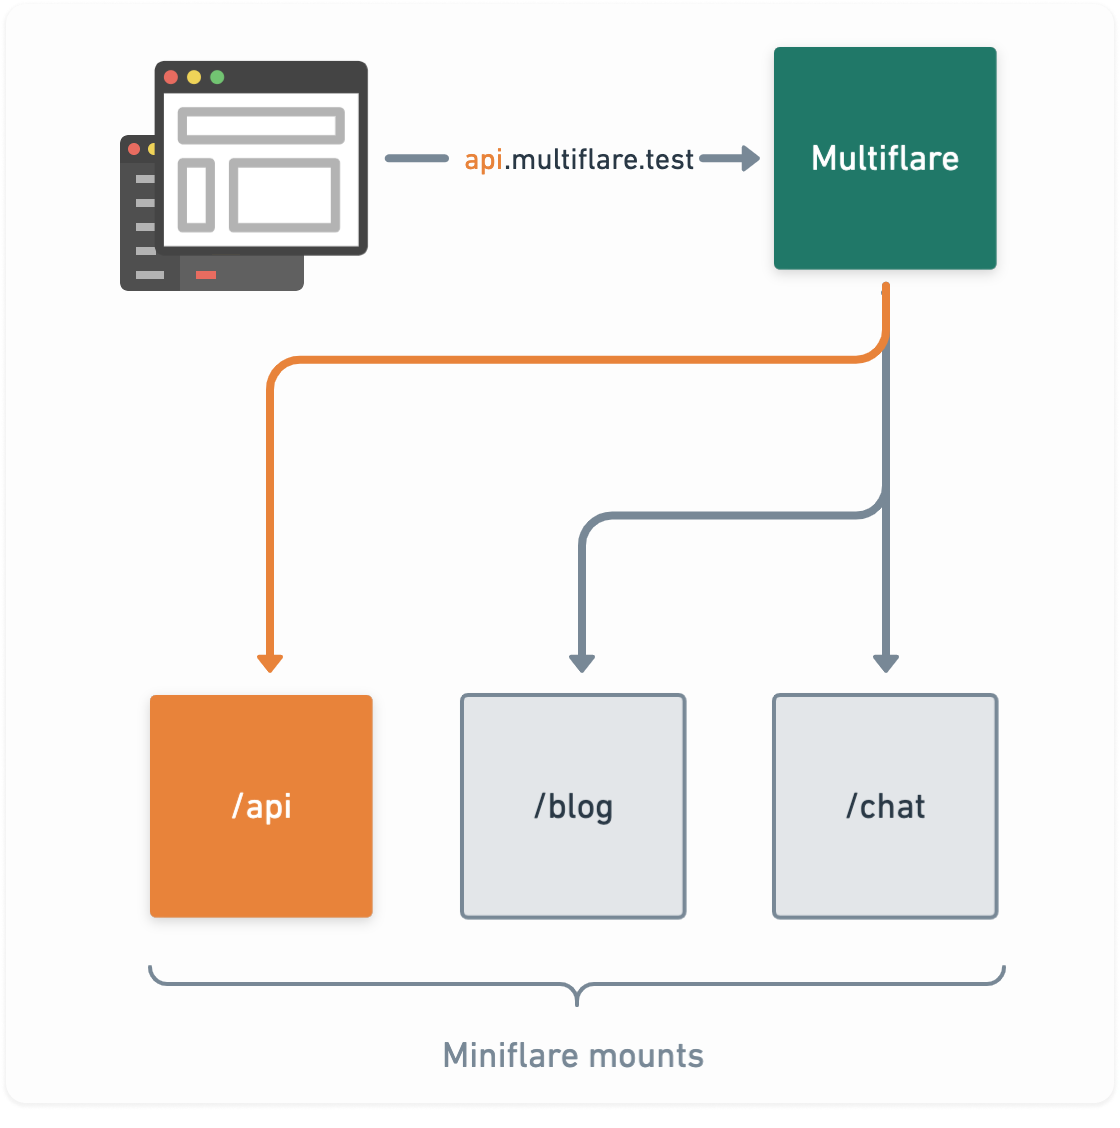
All these workers can share KV, Durable Objects, cache etc.
Essentially everything miniflare offers can be used by multiflare:
Miniflare is a simulator for developing and testing Cloudflare Workers.
- 🎉 Fun: develop workers easily with detailed logging, file watching and pretty error pages supporting source maps.
- 🔋 Full-featured: supports most Workers features, including KV, Durable Objects, WebSockets, modules and more.
- ⚡ Fully-local: test and develop Workers without an internet connection. Reload code on change quickly.
All code examples in this readme are based on the example in this repository.
📥 Installation
Let's go! 👏
yarn add multiflare --dev

# or

npm install --save-dev multiflare
🧑🔧 Usage
Running multiflare is easy:
yarn multiflare ./example/multiflare/workers

# or with ES modules

NODE_OPTIONS=--experimental-vm-modules yarn multiflare ./example/multiflare/workers
🔧 Setup
Put all your workers as subdirectory in a common directory with their respective wrangler.toml files. Like so:
multiflare/
└── workers
    ├── api
    │   ├── wrangler.toml
    │   └── …
    ├── website
    │   ├── wrangler.toml
    │   └── …
    └── account
        ├── wrangler.toml
        └── …
🔀 Add local domain handling
To simulate production environment it's useful to have a similar domain locally.
For example if your production domain is multiflare.io you can easily add multiflare.test domain to your local machine just to have a similar environment.
Simple setup for pre-defined subdomains
Open and modify /etc/hosts:
# Append to file
127.0.0.1 multiflare.test www.multiflare.test
127.0.0.1 api.multiflare.test
127.0.0.1 blog.multiflare.test
127.0.0.1 chat.multiflare.test
Advanced setup for any domain (catch all)
This describes the case for all *.test domains:
- Install
dnsmasq:brew install dnsmasq(installation differs depending on your system) - Add following line to
/usr/local/etc/dnsmasq.conf:
address=/test/127.0.0.1
- Add following to
/etc/resolv.conf
search test
nameserver 127.0.0.1
- Add file
/etc/resolver/testwith this linenameserver 127.0.0.1
Configure wrangler.toml of the workers
Put your domain(s) into the [env.dev] section, so multiflare is able to pick it up.
…/api/wrangler.toml:
name = "api"

# 👇 This is key
[env.dev]
route = "api.multiflare.test/*"

[env.production]
route = "api.multiflare.io/*"
…/website/wrangler.toml:
name = "website"

# 👇 This is key
[env.dev]
routes = ["multiflare.test/*", "www.multiflare.test/*"]

[env.production]
routes = ["multiflare.io/*", "www.multiflare.io/*"]
Now you should be ready to run multiflare! 👌
yarn multiflare ./example/multiflare/workers

# or with ES modules

NODE_OPTIONS=--experimental-vm-modules yarn multiflare ./example/multiflare/workers
Phew! That was a lot to take in. If you have any questions or something is not clear, please feel free to open an issue.
CLI
Arguments:
  directory                Root directory of workers.

Options:
  --https                  Serve via HTTPS. Be sure to also set --key and --cert
  --key <key>              Path to key file
  --cert <cert>            Path to cert file
  -p, --port <port>        Port where to serve from. Default: 80 for HTTP, 443 for HTTPS
  -l, --log-level <level>  Log level: none, error, warn, info, debug, verbose (default: "info")
  -h, --help               display help for command
API
Types:
export type MultiflareOptions = {
  rootDir: string
  https?: string
  key?: string
  cert?: string
  port?: string
  logLevel?: 'none' | 'error' | 'warn' | 'info' | 'debug' | 'verbose'
}

declare const multiflare: (options: MultiflareOptions) => Promise<{
  stop: () => Promise<unknown>
  server: import('http').Server | import('https').Server
  miniflare: Miniflare
}>

export default multiflare
Example usage:
import multiflare from 'multiflare'

const { stop } = await multiflare({
  rootDir: './workers',
})

// later in time:
await stop()