README
NgxSubForm

Utility library to improve the robustness of your Angular forms.
Whether you have simple and tiny forms or huge and complex ones, ngx-sub-form will help you build a solid base for them.
- 🗜️ Tiny bundle
(currently ~30kb as we support both the old api and the new one but soon to be ~15kb!) - ✅ Simple API: No angular module to setup, no
ControlValueAccessorby hand, no inheritance, no boilerplate. Only one function to create all your forms! - 🤖 Adds type safety to your forms
- ✂️ Lets you break down huge forms into smaller ones for simplicity and reusability
Please note one thing: If your goal is to generate forms dynamically (based on some JSON configuration for example) ngx-sub-form is not here for that!
Table of contents
- Basic API usage
- Setup
- Migration guide to the new API
- Principles
- Contribution
- Tell us about your experience with ngx-sub-form
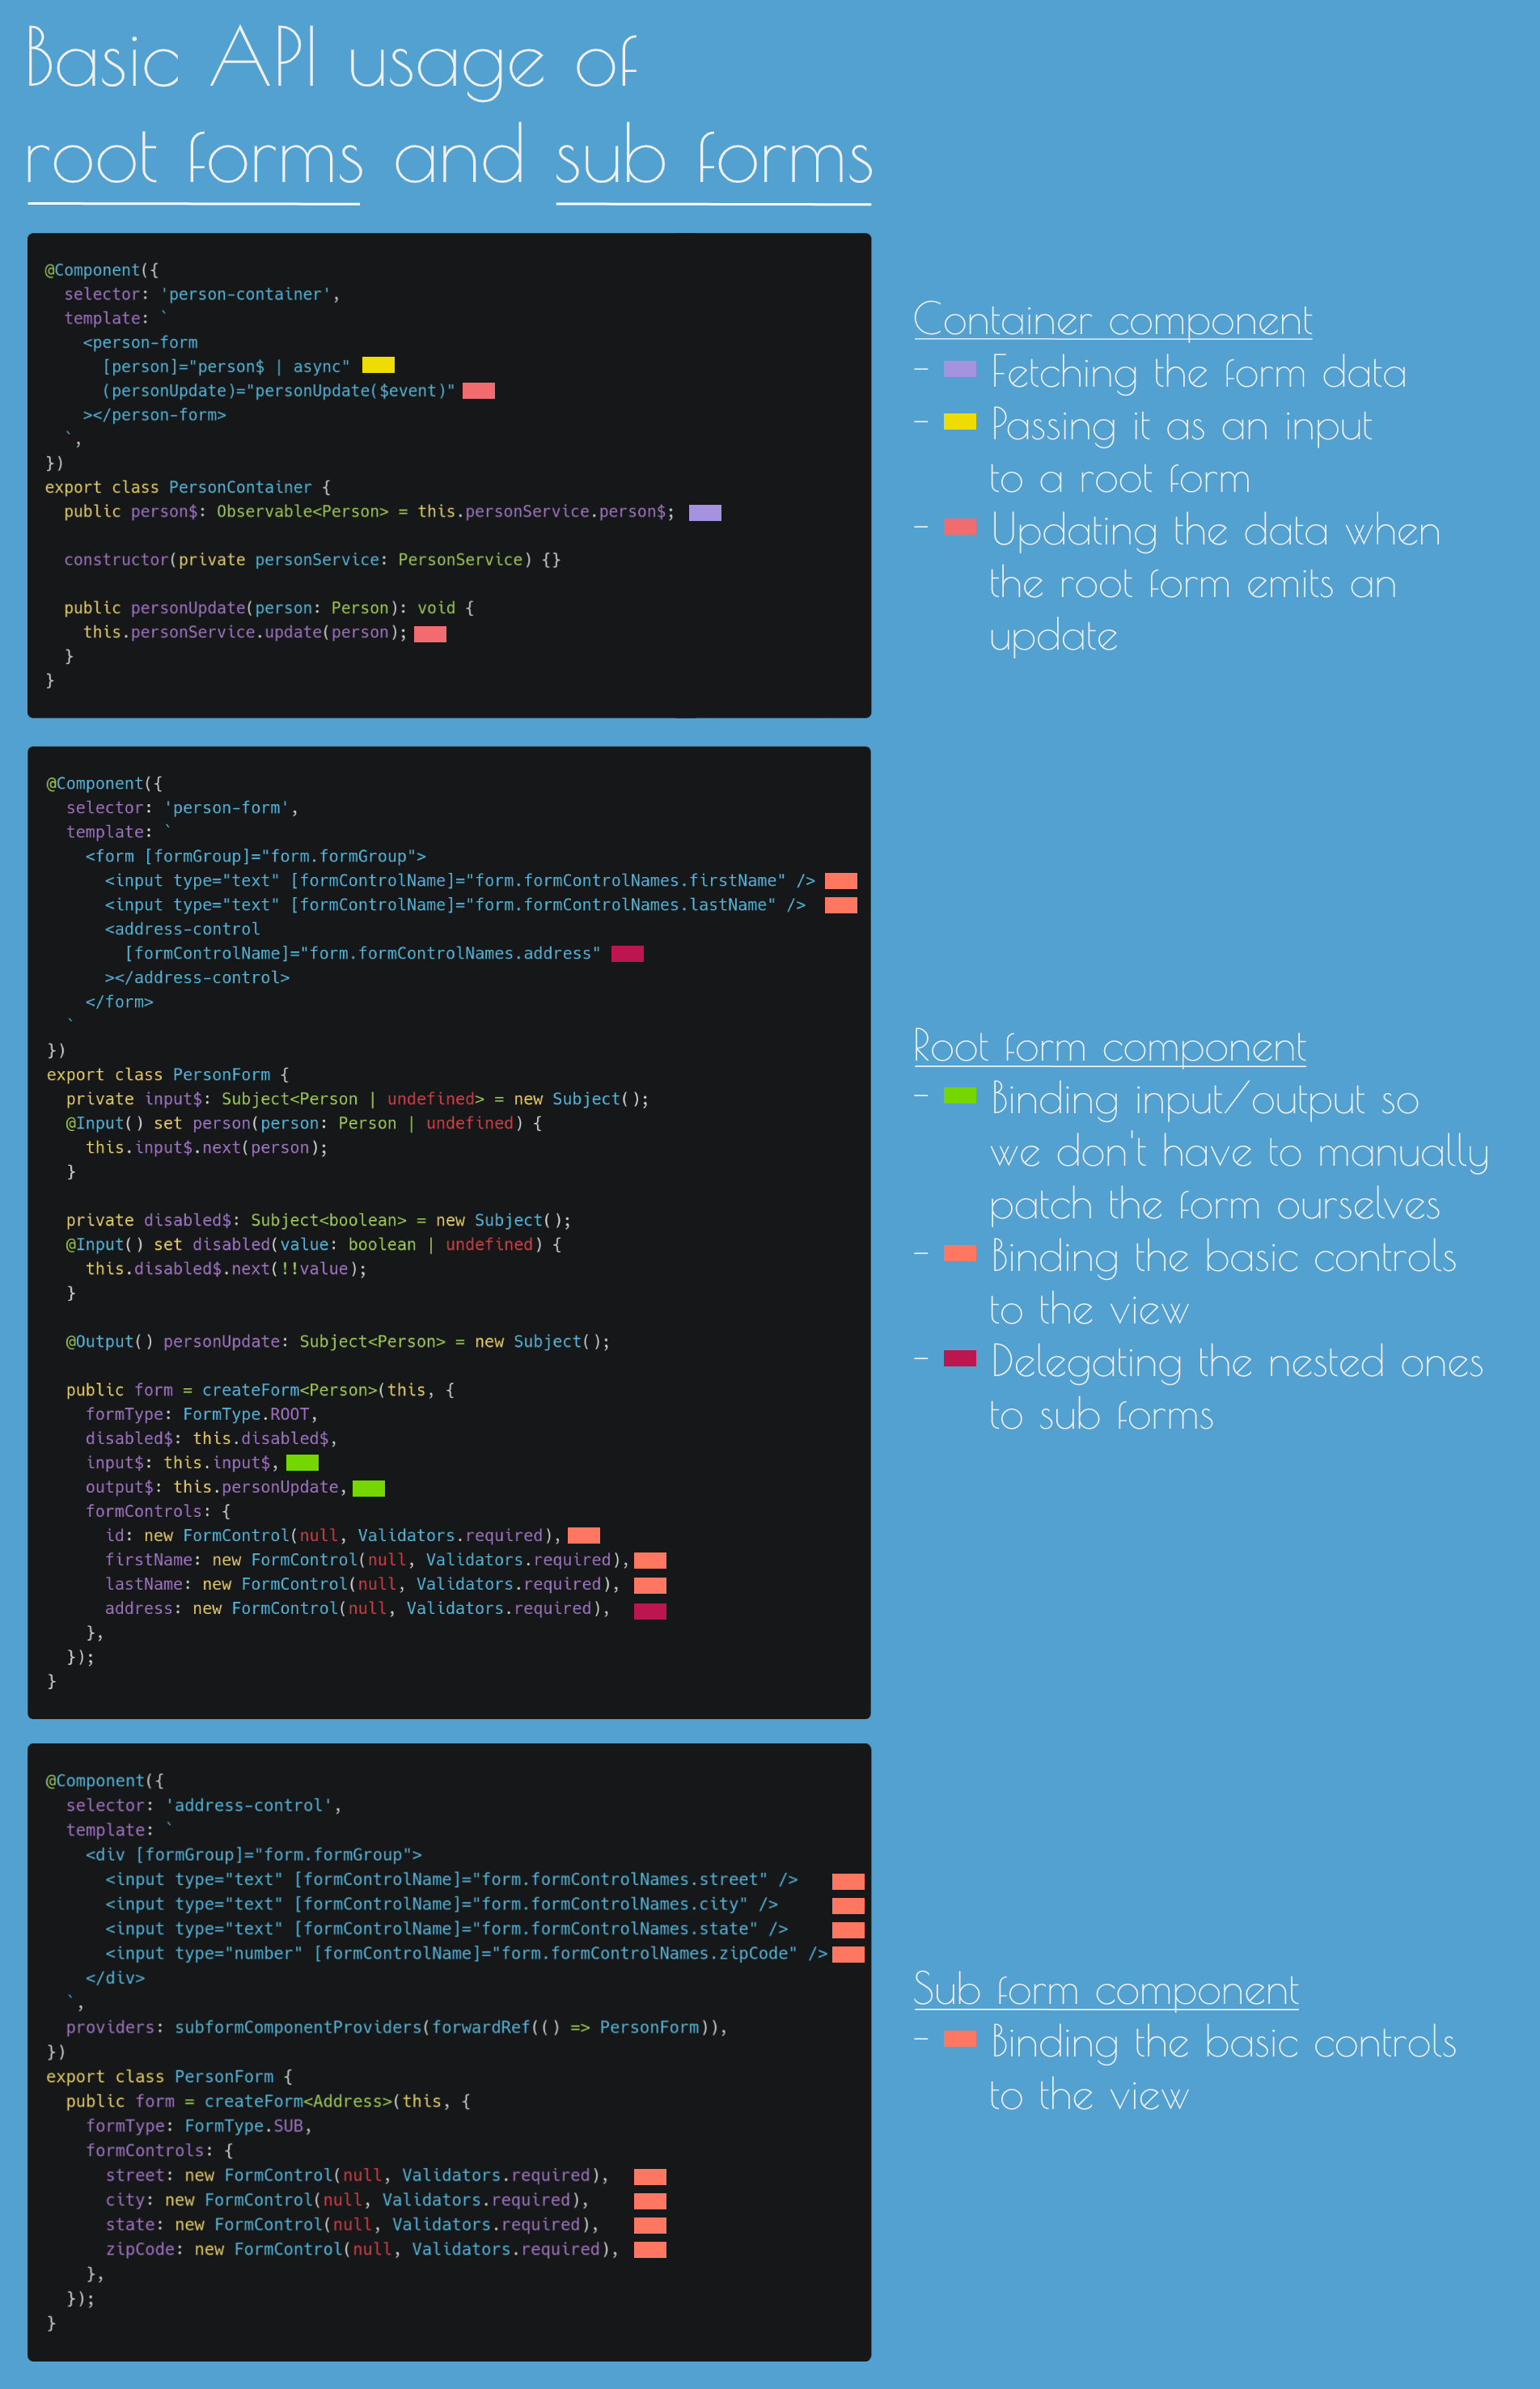
Basic API usage
As a picture is often worth a 1000 words, let's take a quick overlook at the API before explaining in details further on:
Setup
ngx-sub-form is available on NPM:
npm i ngx-sub-form
Note about the versions:
@angular version |
ngx-sub-form version |
|---|---|
<= 7 |
<= 2.7.1 |
8.x |
4.x |
9.x, 10.x |
5.1.2 |
11.x, 12.x, 13.x |
6.0.0 |
The major bump from version 5.1.2 to 6.0.0 doesn't bring any changes to the public API of ngx-sub-form.
It's only a major bump for Angular 11 support and you should be able to upgrade without having to update any of your forms.
That said, the version 6.0.0 also brings some exciting news!
We sneaked into that release a complete rewrite of ngx-sub-form to get rid of inheritance 🎉. The best part being: It's been done in a non breaking way to guarantee a smooth upgrade, which can be done incrementally, one form at a time, from the old API to the new one.
The old API has been marked as deprecated and will be removed in a few months as part of a major version bump, to give you time to upgrade.
Migration guide to the new API
If your project is not using ngx-sub-form yet, feel free to skip this migration guide.
On the other hand, if your project is using ngx-sub-form with the inheritance API please read the following.
High level explanation:
- On the public API, the required changes are mostly moving things around as none of the core concepts have changed
- Depending on how much forms you have, this may be a long and boring task as we don't have any schematics to make those changes automatically for you
- On the bright side, it should be a fairly easy task in terms of complexity
- You should be able to make the upgrade incrementally as well (form after form if you want to instead of a big bang rewrite!). This is because behind the scenes the root and sub forms communicate through the
ControlValueAccessorinterface and as this one is from Angular and didn't change, it should be fine updating one form at a time
The simplest thing to understand the new syntax is probably to have a look on the basic API usage example which covers most of the cases. But let's describe a step by step approach how to update your forms:
createFormis the new function to create both your root and sub forms. It's very similar in terms of configuration to all the attributes and methods that you needed to implement after extending fromNgxRootFormComponentorNgxSubFormComponentThe first parameter that you should be providing in the configuration object of
createFormisformTypewhich can be eitherFormType.ROOTorFormType.SUBThen, you can provide the following ones for a sub form:
formControlsemitNullOnDestroy(optional)formGroupOptions(optional)toFormGroup(optional: If you have only 1 interface, required if you passed a second type to define a remap)fromFormGroup(optional: If you have only 1 interface, required if you passed a second type to define a remap)
And for a root form you additionally provide the following bindings:
input$output$disabled$manualSave$(optional)handleEmissionRate(optional)
Most of the attributes and methods have the same name as they had before so it shouldn't be too much of a trouble to move from a class approach with attributes and methods to a configuration object.
On the template side, assuming that you've saved the return of the createForm in a form variable:
formGroupControlswill now beform.formGroup.controlsformGroupValueswill now beform.formGroup.value
We're exposing the original formGroup object but it has been augmented on the type level by making it a TypedFormGroup<FormInterface> which provides type safety on a bunch of attributes and methods (value, valueChanges, controls, setValue, patchValue, getRawValue). See the TypedFormGroup interface in projects/ngx-sub-form/src/lib/shared/ngx-sub-form-utils.ts if you want to know more. As a result of this, we now don't need to provide formGroupControls nor formGroupValues for type safety any more.
Previously, transformToFormGroup (which is now as you guessed it toFormGroup) was taking as the first parameter obj: ControlInterface | null and as a second one defaultValues: Partial<FormInterface> | null. This was pretty annoying as you needed to define a getDefaultValues method to provide your default values. Now you simply define your default values within the formControls function on each of the form controls as you'd expect. Behind the scenes, when the component is created for the first time we make a deep copy of those default values and apply them automatically if the root form or the sub form is being updated upstream with null or undefined.
If you were previously using inheritance to set some defaults globally, for example on your root forms for the handleEmissionRate method, you cannot do that anymore and you'll need to define those on a per component basis! So if you were extending your own class, itself inheriting from a root form or a sub form, don't forget about that. We're considering passing a token through DI to be able to set some of those settings globally. But it's not done yet and give us feedback if you think it should.
For root forms, the helper DataInput has been removed. It is now by default slightly more verbose to get the input data as you have to declare a Subject and push values into it yourself (by using either a setter on your input or the ngOnChanges hook). DataInput was originally created to reduce this boilerplate but as there are plenty of libraries available to transform an input into an observable, we let the choice to either do it manually or install a library on your side to transform the input into an observable for you.
You can also have a look into our demo app located here: src/app. You'll find main and main-rewrite which are exactly the same applications but main is using the deprecated API (the one with inheritance) while main-rewrite is using the new one. As those 2 applications showcase all the features of ngx-sub-form you can easily find what you're looking for and compare both if we forgot to cover anything. Just as an FYI, we've kept both apps for now which are tested by the same E2E test suite to make sure that nothing got broken on the old API during the rewrite. When we decide to remove the old API we'll of course remove the demo implementation which is using the old API.
API
There's one function available to create all your forms: createForm.
This function takes as parameter a configuration object and returns an object ready to be used to use your form and all its new utilities. In this section we'll discover what configuration we can pass to createForm and what exactly we'll be getting back.
createForm configuration object:
| Key | Type | Optional or required | Root form | Sub form | What is it for? |
|---|---|---|---|---|---|
formType |
FormType |
Required | ✅ | ✅ | Defines the type of the form. Can either be FormType.ROOT or FormType.SUB |
disabled$ |
Observable<boolean> |
Required | ✅ | ❌ | When this observable emits true, the whole form (including the root form and all the sub forms) will be disabled |
input$ |
Observable<ControlInterface \| undefined> |
Required | ✅ | ❌ | A root form is a component in between the parent passing raw data and the form itself. This property is an observable that you must provide which will be used behind the scenes to update for you the form values |
output$ |
Subject<ControlInterface> |
Required | ✅ | ❌ | A root form is a component in between the parent passing raw data and the form itself. This property is an observable that you must provide which will be used behind the scenes to broadcast the form value to the parent when it changes |
manualSave$ |
Observable<void> |
Optional | ✅ | ❌ | By default a root form will automatically broadcast all the form updates (through the output$) as soon as there's a change. If you wish to "save" the form only when you click on a save button for example, you can create a subject on your side and pass it here. Whenever you call next on your subject, assuming the form is valid, it'll broadcast te form value to the parent (through the output$) |
outputFilterPredicate |
(currentInputValue: FormInterface, outputValue: FormInterface) => boolean |
Optional | ✅ | ❌ | The default behaviour is to compare the current transformed value of input$ with the current value of the form (deep check), and if these are equal, the value won't be passed to output$ in order to prevent the broadcast |
handleEmissionRate |
(obs$: Observable<FormInterface>) => Observable<FormInterface> |
Optional | ✅ | ❌ | If you want to control how frequently the form emits on the output$, you can customise the emission rate with this. Example: handleEmissionRate: formValue$ => formValue$.pipe(debounceTime(300)) |
Principles
As simple as forms can look when they only have a few fields, their complexity can increase quite quickly. In order to keep your code as simple as possible and isolate the different concepts, we do recommend to write forms in complete isolation from the rest of your app.
In order to do so, you can create some top level forms that we call "root forms". As one form can become bigger and bigger over time, we also help by letting you create "sub forms" (without the pain of dealing manually with a ControlValueAccessor!). Let's dig into their specifics, how they differ and how to use them.
Root forms
Root forms let you isolate a form from the rest of your app.
You can encapsulate them and (pretty much) never have to deal with patchValue or setValue to update the form nor subscribe to valueChanges to listen to the updates.
Instead, you'll be able to create a dedicated form component and pass data using an input, receive updates using an output. Just like you would with a dumb component.
Let's have a look with a very simple workflow:
- Imagine an application with a list of people and when you click on one of them you can edit the person details
- A smart component is aware of the currently selected person (our "container component")
- A root form component lets us display the data we retrieved in a form and also edit them
In this scenario, the smart component could look like the following:
@Component({
  selector: 'person-container',
  template: `
    <person-form [person]="person$ | async" (personUpdate)="personUpdate($event)"></person-form>
  `,
})
export class PersonContainer {
  public person$: Observable<Person> = this.personService.person$;

  constructor(private personService: PersonService) {}

  public personUpdate(person: Person): void {
    this.personService.update(person);
  }
}
This component is only responsible to get the correct data and manage updates (if any). It completely delegates to the root form:
- How the data will be displayed to the user as a form
- How the user will interact with them
Now let's talk about the actual root form:
@Component({
  selector: 'person-form',
  template: `
    <form [formGroup]="form.formGroup">
      <input type="text" [formControlName]="form.formControlNames.firstName" />
      <input type="text" [formControlName]="form.formControlNames.lastName" />
      <address-control [formControlName]="form.formControlNames.address"></address-control>
    </form>
  `,
})
export class PersonForm {
  private input$: Subject<Person | undefined> = new Subject();
  @Input() set person(person: Person | undefined) {
    this.input$.next(person);
  }

  private disabled$: Subject<boolean> = new Subject();
  @Input() set disabled(value: boolean | undefined) {
    this.disabled$.next(!!value);
  }

  @Output() personUpdate: Subject<Person> = new Subject();

  public form = createForm<Person>(this, {
    formType: FormType.ROOT,
    disabled$: this.disabled$,
    input$: this.input$,
    output$: this.personUpdate,
    formControls: {
      id: new FormControl(null, Validators.required),
      firstName: new FormControl(null, Validators.required),
      lastName: new FormControl(null, Validators.required),
      address: new FormControl(null, Validators.required),
    },
  });
}
We'll go through the example above bit by bit.
public form = createForm<Person>(this, {
  formType: FormType.ROOT,
  disabled$: this.disabled$,
  input$: this.input$,
  output$: this.personUpdate,
  formControls: {
    id: new FormControl(null, Validators.required),
    firstName: new FormControl(null, Validators.required),
    lastName: new FormControl(null, Validators.required),
    address: new FormControl(null, Validators.required),
  },
});
This is what we provide to create a form with ngx-sub-form:
- A type (either
FormType.ROOTorFormType.SUB) - A
disabled$stream to know whether we should disable the whole form or not (including all the sub forms as well) - An
input$stream which is the data we'll use to update the form - An
output$stream, which would usually be ourEventEmitterso that a parent component can listen to the form update through an output - The
formControls, which is exactly what you'd pass when creating aFormGroup
One thing to note: The createForm function takes a generic which will let you type our form. In this case, if you forgot to pass a property of the form in the formControls it'd be caught at build time by Typescript.
private input$: Subject<Person | undefined> = new Subject();
@Input() set person(person: Person | undefined) {
  this.input$.next(person);
}

private disabled$: Subject<boolean> = new Subject();
@Input() set disabled(value: boolean | undefined) {
  this.disabled$.next(!!value);
}
This is simply a way of binding an input to an observable. We do this because the createForm function requires us to pass an input$ stream and a disabled$ one. Hopefully Angular lets us one day access inputs as observables natively. In the meantime if you want to reduce this boilerplate even further, you can search on NPM for libraries which are doing this already. It's not as good as what Angular could do if it was built in, but it's still useful.
@Output() personUpdate: Subject<Person> = new Subject();
This is an Output. It could be an EventEmitter if you prefer a "classic" way of creating an output but really all we need is a Subject so that internally, the createForm function is able to push the form value whenever it's been updated.
Finally, our template:
<form [formGroup]="form.formGroup">
  <input type="text" [formControlName]="form.formControlNames.firstName" />
  <input type="text" [formControlName]="form.formControlNames.lastName" />
  <address-control [formControlName]="form.formControlNames.address"></address-control>
</form>
Our createForm function will return an object of type NgxRootForm. It means we'll then have access to the following properties:
formGroup: TheFormGroupinstance with augmented capacity for type safety. While at runtime this object is really the form group itself, it is now defined as aTypedFormGroup<FormInterface>which provides type safety on a bunch of attributes and methods (value,valueChanges,controls,setValue,patchValue,getRawValue). If you want to know more about theTypedFormGroupinterface, have a look inprojects/ngx-sub-form/src/lib/shared/ngx-sub-form-utils.tsformControlNames: A typed object containing our form control names. The advantage of using this instead of a simple string is in case you ever update the type passed as the generic of the form (through a refactor or a change in the API upstream, etc). If you remove or update an existing property and forget to update the template, Typescript will catch the error (assuming you're using AoT which is the case by default)formGroupErrors: An object holding all the errors in the form. Bonus point: It also includes all the nested errors from the sub forms!controlValue$: If you want to listen to the form value, just useform.formGroup.valueChanges. But keep in mind that it will not be triggered when the form is being updated by the parent ⚠️. It'll only be triggered when the form is changed locally. If you want to know what's the latest form value from either the parent OR the local changes, you should useform.controlValue$insteadcreateFormArrayControl: We'll cover this one in the remap section, after the sub forms
Sub forms
When you've got a form represented by an object containing not one level of info but multiple ones (like a person which has an address, the address contains itself multiple fields), you should create a sub form to manage the address in isolation.
This is great for a couple of reasons:
- You can break down the complexity of your forms into smaller components
- You can reuse sub forms into other sub forms and root forms. It becomes easy to compose different bits of sub forms to create a bigger one
Here's a full example:
@Component({
  selector: 'address-control',
  template: `
    <div [formGroup]="form.formGroup">
      <input type="text" [formControlName]="form.formControlNames.street" />
      <input type="text" [formControlName]="form.formControlNames.city" />
      <input type="text" [formControlName]="form.formControlNames.state" />
      <input type="number" [formControlName]="form.formControlNames.zipCode" />
    </div>
  `,
  providers: subformComponentProviders(PersonForm),
})
export class PersonForm {
  public form = createForm<Address>(this, {
    formType: FormType.SUB,
    formControls: {
      street: new FormControl(null, Validators.required),
      city: new FormControl(null, Validators.required),
      state: new FormControl(null, Validators.required),
      zipCode: new FormControl(null, Validators.required),
    },
  });
}
A sub form looks very much like a root form but with an API that is even simpler.
When you call the createForm function, start by setting the formType to FormType.SUB and then define your formControls.
One important thing to note:
providers: subformComponentProviders(PersonForm);
subformComponentProviders is only here to help reduce the number of lines needed for each sub form component. It returns the following providers:
return [
  {
    provide: NG_VALUE_ACCESSOR,
    useExisting: component,
    multi: true,
  },
  {
    provide: NG_VALIDATORS,
    useExisting: component,
    multi: true,
  },
];
Behind the scenes those providers are allowing us to have a component considered as a ControlValueAccessor.
If you've ever created a ControlValueAccessor yourself, you can probably appreciate the amount of boilerplate ngx-sub-form is removing while adding features on top of it.
Just like the root form, the createForm function will return an object containing the following:
formGroupformControlNamesformGroupErrorscreateFormArrayControlcontrolValue$
As they're exactly the same as the ones in the root form we're not going to go over them again, feel free to check the previous section.
Remap
Sometimes a given data structure may not match the one you'd like to have internally for a form. When that's the case, ngx-sub-form offers 2 functions to:
- Take the input value and remap it to match the shape expected by the form
- Take the form value and remap it to match the shape expected as the output
Here are the 2 interfaces:
toFormGroup: (obj: ControlInterface) => FormInterface;fromFormGroup: (formValue: FormInterface) => ControlInterface;
Example of a remap could be getting a date object that you want to convert to an ISO string date before passing that value to a date picker and before broadcasting that value back to the parent, convert it back to a date. Or vice versa.
A really interesting use case is to deal with polymorphic values. If we take the example of our live demo: https://cloudnc.github.io/ngx-sub-form we've got src/app/main-rewrite/listing/listing-form/listing-form.component.ts. This form can receive either a vehicle or a droid. While polymorphism works great on typescript side, when it comes to templates... It's an other story! The best way is to have 2 sub components, which will handle 1 and 1 thing: Either a vehicle or a droid. And in the template use an ngIf or an ngSwitch to dynamically create the expected sub form.
That said, to be able to switch on a value, we need to know that value: A discriminator. It'll let us know what's the type of our current object really easily, without having to create a type guard for example. And a remap is a perfect candidate for this. If you want a full example please have a look to the listing-form.component.ts (path shown above).
Dealing with arrays
When your data structure contains one or more arrays, you may want to simply display the values in the view but chances are you want to bind them to the form.
In that case, working with a FormArray is the right way to go and for that, we will take advantage of the remap principles explained in the previous section.
If you have custom validations to set on the form controls, you can implement the createFormArrayControl function, which gives the library a hook with which to construct new form controls for the form array with the correct validators applied.
Its definition is the following:
createFormArrayControl(key, value) => FormControl;
Where key is a key of your main form and value, its associated value.
To see a complete example please refer to src/app/main-rewrite/listing/listing-form/vehicle-listing/crew-members/crew-members.component.ts and its html part.
Contribution
Please, feel free to contribute to ngx-sub-form.
We've done our best to come up with a solution that helped us and our own needs when dealing with forms. But we might have forgotten some use cases that might be worth implementing in the core or the lib rather than on every project.
Remember that contributing doesn't necessarily mean to make a pull request, you can raise an issue, edit the documentation (readme), etc.
Tell us about your experience with ngx-sub-form
We'd love to know more about who's using ngx-sub-form in production and on what kind of project! We've created an issue where everyone can share more about their experience.