README


An interactive CLI automation tool 🛠️ for creating react.js and next.js projects most fast and efficiently. ⚛️
About ℹ️
ReexJs CLI is an interactive CLI that automates the process of creating a React / Next App. Usually developers we spent a lot of time installing dependencies, creating folders, etc., before having our initial configuration and start working on the application.
The goal of ReexJs CLI It is that we can start working on our application without worrying about the initial configuration.
Features 🎉
- Create a react.js or next.js app. ⚛️
- Choose from commonly used folders (assets, components, hooks, services, utils, e.t.c.) to create.
- Or create folders with custom names.📂
- Setup routing with user defined routes if you choose react.js.
- Or create pages for nextjs.
- Add supports popularly used CSS preprocessor SASS! 👓
- And installs dependencies and dev dependencies.
Requirements 📝
- Node.js installed on your system.
- An active internet connection for CLI to work.
Installation 🚀
From your terminal run:
# install the package with NPM
$ npx reexjs-cli
# or install it with YARN
$ yarn reexjs-cli
Documentation 📘
ReexJs CLI installs reexjs-cli command in your system. To run the tool, you need to invoke this command from your terminal:
# if you install it globally
$ reexjs-cli
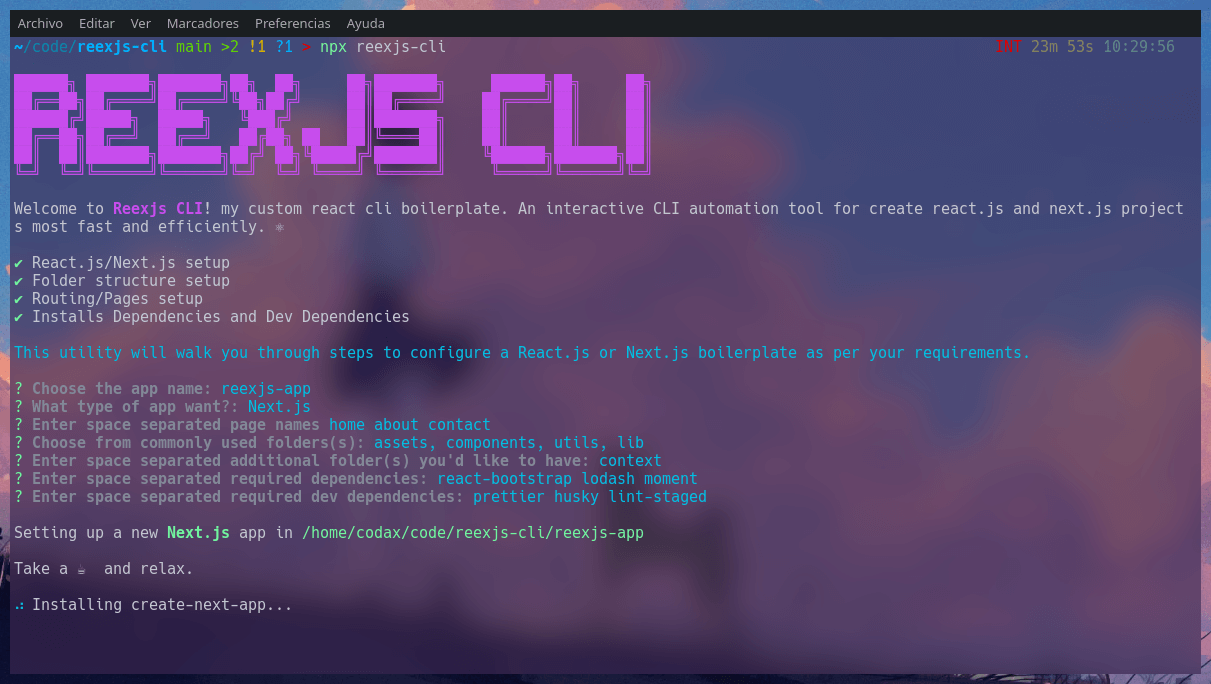
As soon as run the command you are greeted by the CLI and you must choose between the options, the most approached your desired configuration.
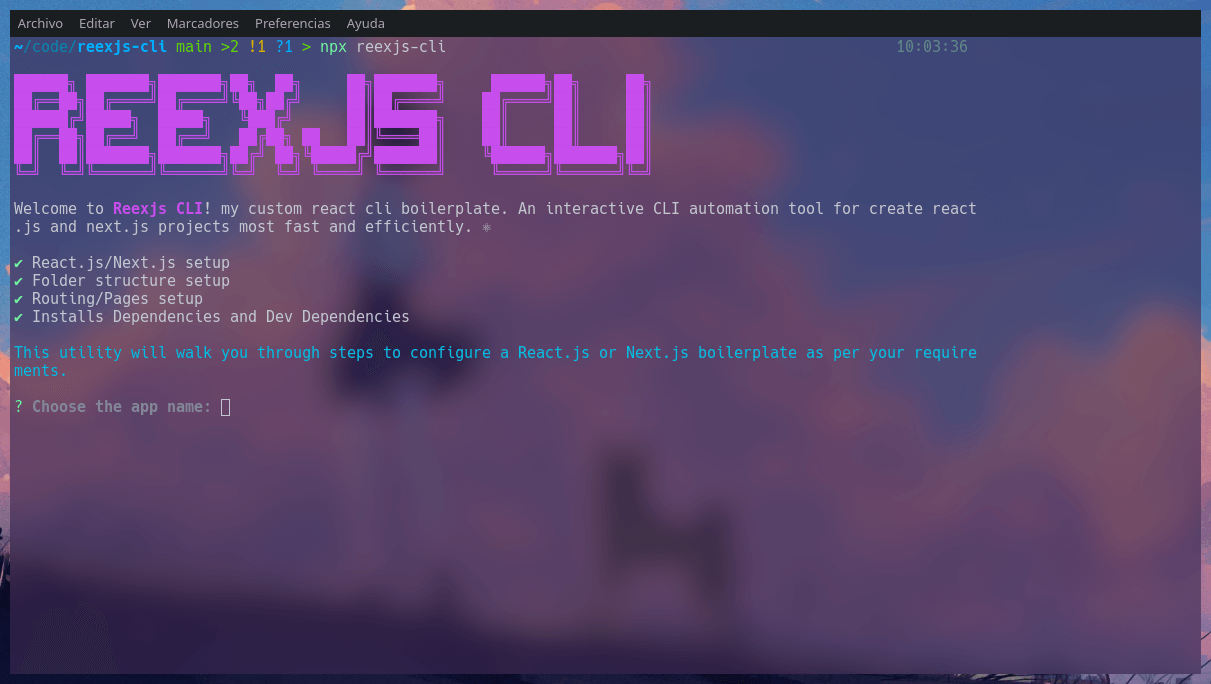
Then you have to answer some questions to configure your react.js or next.js app
Config ⚙️
Depending on the fact that Framework is chosen, different questions will be asked:
App Name:
Enter your app name. By default it fallbacks to reexjs-app.
✅ Valid App Names:- my-app
- onl1n3
- one-2-three
❌ Invalid App Names:
- My-App
- Onl1n3
- One-2-Three
Framework:
Choose the Framework of your application. Next.js or React.js.Pages Names: (Next.Js)
Enter space separated pages for next.js application.React Routing: (React.Js)
Choose if react routes is needed. Yes or No.
If required, enter space separated routes names.✅ Valid Route Names:
- my-route
- one-two-three
❌ Invalid Route Names:
- My-Route:
- one-2-three
- some-route/
- some.route
- some?route
Create Folders:
Predefined:
- You can choose from commonly use folders to create: assets, components, utils, lib.
Custom:
- You can enter space separated folders. The conventions would be same as routes in react routing. E.g.
context hooks
- You can enter space separated folders. The conventions would be same as routes in react routing. E.g.
Style scripting:
Choose if you want use SASS preprocessor in your styles. SCSS, SASS or CSS.Dependencies: (
npm i <dependencies>)
You can enter space separated dependencies. The conventions would be same as routes in react routing. E.g.react-bootstrap lodash moment. This script run the codeDev Dependencies: (
npm i -D <devDependencies>)
You can enter separated dev dependencies. The conventions would be same as routes in react routing. E.g.prettier husky lint-staged.
Examples 🤖
npx reexjs-cli. Run reexjs normally.npx reexjs-cli -nRun reexjs with next default configuration.npx reexjs-cli -rRun reexjs with react default configuration.
TODOs ✅
- Get notification every time an update is available. 🔔
- Choose JavaScript and TypeScript. 🔥
- Choose preferred export type: named or default. 🤔
- Add Redux/MobX/useContext state management setup. ⚙️
- Style your app EXACTLY Like Google. 😎
License
ReexJs CLI is licensed under the terms of MIT
Built with ❤️ by Codax.