README
Repeater
📼 Record browser events as visual test case.

Introduction
There're several pain points testing large web apps:
- It's hard to write test cases for complex user operations.
- It's hard to add test support for existing projects.
- It's hard to ensure the final UI renders correctly.
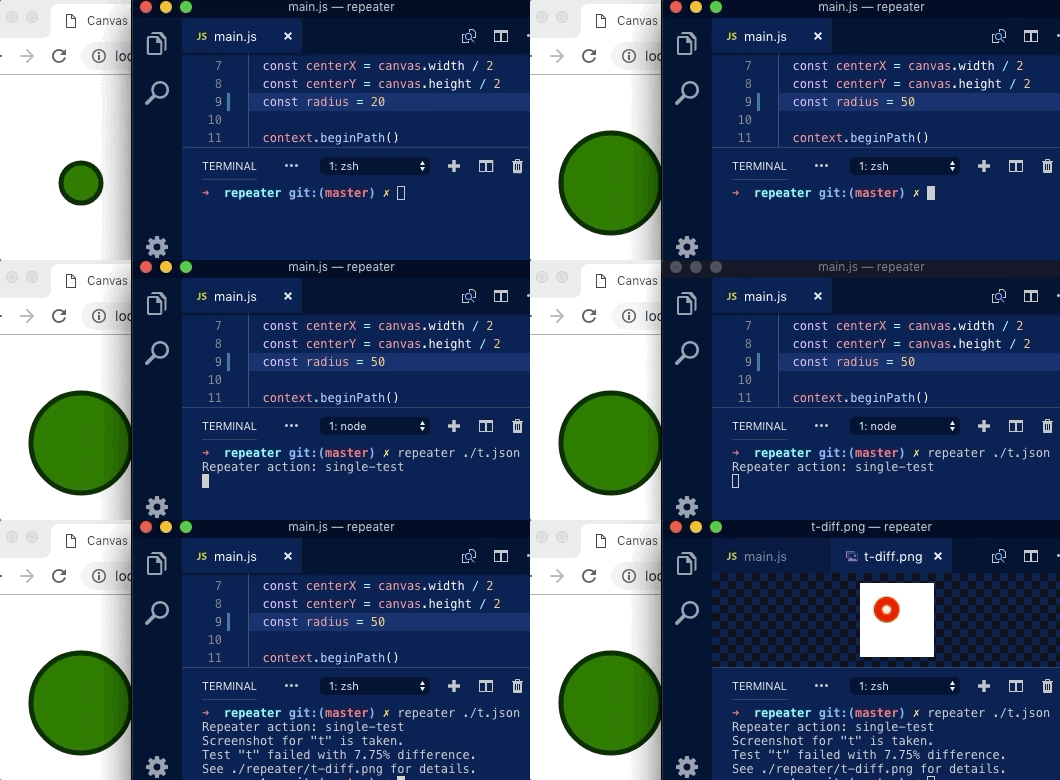
But, it's always trivial to "run test by yourself", what if we simply automate this process? Imagine this happy path:
- Play around in your app, recording all user events (mouse/keyboard...) in the background.
- Take screenshot image for final UI state.
- Use headless browser to replay the events recorded, simply compare the screenshot as test result.
With this idea we invent Repeater, enabling a fresh way adding test cases. Core features:
- Non-aggressive user events recording in browser, with a customizable events stream filter.
- Batch testing based on image diff, which can be accurate to pixels. Image is more readable then complete DOM snapshot, and even smaller!
- Opt-in passive mode, allowing you to make screenshots via API.
- Works out of the box. We use your installed Chrome as host environment. No native dependencies, no binary bundles.
- Automation ready. Repeater supports configurable resources pool for advanced usage in CI environment.
Usage
Install Chrome Extension or NPM package:
npm install repeater.js
The usage of Repeater mainly contains two parts: collecting user events, and replaying tests.
Record Events
To record events in existing project, just following these steps:
- Open Repeater DevTool in your test page, click
ONto enable recording. - Play around in the test page.
- Click
Copy Logto copy the events JSON, orScreenshotto save screenshot file.
Screenshots are not required to be manually saved. You can save the logs and use
repeater --update, saving screenshot automatically.
Then you can manage the test cases in this manner:
some/test
├── foo.json
├── foo.png
├── bar.json
├── bar.png
├── baz.json
└── baz.png
Repeater provides some opt-in helpers for more efficient recording. In the test page, you can import Repeater's helpers:
import { initHelpers } from 'repeater.js'

initHelpers()
Then to copy log, you can simply open deverloper tool and run copyLog() in the console.
Replay Tests
To verify one test case, use Repeater CLI:
npx repeater path/to/log.json
This will take and compare screenshot for you via Puppeteer. Or else you can batching tests:
npx repeater path/to/tests
In fact for each log, you don't have to save its screenshot manually. You can add or update existing screenshots with the --update flag:
npx repeater path/to/log.json --update
Passive Mode
By default Repeater "actively" push events on replaying, and it doesn't need to be integrated in your code. However, if you simply want to ensure "static" render result, or if you don't have to perform complex operations in the page, we provide a passive mode for these tasks.
In passive mode, Repeater "passively" listens for your invoking to its API, without triggering events. This mode doesn't require the browser extension. To get started, You can add a JSON test file in this format:
{
  "viewport": {
    "width": 400,
    "height": 400
  },
  "url": "http://localhost:8080/some-test",
  "mode": "passive"
}
In the test page, use Repeater's API for screenshot:
import { screenshot } from 'repeater.js'

// Render your canvas or so.
// ...

// Tell Puppeteer to take the screenshot.
screenshot()
Then you can use same CLI managing test cases. On repeater command runs, screenshot will be taken when screenshot() invokes.
API
Usage: repeater <location> [options]
Options:
  -V, --version                  output the version number
  --update                       update existing screenshots
  --concurrency [concurrency]    test runner concurrency (default: 4)
  --pool-timeout [timeout]       browser pool timeout in seconds (default: 60)
  --headless                     hide browser window
  --executable-path [path]       chrome path
  --diff-threshold [percentage]  for image diff, 0 to 100 (default: 0.5)
  -h, --help                     output usage information
Test Coverage
For now to collect coverage data, you'll need to follow these steps in your project briefly:
- Add
babel-plugin-istanbulandnyc. - Run tests via Repeater.
- Run
npx nyc report --reporter=htmlfor coverage report.
Repeater will write coverage data into
./.nyc_outputas long as coverage data exists.
Best Practises
Several points for better Repeater integration:
- Build a "static" demo page for test, so that you can always get same render result with same inputs.
- If multi test cases requires multi setup ways, you can simply identify them in demo page's URL and do the automation. Don't Repeat Yourself.
- Use small browser window for screenshot. Smaller window size leads to significantly smaller screenshot size, and more sensitive image diff.
- Use similar OS environment for testing. Render results among operating systems can vary, say text.
- Add
./.repeaterto.gitignore.
Caveats
Wheel Events
Chrome 51 no longer scrolls when the user-defined wheel event is dispatched. Per the DOM spec (3.10) events are not action-causers, but notifications of an action already-in-process. Chrome was aware of this defect and has not finally fixed it.
External States
UI is full of side effects. Repeater only records input events as data source, so you'll need to ensure external state can be stable. And there're also some limitations. For example:
- Network state. If HTTP request returns different result, that can be a problem.
- Clipboard state. Pasting from OS clipboard is unreliable.
- IME state. Text inputs with IME may not be replayed correctly.
License
MIT
Code with ❤️ by Undefined FE team, Gaoding Inc. 2019.