README
tachometer 

tachometer is a tool for running benchmarks in web browsers. It uses repeated sampling and statistics to reliably identify even tiny differences in runtime.
Install | Usage | Why? | Example | Features | Sampling | Measurement modes | Interpreting results | Swap NPM dependencies | JavaScript module imports | Browsers | Performance traces | Remote control | Config file | CLI usage
Install
npm i tachometer
Usage
npx tachometer bench1.html [bench2.html ...]
Why?
Even if you run the same JavaScript, on the same browser, on the same machine, on the same day, you'll still get a different result every time. But if you take enough repeated samples and apply the right statistics, you can reliably identify even tiny differences in runtime.
Example
Let's test two approaches for adding elements to a page. First ceate two HTML files:
inner.html
<script type="module">
  import * as bench from '/bench.js';
  bench.start();
  for (let i = 0; i < 100; i++) {
    document.body.innerHTML += '<button></button>';
  }
  bench.stop();
</script>
append.html
<script type="module">
  import * as bench from '/bench.js';
  bench.start();
  for (let i = 0; i < 100; i++) {
    document.body.append(document.createElement('button'));
  }
  bench.stop();
</script>
Now run tachometer:
npx tachometer append.html inner.html
Tachometer opens Chrome and loads each HTML file, measuring the time between
bench.start() and bench.stop(). It round-robins between the two files,
running each at least 50 times.
[==============================================------------] 79/100 chrome append.html
After a few seconds, the results are ready:
┌─────────────┬─────────────────┬─────────────────┬─────────────────┐
│ Benchmark   │        Avg time │   vs inner.html │  vs append.html │
├─────────────┼─────────────────┼─────────────────┼─────────────────┤
│ inner.html  │ 7.23ms - 8.54ms │                 │          slower │
│             │                 │        -        │    851% - 1091% │
│             │                 │                 │ 6.49ms - 7.80ms │
├─────────────┼─────────────────┼─────────────────┼─────────────────┤
│ append.html │ 0.68ms - 0.79ms │          faster │                 │
│             │                 │       90% - 92% │        -        │
│             │                 │ 6.49ms - 7.80ms │                 │
└─────────────┴─────────────────┴─────────────────┴─────────────────┘
This tells us that using the document.body.append approach instead of the
innerHTML approach would be between 90% and 92% faster on average. The ranges
tachometer reports are 95% confidence intervals for the percent change from one
benchmark to another. See Interpreting results for more
information.
Features
Measure your own specific timings with the
/bench.jsmodule, by setting the window.tachometerResult global (or by polling an arbitrary JS expression), or measure First Contentful Paint on any local or remote URL.Compare benchmarks by round-robin between two or more files, URLs, URL query string parameters, or browsers, to measure which is faster or slower, and by how much, with statistical significance.
Swap dependency versions of any NPM package you depend on, to compare published versions, remote GitHub branches, or local git repos.
Automatically sample until we have enough precision to answer the question you are asking.
Remote control browsers running on different machines using remote WebDriver.
Sampling
Minimum sample size
By default, a minimum of 50 samples are taken from each benchmark. You
can change the minimum sample size with the --sample-size flag or the
sampleSize JSON config option.
Auto sample
After the initial 50 samples, tachometer will continue taking samples until there is a clear statistically significant difference between all benchmarks, for up to 3 minutes.
You can change this duration with the --timeout flag or the timeout JSON
config option, measured in minutes. Set --timeout=0 to disable auto sampling
entirely. Set --timeout=60 to sample for up to an hour.
Auto sample conditions
You can also configure which statistical conditions tachometer should check for when deciding when to stop auto sampling by configuring auto sample conditions.
To set auto sample conditions from the command-line, use the
--auto-sample-conditions flag with a comma-delimited list:
--auto-sample-conditions=0%,10%
To set auto sample conditions from a JSON config file, use the
autoSampleConditions property with an array of strings (including if there is
only one condition):
{
  "autoSampleConditions": ["0%", "10%"]
}
An auto sample condition can be thought of as a point of interest on the number-line of either absolute milliseconds, or relative percent change. By setting a condition, you are asking tachometer to try to shrink the confidence interval until it is unambiguously placed on one side or the other of that condition.
| Example condition | Question |
|---|---|
0% |
Is A faster or slower than B at all? (The default) |
10% |
Is A faster or slower than B by at least 10%? |
+10% |
Is A slower than B by at least 10%? |
-10% |
Is A faster than B by at least 10%? |
-10%, +10% |
(Same as 10%) |
0%, 10%, 100% |
Is A at all, a little, or a lot slower or faster than B? |
0.5ms |
Is A faster or slower than B by at least 0.5 milliseconds? |
In the following example, we have set --auto-sample-conditions=10%, meaning we
are interested in knowing whether A differs from B by at least 10% in either
direction. The sample size automatically increases until the confidence interval
is narrow enough to place the estimated difference squarely on one side or the
other of both conditions.
      <------------------------------->     n=50  X -10% X +10%
                <------------------>        n=100 ✔️ -10% X +10%
                    <----->                 n=200 ✔️ -10% ✔️ +10%

  |---------|---------|---------|---------| difference in runtime
-20%      -10%        0       +10%      +20%

n    = sample size
<--> = confidence interval for percent difference of mean runtimes
✔️    = resolved condition
X    = unresolved condition
In this example, by n=50 we are not sure whether A is faster or slower than B
by more than 10%. By n=100 we have ruled out that B is faster than A by more
than 10%, but we're still not sure if it's slower by more than 10%. By n=200
we have also ruled out that B is slower than A by more than 10%, so we stop
sampling. Note that we still don't know which is absolutely faster, we just
know that whatever the difference is, it is neither faster nor slower than 10%
(and if we did want to know, we could add 0 to our conditions).
Note that, if the actual difference is very close to a condition, then it is likely that the condition will never be met, and the timeout will expire.
Measurement modes
Tachometer supports four modes of time interval measurements, controlled with
the measurement config file property, or the --measure flag.
If measurement is an array, then all of the given measurements will be
retrieved from each page load. Each measurement from a page is treated as its
own benchmark.
A measurement can specify a name property that will be used to display its
results.
Performance API
Retrieve a measure, mark, or paint timing from the
performance.getEntriesByName
API. Note this mode can only be used with a config file.
For example, in your benchmark:
performance.mark('foo-start');
// Do some work ...
performance.mark('foo-stop');
performance.measure('foo', 'foo-start', 'foo-stop');
And in your config file:
"benchmarks": [
  {
    "measurement": {
      "mode": "performance",
      "entryName": "foo"
    }
  }
]
The following performance entry types are supported:
measure: Retrieve thedurationof a user-defined interval between two marks. Use for measuring the timing of a specific chunk of your code.mark: Retrieve thestartTimeof a user-defined instant. Use for measuring the time between initial page navigation and a specific point in your code.paint: Retrieve thestartTimeof a built-in paint measurement (e.g.first-contentful-paint).
Callback
By default with local (non-URL) benchmarks, or when the --measure flag is set
to callback, your page is responsible for calling the start() and
stop() functions from the /bench.js module. This mode is appropriate for
micro benchmarks, or any other kind of situation where you want full control
over the beginning and end times.
Global result
When the --measure flag is set to global, then you can assign an arbitrary
millisecond result to the window.tachometerResult global. In this mode,
tachometer will poll until it finds a result assigned here.
const start = performance.now();
for (const i = 0; i < 1000; i++) {}
window.tachometerResult = performance.now() - start;
This mode is appropriate when you need full control of the measured time, or when you can't use callback mode because you are not using tachometer's built-in server.
Alternatively, to poll an arbitrary JS expression in global measurement mode
(rather than window.tachometerResult), set --measurement-expression to the
JS expression to poll. This option is useful for scenarios where you cannot
easily modify the code under test to assign to window.tachometerResult but
are otherwise able to extract a measurement from the page using JavaScript.
First Contentful Paint (FCP)
When the --measure flag is set to fcp, or when the benchmark is an
external URL, then the First Contentful Paint
(FCP)
time will be automatically extracted from your page using the Performance
Timeline
API.
This interval begins at initial navigation, and ends when the browser first
renders any DOM content. Currently, only Chrome supports the
first-contentful-paint
performance timeline entry. In this mode, calling the start() and stop()
functions is not required, and has no effect.
Interpreting results
Average runtime
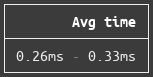
The first column of output is the average runtime of the benchmark. This is a 95% confidence interval for the number of milliseconds that elapsed during the benchmark. When you run only one benchmark, this is the only output.
Difference table
When you run multiple benchmarks together, you'll get an NxN table summarizing all of the differences in runtimes, both in absolute and relative terms (percent-change).
In this example screenshot we're comparing for loops, each running with a
different number of iterations (1, 1000, 1001, and 3000):
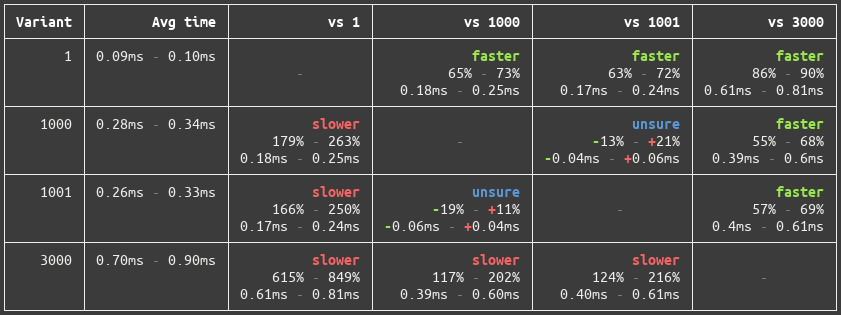
This table tells us:
1 iteration was between 65% and 73% faster than 1000 iterations.
1000 iterations was between 179% and 263% slower than 1 iteration. Note that the difference between 1-vs-1000 and 1000-vs-1 is the choice of which runtime is used as the reference in the percent-change calculation, where the reference runtime comes from the column labeled "vs X".
The difference between 1000 and 1001 iterations was ambiguous. We can't tell which is faster, because the difference was too small. 1000 iterations could be as much as 13% faster, or as much as 21% slower, than 1001 iterations.
Confidence intervals
Loosely speaking, a confidence interval is a range of plausible values for a parameter like runtime, and the confidence level (which tachometer always fixes to 95%) corresponds to the degree of confidence we have that interval contains the true value of that parameter. See Wikipedia for more information about confidence intervals.
    <------------->   Wider confidence interval
                      High variance and/or low sample size

         <--->   Narrower confidence interval
                 Low variance and/or high sample size

 |---------|---------|---------|---------|
-1%      -0.5%       0%      +0.5%      +1%
The way tachometer shrinks confidence intervals is by increasing the sample size. The central limit theorem means that, even when we have high variance data, and even when that data is not normally distributed, as we take more and more samples, we'll be able to calculate a more and more precise estimate of the true mean of the data.
Swap NPM dependencies
Tachometer has specialized support for swapping in custom versions of any NPM
dependency in your package.json. This can be used to compare the same
benchmark against one or more versions of a library it depends on.
Use the benchmarks.packageVersions JSON config property to specify the version
to swap in, like this:
{
  "benchmarks": [
    {
      "name": "my-benchmark",
      "url": "my-benchmark.html",
      "packageVersions": {
        "label": "my-label",
        "dependencies": {
          "my-package": "github:MyOrg/my-repo#my-branch"
        }
      }
    }
  ]
}
The version for a dependency can be any of the following:
Any version range supported by NPM, including semver ranges, git repos, and local paths. See the NPM documentation for more details.
For monorepos, or other git repos where the
package.jsonis not located at the root of the repository (which is required for NPM's git install function), you can use an advanced git configuration object (schema) in place of the NPM version string, e.g.:{ "benchmarks": [ { "name": "my-benchmark", "url": "my-benchmark.html", "packageVersions": { "label": "my-label", "dependencies": { "my-package": { "kind": "git", "repo": "git@github.com:MyOrg/my-repo.git", "ref": "my-branch", "subdir": "packages/my-package", "setupCommands": ["npm install", "npm run build"] } } } } ] }
You can also use the --package-version flag to specify a version to swap in
from the command-line, with format [label=]package@version. Note that the
advanced git install configuration is not supported from the commandline:
tach mybench.html \
  --package-version=my-package@1.0.0 \
  --package-version=my-label=my-package@github:MyOrg/my-repo#my-branch
When you specify a dependency to swap, the following happens:
The
package.jsonfile closest to your benchmark HTML file is found.A copy of this
package.json, with the new dependency version swapped in, is written to the system's temp directory (use--npm-install-dirto change this location), andnpm installis run in that directory.A separate server is started for each custom NPM installation, where any request for the benchmark's
node_modules/directory is served from that location.
NOTE: Tachometer will re-use NPM install directories as long as the dependencies you specified haven't changed, and the version of tachometer used to install it is the same. To always do a fresh
npm install, set the--force-clean-npm-installflag.
JavaScript module imports
JavaScript module imports with bare module specifiers (e.g. import {foo} from 'mylib';) will be automatically transformed to browser-compatible path
imports using Node-style module resolution (e.g.import {foo} from './node_modules/mylib/index.js';).
This feature can be disabled with the --resolve-bare-modules=false flag, or
the resolveBareModules: false JSON config file property.
Browsers
| Browser | Headless | FCP |
|---|---|---|
| chrome | yes | yes |
| firefox | yes | no |
| safari | no | no |
| edge | no | no |
| ie | no | no |
Webdriver Plugins
Tachometer comes with WebDriver plugins for Chrome, Safari, Firefox, and Internet Explorer.
For Edge, follow the Microsoft WebDriver installation documentation.
If you encounter errors while driving IE, see the Required
Configuration
section of the WebDriver IE plugin documentation. In particular, setting "Enable
Protected Mode" so that it is consistently either enabled or disabled across all
security zones appears to resolve NoSuchSessionError errors.
On-demand dependencies
Tachometer will install WebDriver plugins for Chrome, Firefox and IE on-demand. The first time that Tachometer runs a benchmark in any of these browsers, it will install the appropriate plug-in from via NPM or Yarn if it is not already installed.
If you wish to avoid on-demand installations like this, you can install the
related packages (chromedriver, geckodriver and iedriver, respectively)
ahead of time with npm install, for example:
npm install tachometer chromedriver
In the example above, Tachometer will detect the manually installed chromedriver
package and will skip any attempt to install it on-demand later.
Headless
If supported by the browser, you can launch in headless mode by adding
"headless": true to the browser JSON config, or by appending -headless to
the browser name when using the CLI flag (e.g. --browser=chrome-headless).
Binary path and arguments
WebDriver automatically finds the location of the browser binary, and launches it with a default set of arguments.
To customize the binary path (Chrome and Firefox only), use the binary
property in the browser JSON config. For example, to launch Chrome Canary from
its standard location on macOS:
{
  "name": "chrome",
  "binary": "/Applications/Google Chrome Canary.app/Contents/MacOS/Google Chrome Canary"
}
To pass additional arguments to the binary (Chrome and Firefox only), use the
addArguments property in the browser JSON config. To remove one of the
arguments that WebDriver sets by default (Chrome only), use removeArguments
(see example in next section).
To configure Firefox preferences that are usually set from the about:config
page, use the preferences property in the browser JSON config.
Profiles
It is normally recommended to use the default behavior whereby a new, empty browser profile is created when the browser is launched, so that state from your personal profile (cookies, extensions, cache etc.) do not influence benchmark results.
However, in some cases it may be useful to use an existing browser profile, for example if the webpage you are benchmarking requires being signed into an account.
In Chrome and Firefox, use the profile JSON config option to specify an
existing profile to use. Other browsers do not yet support this option.
Chrome
To find your current profile location in Chrome, visit chrome://version and
look for "Profile Path".
If there is an existing Chrome process using this profile, you must first terminate it. You also need to close all open tabs, or disable the "Continue where you left off" startup setting, because tachometer does not expect to find any existing tabs.
You may also need to remove the use-mock-keychain default argument if you
encounter authentication problems.
For example, using the standard location of the default user profile on macOS:
{
  "benchmarks": [
    {
      "url": "mybench.html",
      "browser": {
        "name": "chrome",
        "profile": "/Users/<username>/Library/Application Support/Google/Chrome",
        "removeArguments": ["use-mock-keychain"]
      }
    }
  ]
}
Firefox
To find your current profile location in Firefox, visit about:support and look
for "Profile Folder" or "Profile Directory".
Note when using the profile option in Firefox, the profile directory is copied
to a temporary location.
You may encounter a no such file or directory, stat '.../lock' error, due to a
bug in selenium-webdriver. Deleting this lock file should resolve the error.
For example, using the standard location of user profiles on macOS:
{
  "benchmarks": [
    {
      "url": "mybench.html",
      "browser": {
        "name": "firefox",
        "profile": "/Users/<username>/Library/Application Support/Firefox/Profiles/<profile-name>"
      }
    }
  ]
}
Performance traces
Once you determine that something is slower or faster in comparison to something else, investigating why is natural next step. To assist in determining why, consider collecting performance traces. These traces can be used to determine what the browser is doing differently between two version of code.
When the trace option is turned on in Chromium-based browsers, each tachometer
sample will produce a JSON file that can be viewed in Chromium's about:tracing
tool. Enter about:tracing in the URL bar of Chromium, click load, and select
the json file you want to view. Check out the about:tracing doc
page to
learn more about using the trace event profiling tool.
To turn on tracing with the default configuration, add trace: true to a
Chromium browser's config object. This config turns on tracing with some
default categories enabled and puts the JSON files into
a directory called logs in your current working directory.
For example:
{
  "benchmarks": [
    {
      "name": "my-benchmark",
      "url": "my-benchmark.html",
      "browser": {
        "name": "chrome",
        "trace": true
      }
    }
  ]
}
To customize where the logs files are placed or what categories of events are
traced, pass an object to the trace config as demonstrated below. The
categories property is a list of trace categories to collect. The logDir is
the directory to store the log files to. If it is relative, it is resolved
relative to the current working directory.
{
  "benchmarks": [
    {
      "name": "my-benchmark",
      "url": "my-benchmark.html",
      "browser": {
        "name": "chrome",
        "trace": {
          "categories": ["blink", "cc", "netlog", "toplevel", "v8"],
          "logDir": "results/trace-logs"
        }
      }
    }
  ]
}
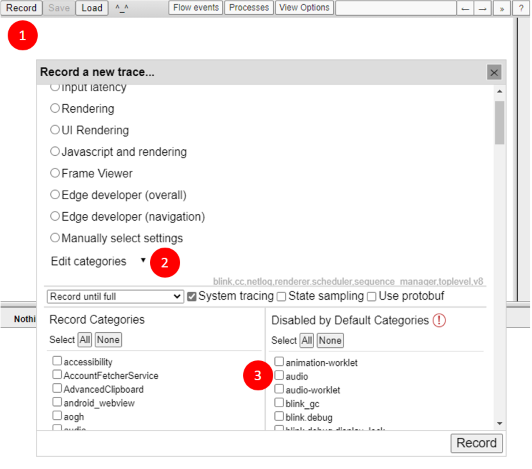
Available trace categories can be found by going to about:tracing in a
Chromium browser by entering about:tracing in the URL bar. Press "Record" in
the top right (1), then expand the "Edit categories" section (2). There, all the
categories available for tracing are listed. Note, for the "Disabled by Default
Categories", preface the name with the string disabled-by-default- when adding
it to your tachometer config. For example, to enable the disabled by default
audio category shown below (3), specify disabled-by-default-audio in your
browser.trace.categories tachometer config.
Tracing can also be enabled via command line flags. See the table at the end of the file for details.
Remote control
Tachometer can control and benchmark browsers running on remote machines by using the Standalone Selenium Server, which supports macOS, Windows, and Linux.
This may be useful if you want to develop on one platform but benchmark on another, or if you want to use a dedicated benchmarking computer for better performance isolation.
Note you will need to know the IP address of both your local and remote machine for the setup steps below. You can typically use
ipconfigon Windows,ifconfigon macOS, andipon Linux to find these addresses. You'll need to be able to initiate connections between these machines in both directions, so if you encounter problems, it's possible that there is a firewall or NAT preventing the connection.
On the remote machine:
Install a Java Development Kit (JDK) if you don't already have one.
Download the latest Standalone Selenium Server
.jarfile from seleniumhq.org.Download the driver plugins for the browsers you intend to remote control from seleniumhq.org. Note that if you download a plugin archive file, the archive contents must be extracted and placed either in the current working directory for the next command, or in a directory that is included in your
$PATHenvironment variable.Launch the Standalone Selenium Server.
java -jar selenium-server-standalone-<version>.jar
On the local machine:
Use the
--browserflag or thebrowserconfig file property with syntax<browser>@<remote-url>to tell tachometer the IP address or hostname of the remote Standalone Selenium Server to launch the browser from. Note that4444is the default port, and the/wd/hubURL suffix is required.--browser=chrome@http://my-remote-machine:4444/wd/hubUse the
--hostflag to configure the network interface address that tachometer's built-in static server will listen on (unless you are only benchmarking external URLs that do not require the static server). By default, for security, tachometer listens on127.0.0.1and will not be accessible from the remote machine unless you change this to an IP address or hostname that will be accessible from the remote machine.If needed, use the
--remote-accessible-hostflag to configure the URL that the remote browser will use when making requests to your local tachometer static server. By default this will match--host, but in some network configurations it may need to be different (e.g. if the machines are separated by a NAT).
Config file
Use the --config flag to control tachometer with a JSON configuration file.
Defaults are the same as the corresponding command-line flags.
{
  "root": "./benchmarks",
  "sampleSize": 50,
  "timeout": 3,
  "autoSampleConditions": ["0%", "1%"],
  "benchmarks": [
    {
      "name": "foo",
      "url": "foo/bar.html?baz=123",
      "browser": {
        "name": "chrome",
        "headless": true,
        "windowSize": {
          "width": 800,
          "height": 600
        }
      },
      "measure": "fcp",
      "packageVersions": {
        "label": "my-branch",
        "dependencies": {
          "mylib": "github:Polymer/mylib#my-branch"
        }
      }
    }
  ]
}
Use the expand property in a benchmark object to recursively generate multiple
variations of the same benchmark configuration. For example, to test the same
benchmark file with two different browsers, you can use expand instead of
duplicating the entire benchmark configuration:
{
  "benchmarks": [
    {
      "url": "foo/bar.html",
      "expand": [
        {
          "browser": "chrome"
        },
        {
          "browser": "firefox"
        }
      ]
    }
  ]
}
Which is equivalent to:
{
  "benchmarks": [
    {
      "url": "foo/bar.html",
      "browser": "chrome"
    },
    {
      "url": "foo/bar.html",
      "browser": "firefox"
    }
  ]
}
CLI usage
Run a benchmark from a local file:
tach foo.html
Compare a benchmark with different URL parameters:
tach foo.html?i=1 foo.html?i=2
Benchmark index.html in a directory:
tach foo/bar
Benchmark First Contentful Paint time of a remote URL:
tach http://example.com
| Flag - | Default | Description |
|---|---|---|
--help |
false |
Show documentation |
--root |
./ |
Root directory to search for benchmarks |
--host |
127.0.0.1 |
Which host to run on |
--port |
8080, 8081, ..., 0 |
Which port to run on (comma-delimited preference list, 0 for random) |
--config |
(none) | Path to JSON config file (details) |
--package-version / -p |
(none) | Specify an NPM package version to swap in (details) |
--browser / -b |
chrome |
Which browsers to launch in automatic mode, comma-delimited (chrome, firefox, safari, edge, ie) (details) |
--window-size |
1024,768 |
"width,height" in pixels of the browser windows that will be created |
--sample-size / -n |
50 |
Minimum number of times to run each benchmark (details) |
--auto-sample-conditions |
0% |
The degrees of difference to try and resolve when auto-sampling ("N%" or "Nms", comma-delimited) (details) |
--timeout |
3 |
The maximum number of minutes to spend auto-sampling (details) |
--measure |
callback |
Which time interval to measure (callback, global, fcp) (details) |
--measurement-expression |
window.tachometerResult |
JS expression to poll for on page to retrieve measurement result when measure setting is set to global |
--remote-accessible-host |
matches --host |
When using a browser over a remote WebDriver connection, the URL that those browsers should use to access the local tachometer server (details) |
--npm-install-dir |
system temp dir | Where to install custom package versions. (details) |
--force-clean-npm-install |
false |
Always do a from-scratch NPM install when using custom package versions. (details) |
--csv-file |
none | Save statistical summary to this CSV file. |
--csv-file-raw |
none | Save raw sample measurements to this CSV file. |
--json-file |
none | Save results to this JSON file. |
--manual |
false |
Don't run automatically, just show URLs and collect results |
--trace |
false |
Enable performance tracing (details) |
--trace-log-dir |
${cwd}/logs |
The directory to put tracing log files. Defaults to ${cwd}/logs. |
--trace-cat |
default categories | The tracing categories to record. Should be a string of comma-separated category names |