README


A simple kanban board where the items can be dragged and dropped from the list. This is a hybrid implementation of vue-smooth-dnd.
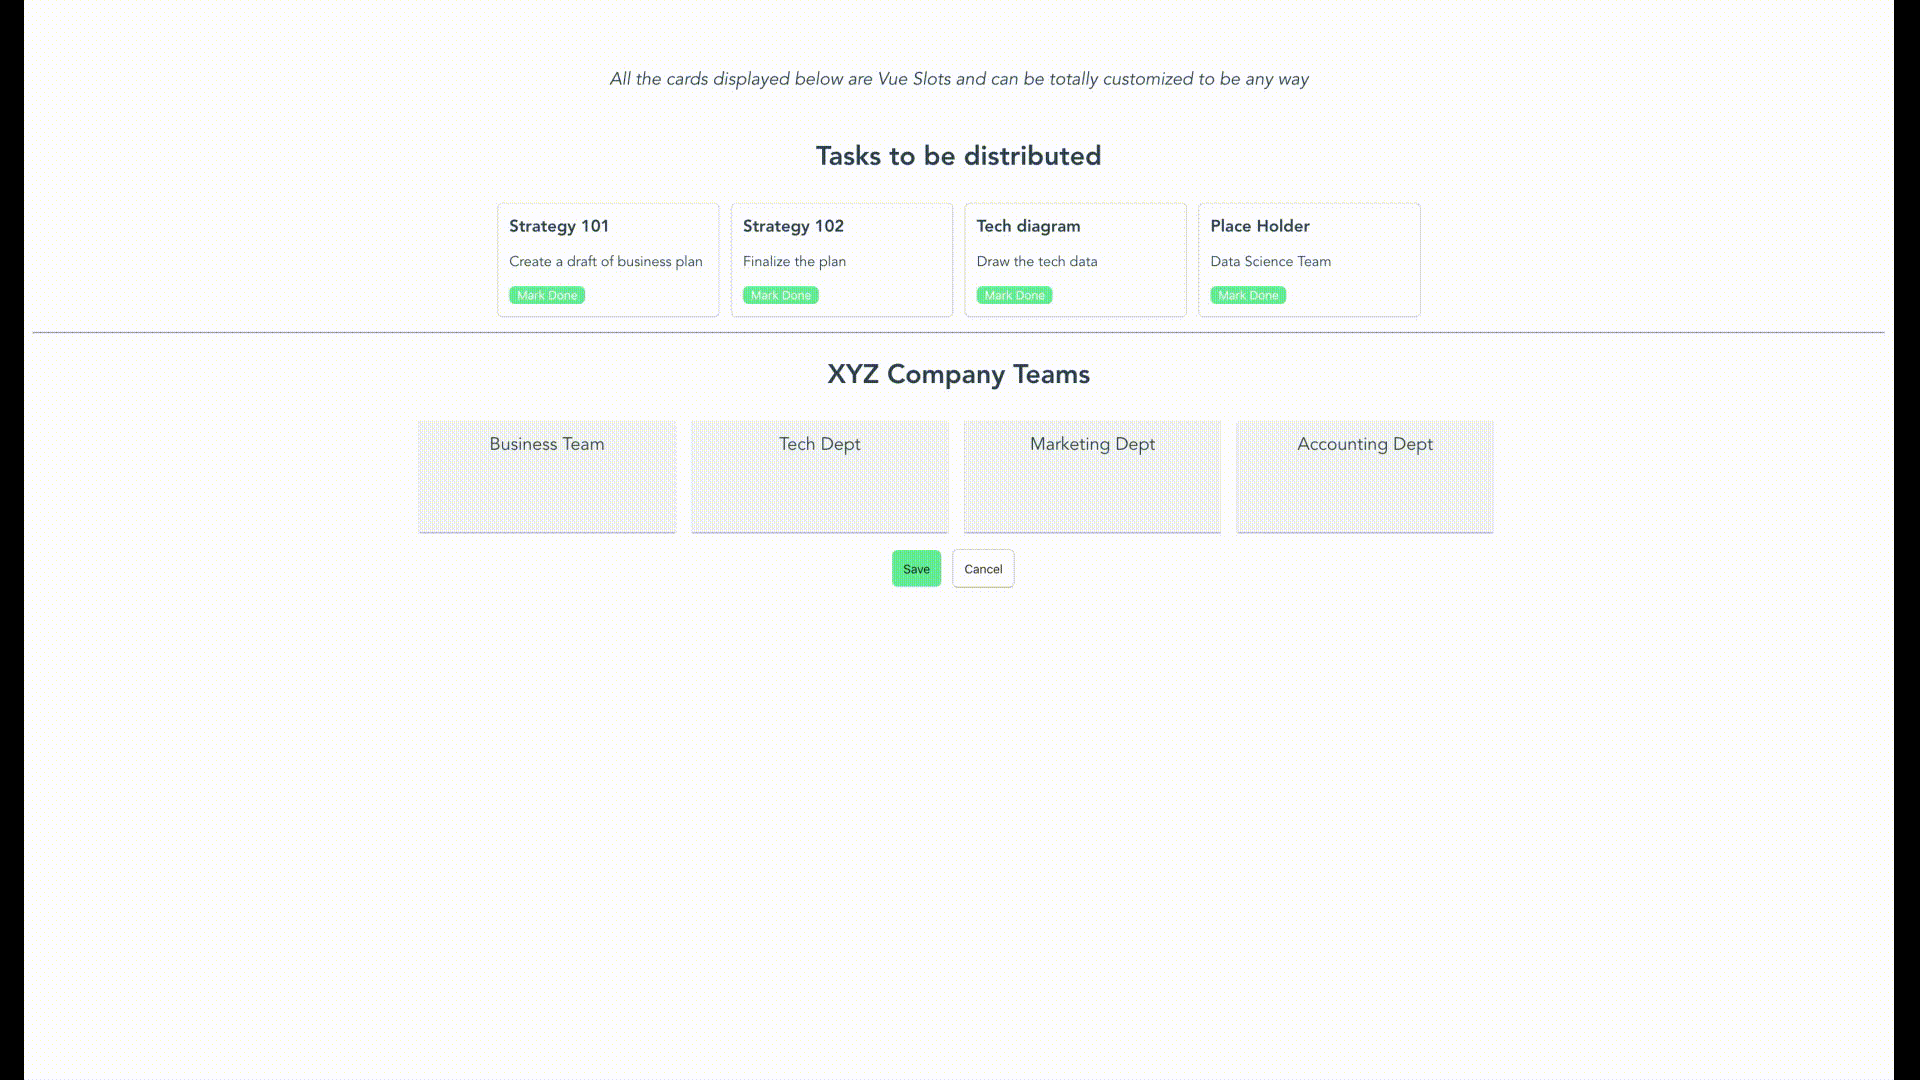
Demo
Usage
Installation
To use the vue-drag-n-drop module, you first need to install the module.
npm install vue-drag-n-drop
or
yarn add vue-drag-n-drop
Use Case
<template>
  <div id="app">
    <drag-drop
      :dropzones="dropGroups"
      :dropzonesTitle="'XYZ Company Teams'"
      :originalData="stories"
      :originalTitle="'Tasks to be distributed'"
      :inPlace="true"
      :enableSave="true"
      :enableCancel="true"
      @dropInOriginalBucket="originalBucketDropEvent"
      @dropInDestinationBucket="destinationBucketDropEvent"
      @save="save"
      @cancel="cancel"
    >
      <template #dd-card="{ cardData }">
        <custom-card
          :data="cardData"
          @done="doneMarked"
        />
      </template>
    </drag-drop>
  </div>
</template>

<script>
import DragDrop from 'vue-drag-n-drop'
import MyComponent from './MyComponent.vue'

export default {
  components: {
    DragDrop,
    MyComponent
  },
  data() {
    return {
      stories: [
        {
          title: 'Strategy 101',
          description: 'Create a draft of business plan',
          time: '3 days',
          done: false
        },
        {
          title: 'Strategy 102',
          description: 'Finalize the plan',
          time: '4 days',
          done: false
        },
        {
          title: 'Tech diagram',
          description: 'Draw the tech data',
          time: '4 days',
          done: false
        },
        {
          title: 'Place Holder',
          description: 'Data Science Team',
          time: '5 days',
          done: false
        }
      ],

      dropGroups: [
        {
          name: 'Business Team',
          children: []
        },
        {
          name: 'Tech Dept',
          children: []
        },
        {
          name: 'Marketing Dept',
          children: []
        }
      ]
    }
  },
}
</script>
MyComponent.vue
<template>
  <div class="cc-card">
    <h3>{{data.title}}</h3>
    <p>
      {{data.description}}
    </p>
    <button v-if="!data.done" class="cc-btn" @click="markDone()">
      Mark Done
    </button>
  </div>
</template>

<script>
export default {
  name: 'MyComponent',
  props: ['data'],
  methods: {
    markDone() {
      this.$emit('done', this.data);
    }
  }
}
</script>
Documentation
Instantiating the component
To put the component in your code, you can simply run import DragDrop from 'vue-drag-n-drop';. Then, use it in the code as:
<drag-drop
  :dropzones="dropGroups"
  :dropzonesTitle="'XYZ Company Teams'"
  :originalData="stories"
  :originalTitle="'Tasks to be distributed'"
/>
originalData in the above code is assumed to be a list of string. However, you can also pass in the list of custom objects like this:
[
  {
    title: 'Strategy 101',
    description: 'Create a draft of business plan',
    time: '3 days',
    done: false
  },
  {
    title: 'Strategy 102',
    description: 'Finalize the plan',
    time: '4 days',
    done: false
  }
]
When you pass your own objects instead of a list of string, you also need to provide a custom component to handle view/action of this object since you can virtually pass any kind of object.
Events
When you use the component, you can also listen to some events that happen inside the component like drag, drop, save and cancel
<drag-drop
  :dropzones="dropGroups"
  :dropzonesTitle="'XYZ Company Teams'"
  :originalData="stories"
  :originalTitle="'Tasks to be distributed'"
  @dropInOriginalBucket="originalBucketDropEvent"
  @dropInDestinationBucket="destinationBucketDropEvent"
  @save="save"
  @cancel="cancel"
/>
save - This event is triggered when you click save from inside the component. It gives back the final state of the data in corresponding buckets.
cancel - This gives you a choice on how to handle the cancellationn event.
dropInOriginalBucket - This event is emitted everytime there is a drop event for original bucket. You provides an object with startIndex, endIndex and payload.
dropInDestinationBucket - This event is emitted for each dropzone in the destination bucket. First parameter returns the dropzone name and second parameter returns the drop info startIndex, endIndex and payload.
Custom Component for list of objects
vue-drag-n-drop uses Vue Named Slots. So, the users can pass in custom component that will have access to the data for the single item. You can impolement the slots like below:
<drag-drop
  :dropzones="dropGroups"
  :dropzonesTitle="'XYZ Company Teams'"
  :originalData="stories"
  :originalTitle="'Tasks to be distributed'"
>
  <template #dd-card="{ cardData }">
    <custom-card
      :data="cardData"
      @done="doneMarked"
    />
  </template>
</drag-drop>
Here, dd-card is the slot name. The component provides a cardData variable provides the access of a single object from the original data. If slots aren't used, the component assumes that original data is a list of string. This makes it compatible with older version.
CSS Modification
To modify the CSS style, you can override these css classes from your component:
.vue-drag-n-drop # This holds the whole container.

  .dd-title  # Class for modifying the titles

  .dd-first-group # Class to modify the first (original) container. It holds the list of
                    cards

    .dd-card-ghost  # Class provided for drag class by smooth-dnd

    .dd-card-ghost-drop   # Class provided for drop by smooth-dnd

  .dd-result-group   # Class to modify the second drop container (Result container)

    .dd-drop-container   # Class to modify the style of each column for second container
Support for SSR/Nuxt
Currently, Server Side Rendering is not supported. To use it in SSR/Nuxt project, you need to specify Nuxt that this plugin needs to render on the client side.
To specify Nuxt to render it on client-side, create a JS file under ~/plugins/ or add to existing one:
~/plugins/vue-drap-n-drop.js
import Vue from 'vue';
import DragDrop from 'vue-drag-n-drop';

Vue.use(DragDrop);
Add the plugin to nuxt.config.js
plugins: [
  {
    src: './plugins/vue-drag-n-drop.js',
    ssr: false
  }
],
Contributions
Feel free to raise an issue or create a Pull Request if you see ways that can improve this library.


