README
BANDYER CHAT WIDGET
Bandyer widget chat is a fast and effective way to offer live chat and videochat in your application.
Consuming a library
You can consume the library from NPM:
npm install @bandyer/bandyer-chat-widget
For browser you can also use the version from CDN:
<script src="https://cdn.bandyer.com/sdk/js/chat/X.X.X/bandyer-widget.min.js" type="text/javascript" ></script>
Example embed in HTML page;
<html>
<head></head>
    <body>
    <script src="https://cdn.bandyer.com/sdk/js/chat/1.45.0/bandyer-widget.min.js" type="text/javascript" >
    </script>
    </body>
</html>
The widget attaches in the window object of the HTML page the BandyerChat global variable.
Browser support
| Browser | min version | Plugin requested |
|---|---|---|
| Chrome | 56 | Screenshare extension for Chrome <72 |
| Firefox | 54 | |
| Safari | 12 | |
| Edge old | 17 | |
| Edge new | 79 | |
| Internet Explorer | 11 | Temasys WebRTC Plugin for Call |
Versions
Latest version available is: 1.45.0 https://cdn.bandyer.com/sdk/js/chat/1.45.0/bandyer-widget.min.js
For the complete list of versions visit: CHANGELOG
Screenshots


Create
.create()
const Client = await BandyerChat.create({

    accessToken: 'jwt',
    environment: 'sandbox',
    hidden: false
});
.create({accessToken: 'jwt', environment: 'sandbox', hidden: false})
Configuration of a new widget instance is made by calling .create() method. The options required are the following:
Create Parameters
| Parameter | Required | Default | Description |
|---|---|---|---|
| accessToken | yes | accessToken obtained server side (see more here) | |
| environment | yes | "" | 'sandbox' or 'production' are the permitted values. |
| hidden | no | false | Create the widget in hidden mode (not visibile in the HTML). |
| screenSharingExtensionId | no | '' | Extension ID of the Screen Sharing Extension. (see more here |
| screenSharingExtensionURL | no | '' | The URL from witch download your custom extension (see more here |
| layout | no | {} | Specify the custom layout (see more here) |
| record | no | false | Specify if all the calls must be recorded. |
| recordingType | no | 'automatic' | Allowed params are 'manual' or 'automatic', allows to define the recording type for all the calls |
| isAdmin | no | false | Specify if the logged user is an admin, this capability allow to trigger the start/stop of the manual recording |
| callType | no | audio_video | Specify the call type. Valid values are: "audio_only", "audio_upgradable", "audio_video" |
| mode | no | embed | Specify the widget call mode. Valid values are: "embed" or "window" |
| language | no | it | Specify the language of the widget. Valid values are: "it" or "en" |
| userDetailsProvider | no | default user provider | Specify the information for each user (see more here) |
| userDetailsFormatter | no | default user formatter | Specify how the user identity is formatted in the UI (see more here) |
| tools | no | All tools enabled | Allows you to enable the available tools during the call and the chat for the widget (embed and window mode)(See more here) |
| virtualBackground | no | false | Allowed params are 'blur' or 'image', allows to publish the local webcam with the blur or the replacement of the background as default (embed and window mode) |
| feedback | no | false | Allowed to show a feedback view after the call |
Deprecated parameters — Deprecation date: 26/11/20
| Parameter | Required | Default | Description |
|---|---|---|---|
| userAlias | yes | "" | The widget who initialize the widget. Needs to create a user via rest API |
| appId | yes | "" | A valid appId. Please contact Bandyer to have a valid appId |
| chat | no | true | If false it disables the chat module so that the widget is only able to receive calls and create calls through the createCall API |
Authentication
The authentication require the use of an accessToken obtained from your own server using the following api :
curl -X POST "https://sandbox.bandyer.com/rest/sdk/credentials" \
     -H "apikey: COMPANY_APIKEY" \
     -H "Content-Type: application/json" \
     -d '{
        {user_id: "user_xxx", expires_in: 360}
     }'
Example Response
{
    "access_token": "valid jwt for the user",
    "expires_at": "2022-01-10T11:41:19.000Z",
    "user_id": "user_xxx"
}
Return a valid accessToken to provide to the clients that needs a sdk authentication, please DO NOT request the token client side in order to not expose the api_key. If you expose the api_key the credential's generation for your company became unsafe.
HTTP Request
POST https://sandbox.bandyer.com/rest/sdk/credentials
Header Parameters
| Parameter | Required | Default | Description |
|---|---|---|---|
| apikey | yes | "" | Every request must have the API Key. |
Body Parameters
| Parameter | Required | Default | Description |
|---|---|---|---|
| user_id | yes | "" | user that you want to authenticate |
| expires_in | no | 360 | Seconds after that the token expires |
Error
| Status | Name | Code | Reason |
|---|---|---|---|
| 401 | invalid_api_key | invalid_api_key | Apikey is not valid |
| 422 | validation_error | invalid_token_expirations | The expires_in must be between 360 (6 minutes) and 86400 (24 hours) |
Once you have obtained the access token you are able to authenticate the sdk, in order to maintain the connected state you need to bind two events to the Client object(see Create):
- access_token_is_about_to_expire
- access_token_expired
client.on('access_token_is_about_to_expire', async (data) => { // data: {expiresAt: "2022-01-10T11:41:19.000Z"'}
    const accessToken = await yourAsyncFunction(); // async function that allow you to ask a new accessToken to the server
    // Provide the obtained accessToken to the sdk
    const { expiresAt } = await BandyerChat.updateAccessToken(accessToken); // return the new expiration date

})
client.on('access_token_expired', () => {
   // the session expired, for some reason the update token process is failed, you need to re-initilize the sdk
})
Call type options:
- audio_only: the call is only audio and the participants can't use the webcam
- audio_upgradable: the call begins with only audio but the participants can publish the webcam
- audio_video: the call begins with audio and webcam
Mode options:
- embed: the call is embedded in the widget view
- window: the call is accessible in a window popup
Hidden options
The widget chat is not visible in the frontend until it receives the following events:
- addChat event
- incoming call event
Tools option
By default, if no tools are provided (missing field), all the tools are enabled. If the tools field is defined but empty, all the tools are disabled.
List of available tools
| Name | Mode | Description |
|---|---|---|
| chat | Window & Embed | Enable the chat feature |
| screen_sharing | Window & Embed | Enable the screen_sharing feature |
| file_upload | Window & Embed | Enable the capability to send file |
| whiteboard | Window | If true enable all the whiteboard tools. Can be an object of whiteboard tools |
| snapshot | Window | Enable the snapshot feature |
| live_edit | Window | Enable the live_edit feature |
| live_pointer | Window | Enable to send pointer-events to others participants (always active in reception) |
The whiteboard(WB), snapshot(SN) and live_edit(LE) tools are strictly correlated, so use it accordingly as follow:
| Combination | Receive live_edit | Collaborate | Snapshot & Gallery | Open whiteboard |
|---|---|---|---|---|
| SN+ LE + WB | ✅ | ✅ | ✅ | ✅ |
| SN | ❌ | ❌ | ✅ | ❌ |
| SN + WB (default LE active in reception) | ✅ | ❌ | ✅ | ✅ |
| WB (default LE active in reception) | ✅ | ❌ | ❌ | ✅ |
| NONE | ❌ | ❌ | ❌ | ❌ |
Whiteboard tools
{
    "tools": {
        "whiteboard": {
            "wb_add_file": true,
            "wb_cursor": true,
            "wb_text": true,
            "wb_shape": true,
            "wb_pen": true,
            "wb_eraser" : true
        }
    }
}
The whiteboard tools object is included in the tools parameter
| Name | Description |
|---|---|
| wb_add_file | Allows to add files on the whiteboard |
| wb_cursor | Allows to send the cursor events to the other participants |
| wb_text | Allows to add text on the whiteboard |
| wb_shape | Allows to add shape on the whiteboard |
| wb_pen | Allows to using the pen on the whiteboard |
| wb_eraser | Allows to erase a previous draw on the whiteboard |
Returns:
Type
Promise.<(Client|Error)>
Custom layout
The widget has custom configurable layout to give the opportunity to match the look and feel you prefer. The layout option is composed by a list of other keys. The table above is the list of the available options:
| Key | Options | Description |
|---|---|---|
| header | background, color | Specify the background and color of the header |
| headerButton | background, color | Specify the background and color of the header buttons |
| body | background, color | Specify the background and color of the body |
| launcher | background | Specify the background of the launcher |
| messageSent | background, color | Specify the background and color of the messages you sent |
| messageReceived | background, color | Specify the background and color messages you received |
| dial | background, color | Specify the background and color of the dial view |
| call | background, color | Specify the background and color of the call view |
| feedback | body: {background, color}, buttons: {background, color} | Specify the theme for the feedback view |
| fontFamily | font Family | Font family of the entire widget |
Here an example:
BandyerChat.create({
    userAlias: 'usr_123456',
    appId: 'wAppId_fake123456',
    environment: 'sandbox',
    layout: {
        body: {background: '#0069B4', color: '#000'},
        dial:{background: '#003762', color: '#fff'},
        call: {background: '#003762', color: '#fff'},
        messageSent: {background: '#003762', color: '#fff'},
        launcher: {background: '#0069B4'},
        header: {background: '#003762', color: '#fff'},
        headerButton: {background: '#0069B4', color: '#fff'},
        feedback: {body: {background: '#0069B4', color: '#fff'}, buttons: {background: '#0069B4', color: '#fff'}},
        fontFamily: '"Segoe UI","Segoe",Tahoma,Helvetica,Arial,sans-serif'
    }
})
userDetailsProvider
The widget has a custom configurable function that allows customizing the users' information, which later will be displayed in the UI.
The userDetailsProvider is optional, but if defined must be a function.
This function takes an array of String (userAlias) as the only input parameter and must return a Promise that contains an Array of objects, one object for each userAlias provided as input.
Performance considerations The userDetailsProvider function is called and waited internally for up to 1200 ms, otherwise it default to the default provider logic. For this reason your logic will be applied only if it is faster then 1200 ms.
Every single object representing a user and must contain a userAlias key(otherwise the object will be ignored) and optionally other keys that can be used to define the logic used in your custom userDetailFormatter.
Here an example:
yourProviderFunction = function (usersAlias){
    const userObjPromises = [];
    usersAlias.forEach( (alias) => {
        // Your logic here
        const user = yourAsyncFetchFunction(alias);
        // Example of yourAsyncFetchFunction promise return
        /*{
            userAlias: alias,
            firstName: myFirstName,
            lastName: myLastName,
            image: myImage
        };*/
        usersObjPromises.push(user);
    });
    return Promise.all(userObjPromises);
}

BandyerChat.create({
    userAlias: 'usr_123456',
    appId: 'wAppId_fake123456',
    environment: 'sandbox',
    userDetailsProvider: yourProviderFunction
})
N.B define a userDetailsProvider without the relative userDetailsFormatter is useless since the displayed result will be the userAlias as it is the default logic of userDetailsFormatter.
userDetailsFormatter
The widget has a custom configurable function that lets you customize how users name are displayed in the UI. The userDetailsFormatter is optional, but if defined, it must be a function.
This function takes as input parameter an Object that represents one user and must return a String that represents how the user identity must be displayed in the UI.
If the return value is not a String or the logic fails, the displayed information will be the userAlias.
Here an example:
yourFormatterFunction = function (user){
    return user.firstName + " " + user.lastName;
}

BandyerChat.create({
    userAlias: 'usr_123456',
    appId: 'wAppId_fake123456',
    environment: 'sandbox',
    userDetailsFormatter: yourFormatterFunction
})
N.B define a userDetailsFormatter without the relative userDetailsProvider can be useless since the displayed result will use the information provided at user creation.
logout
.logout()
BandyerChat.logout();
To logout to the current istance of the widget, you can call the .logout() method. The logout() method will unmount the widget component.
Returns:
Type
Promise.<(void|Error)>
version
.version()
BandyerChat.version();
Return the current version of the widget
Returns:
Type
String
Client
A Client is a starting point to access Bandyer Chat functionality. It is possible to listen events which are fired by the widget. A Client is returned by the create method.
const Client = BandyerChat.create({
    userAlias: 'usr_123456',
    appId: 'wAppId_fake123456',
    environment: 'sandbox',
    hidden: false,
    screenSharingExtensionId: 'id of your screen sharing extension'
});
Add chat
.addChat(userAlias)
BandyerChat.addChat('usr_fr55ga3');
.addChat('usr_fr55ga3')
To enable the chat with another user of your platform, you need to call the .addChat() method. The addChat method expect a valid user alias (it must be a user already created). Once the method is called, the widget will display the chat added.
Note: if the widget is in hidden mode, the addChat method mode will display the widget. Note: if the widget is initialized with chat: false this method returns an error: 'Chat module not initialized'
Arguments:
| Name | Type | Description |
|---|---|---|
| userAlias | String | User whose chat is to be added |
Returns:
Type
Promise.<(void|Error)>
Remove chat
.removeChat(userAlias)
BandyerChat.removeChat('usr_fr55ga3');
.removeChat('usr_fr55ga3')
To remove a chat you need to call the .removeChat() method. The removeChat will remove the chat between the user authenticated and the user specified as input of the method. All the messages between them will be deleted permanently.
Note: if the widget is initialized with chat: false this method returns an error: 'Chat module not initialized'
Arguments:
| Name | Type | Description |
|---|---|---|
| userAlias | String | User whose chat is to be removed |
Returns:
Type
Promise.<(void|Error)>
isAuthenticated
.isAuthenticated()
BandyerChat.isAuthenticated();
.isAuthenticated()
To check if the current istance of the widget is authenticated, you need to call the .isAuthenticated() method. The method will return true if the widget is authenticated, false otherwise.
Returns:
Type
Type: boolean
Select chat
.selectChat(userAlias)
BandyerChat.selectChat('usr_fr55ga3');
.selectChat('usr_fr55ga3')
To select a chat you need to call the .selectChat() method. The selectChat will select the chat between the user authenticated and the user specified as input of the method.
Note: if the widget is initialized with chat: false this method returns an error: 'Chat module not initialized'
Arguments:
| Name | Type | Description |
|---|---|---|
| userAlias | String | User whose chat is to be selected |
Returns:
Type
Promise.<(void|Error)>
createCall
.createCall(Array
, options)
BandyerChat.createCall(['usr_fr55ga3'], {'call_type':'audio_video'});
Create a call with arbitrary call options with the users specified in the array (Only one user)
Note: If the widget is in hidden mode, the createCall method mode will display the widget.
Arguments:
| Name | Type | Description |
|---|---|---|
| usersAlias | Array of String | List of users with whom you want to start a call |
| options | Object | Call options |
Options
| Name | Default | Type | Description |
|---|---|---|---|
| callType | inherit from the config | string | Can be 'audio_only', 'audio_upgradable', 'audio_video' |
| record or recording | inherit from the config | boolean | Allow to define if the call start with recording |
| recordingType | inherit from the config | string | Can be 'manual' or 'automatic' |
| isAdmin | inherit from the config | boolean | Allow the user to control the manual recording capabilities |
N.B. if the call is {recording: true, recordingType: 'manual', isAdmin: false} create a call with the recording capability but no-one is able to start the recording. In order to do that create this type of call with isAdmin: true
Returns:
Type
Promise.<(Call|Error)>
| Key | Type | Description |
|---|---|---|
| callAlias | String | Unique alias of the current call |
| callDirection | String | Direction of the call (incoming |
| callParticipants | Array | Array of userAlias of the participants |
| callStatus | String | Status of the call, can be dialing, connected, ended |
| hangUp | Function | Allow to hangUp the call |
| callOptions | Object | Basic information about the call |
CallOptions:
| Key | Type | Description |
|---|---|---|
| record | Boolean | True if the call has been initialized with recording |
| creationDate | Date | Date and time of the created call |
| callType | String | audio_only, audio_upgradable, audio_video |
| live | Boolean | This param defines whether the link should trigger widget and mobile ringing or not. |
Error:
| Key | Type | Description |
|---|---|---|
| ANOTHER_CALL_IN_PROGRESS | String | There are another active call |
| INITIATOR_NOT_AVAILABLE | String | The caller is not available |
| USERS_BUSY_ERROR | String | The called user is busy |
| INVALID_PERMISSION_CAN_VIDEO" | String | The user does not have permissions for a video call |
| HANG_UP_ON_ENDED_CALL | String | When try to call hangUp on an ended call |
| GENERIC_CALL_ERROR | String | Something went wrong, please retry |
joinCallURL
.joinCallURL(url)
BandyerChat.joinCallURL('https://sandbox.bandyer.com/connect/rest-call-handler/mycustomtoken');
Join a one to one call from an URL.
The widget must be authenticated and the url must be coupled with the user authenticated on the widget.
Join call URLs can be created using the dedicated /rest/room/create API .
Documentation can be found here
Note: If the widget is in hidden mode, the joinCallURL method mode will display the widget.
Arguments:
| Name | Type | Description |
|---|---|---|
| url | String | Rest link to the call |
Returns:
Type
Promise.<(Call|Error)>
| Key | Type | Description |
|---|---|---|
| callAlias | String | Unique alias of the current call |
| callDirection | String | Direction of the call (incoming |
| callParticipants | Array | Array of userAlias of the participants |
| callStatus | String | Status of the call, can be dialing, connected, ended |
| hangUp | Function | Allow to hangUp the call |
| callOptions | Object | Basic information about the call |
CallOptions:
| Key | Type | Description |
|---|---|---|
| record | Boolean | True if the call has been initialized with recording |
| creationDate | Date | Date and time of the created call |
| callType | String | audio_only, audio_upgradable, audio_video |
| live | Boolean | This param defines whether the link should trigger widget and mobile ringing or not. |
Error:
| Key | Type | Description |
|---|---|---|
| ANOTHER_CALL_IN_PROGRESS | String | There are another active call |
| JOIN_CALL_REQUEST_FAILED | String | The user is busy or there is a network error |
| JOIN_CALL_INVALID_URL | String | The given url is not correct |
| JOIN_CALL_INVALID_MTM | String | Impossible to start a many to many call |
| HANG_UP_ON_ENDED_CALL | String | When try to call hangUp on an ended call |
| GENERIC_CALL_ERROR | String | Something went wrong, please retry |
composeMessage
.composeMessage(userAlias, message, send)
BandyerChat.composeMessage('usr_fr55ga3', 'How are you?', true);
Compose and optionally send a message to a user.
If send === true the specified message is sent directly to the specified user chat without trigger UI changes.
Otherwise ( send === false), the widget will display the chat and fill the input text with the specified message, letting the user decide wether edit it before send it.
Note: If the widget is in hidden mode, the message is sent anyway. Note: if the widget is initialized with chat: false this method returns an error: 'Chat module not initialized'
Arguments:
| Name | Type | Description |
|---|---|---|
| userAlias | String | User to whom compose o send message |
| message | String | Text of the message |
| send | boolean | If true, directly send the message otherwise inflate the message in the UI |
Returns:
Type
Promise.<(void|Error)>
Events
| Event | Description |
|---|---|
| typing_started | Fired when a User has started typing |
| message_sent | Fired when a User has sent a message |
| message_received | Fired when a User has received a message |
| message_read | Fired when a User has read a message |
| chat_loaded | Fired when Chat channel is loaded |
| user_connected | Fired when a User connects to the platform |
| user_disconnected | Fired when a User disconnects to the platform |
| incoming_call | Fired when a User create or receive a call |
| call_dial_answered | Emitted when a user answers a dial |
| call_dial_declined | Emitted when a user declines a dial |
| call_dial_stopped | Emitted when a user stop a dial |
| call_started | Fired when a call start |
| call_ended | Fired when a call end |
| force_disconnect | Fired when the server close the connection due to a user disable or delete |
Typing started
Client.on('typing_started',(data) => {
    // your logic
});
Fired when a User has started typing.
Note: To optimise network traffic, Client endpoints will only send a Typing signal once every 5 seconds
Type
| Key | Type | Description |
|---|---|---|
| userAlias | String | Alias of the user |
| chat | String | Unique identifier of the chat |
| participants | Array | Array of participants |
Message sent
Client.on('message_sent',(data) => {
    // your logic
});
Fired when a User has sent a message.
Type
| Key | Type | Description |
|---|---|---|
| id | String | Unique identifier of the message |
| chat | String | Unique identifier of the chat |
| participants | Array | Array of participants |
| text | String | Text of the message |
| timestamp | Date | When message was created |
| sender | String | User alias of the creator of the message |
Message received
Client.on('message_received',(data) => {
    // your logic
});
Fired when a User has received a message.
Type
| Key | Type | Description |
|---|---|---|
| id | String | Unique identifier of the message |
| chat | String | Unique identifier of the chat |
| participants | Array | Array of participants |
| text | String | Text of the message |
| timestamp | Date | When message was created |
| sender | String | User alias of the creator of the message |
Message read
Client.on('message_read',(data) => {
    // your logic
});
Fired when a User has read a message.
Type
| Key | Type | Description |
|---|---|---|
| id | String | Unique identifier of the message |
| chat | String | Unique identifier of the chat |
| participants | Array | Array of participants |
| text | String | Text of the message |
| timestamp | Date | When message was created |
| sender | String | User alias of the creator of the message |
Chat loaded
Client.on('chat_loaded',(data) => {
    // your logic
});
Fired when the chat channel is loaded
Type
| Key | Type | Description |
|---|---|---|
| chat | String | Unique identifier of the chat |
| participants | Array | Array of participants |
| lastMessage.author | String | Author of the message |
| lastMessage.message | String | Text of the message |
| lastMessage.timestamp | String | Timestamp of the message |
| dateCreated | Date | When channel was created |
| createdBy | String | Creator of the channel |
| unreadMessages | Number | Number of unread messages |
User connection
Client.on('user_connected',(data) => {
    // your logic
});
Fired when a user connects one platform
Type
| Key | Type | Description |
|---|---|---|
| userAlias | String | User alias of the user |
| status | String | Current status ('online', 'offline') |
User disconnection
Client.on('user_disconnected',(data) => {
    // your logic
});
Fired when a user disconnects all the platforms
Type
| Key | Type | Description |
|---|---|---|
| userAlias | String | User alias of the user |
| status | String | Current status ('online', 'offline') |
Dial Events
The dial events let you know when one of the two users takes an action that will bring the call into a new state
Incoming call
Client.on('incoming_call',(call) => {
    // your logic
});
Fired when a User create or receive a call.
To discriminate whether the call has been created or received, it is necessary to refer to the callDirection, outgoing in case of creation, incoming in case of reception
call object:
The data in the event is a call object:
{
  "event": "incoming_call",
  "callAlias": "room_027b9312e9a5",
  "callDirection": "outgoing",
  "callParticipants": ["user1", "user2"],
  "callOptions": {
    "record": false,
    "creationDate": "2021-04-13T08:31:03.916Z",
    "callType": "audio_video",
    "live": true
  }
}
| Key | Type | Description |
|---|---|---|
| event | String | Event name |
| callAlias | String | Unique alias of the current call |
| callDirection | String | Direction of the call (incoming/outgoing) |
| callParticipants | Array | Array of userAlias of the participants |
| callOptions | Object | Basic information about the call |
CallOptions:
| Key | Type | Description |
|---|---|---|
| record | Boolean | True if the call has been initialized with recording |
| creationDate | Date | Date and time of the created call |
| callType | String | audio_only, audio_upgradable, audio_video |
| live | Boolean | This param defines whether the link should trigger widget and mobile ringing or not. |
Dial Answered
Client.on('call_dial_answered',(call) => {
    // your logic
});
Fired when the user(executor) answered on a dial event.
This event is raised for both users. The 'executor' field allows you to understand which user performed the action
call object:
The data in the event is a call object:
{
  "event": "call_dial_answered",
  "executor": "user2",
  "callAlias": "room_027b9312e9a5",
  "callDirection": "outgoing",
  "callParticipants": ["user1", "user2"],
  "callOptions": {
    "record": false,
    "creationDate": "2021-04-13T08:31:03.916Z",
    "callType": "audio_video",
    "live": true
  }
}
| Key | Type | Description |
|---|---|---|
| event | String | Event name |
| callAlias | String | Unique alias of the current call |
| executor | String | UserAlias of the participant that have performed the action |
| callDirection | String | Direction of the call (incoming/outgoing) |
| callParticipants | Array | Array of userAlias of the participants |
| callOptions | Object | Basic information about the call |
CallOptions:
| Key | Type | Description |
|---|---|---|
| record | Boolean | True if the call has been initialized with recording |
| creationDate | Date | Date and time of the created call |
| callType | String | audio_only, audio_upgradable, audio_video |
| live | Boolean | This param defines whether the link should trigger widget and mobile ringing or not. |
Dial Declined
Client.on('call_dial_declined',(call) => {
    // your logic
});
Fired when a user declines a call.
This event is raised for both users. The 'executor' field allows you to understand which user performed the action
call object:
The data in the event is a call object:
{
  "event": "call_dial_declined",
  "executor": "user2",
  "callAlias": "room_027b9312e9a5",
  "callDirection": "outgoing",
  "callParticipants": ["user1", "user2"],
  "callOptions": {
    "record": false,
    "creationDate": "2021-04-13T08:31:03.916Z",
    "callType": "audio_video",
    "live": true
  }
}
| Key | Type | Description |
|---|---|---|
| event | String | Event name |
| callAlias | String | Unique alias of the current call |
| executor | String | UserAlias of the participant that have performed the action |
| callDirection | String | Direction of the call (incoming\outgoing) |
| callParticipants | Array | Array of userAlias of the participants |
| callOptions | Object | Basic information about the call |
| reason | String | Valid reasons are: none, do_not_disturb, no_answer, error or answered_another_call |
CallOptions:
| Key | Type | Description |
|---|---|---|
| record | Boolean | True if the call has been initialized with recording |
| creationDate | Date | Date and time of the created call |
| callType | String | audio_only, audio_upgradable, audio_video |
| live | Boolean | This param defines whether the link should trigger widget and mobile ringing or not. |
Dial stopped
Client.on('call_dial_stopped',(call) => {
    // your logic
});
Fired when a call ends.
This event is raised for both users. The 'executor' field allows you to understand which user performed the action
call object:
The data in the event is a call object:
{
  "event": "call_dial_stopped",
  "executor": "user2",
  "callAlias": "room_027b9312e9a5",
  "callDirection": "outgoing",
  "callParticipants": ["user1", "user2"],
  "callOptions": {
    "record": false,
    "creationDate": "2021-04-13T08:31:03.916Z",
    "callType": "audio_video",
    "live": true
  }
}
| Key | Type | Description |
|---|---|---|
| event | String | Event name |
| callAlias | String | Unique alias of the current call |
| executor | String | UserAlias of the participant that have performed the action |
| callDirection | String | Direction of the call (incoming\outgoing) |
| callParticipants | Array | Array of userAlias of the participants |
| callOptions | Object | Basic information about the call |
CallOptions:
| Key | Type | Description |
|---|---|---|
| record | Boolean | True if the call has been initialized with recording |
| creationDate | Date | Date and time of the created call |
| callType | String | audio_only, audio_upgradable, audio_video |
| live | Boolean | This param defines whether the link should trigger widget and mobile ringing or not. |
Call events
Call started
Client.on('call_started',(call) => {
    // your logic
});
Fired when the call start, this event is raised only after a call_dial_answered event.
This event is raised for both the users but don't have an executor because is a general event that represents when both the users are in call.
call object:
The data in the event is a call object:
{
  "event": "call_started",
  "callAlias": "room_027b9312e9a5",
  "callDirection": "outgoing",
  "callParticipants": ["user1", "user2"],
  "callOptions": {
    "record": false,
    "creationDate": "2021-04-13T08:31:03.916Z",
    "callType": "audio_video",
    "live": true
  }
}
| Key | Type | Description |
|---|---|---|
| event | String | Event name |
| callAlias | String | Unique alias of the current call |
| callDirection | String | Direction of the call (incoming/outgoing) |
| callParticipants | Array | Array of userAlias of the participants |
| callOptions | Object | Basic information about the call |
CallOptions:
| Key | Type | Description |
|---|---|---|
| record | Boolean | True if the call has been initialized with recording |
| creationDate | Date | Date and time of the created call |
| callType | String | audio_only, audio_upgradable, audio_video |
| live | Boolean | This param defines whether the link should trigger widget and mobile ringing or not. |
Call ended
Client.on('call_ended',(call) => {
    // your logic
});
Fired when the call ends.
This event is raised for both users. The 'executor' field allows you to understand which user performed the action
call object:
The data in the event is a call object:
{
  "event": "call_ended",
  "executor": "user2",
  "callAlias": "room_027b9312e9a5",
  "callDirection": "outgoing",
  "callParticipants": ["user1", "user2"],
  "callOptions": {
    "record": false,
    "creationDate": "2021-04-13T08:31:03.916Z",
    "callType": "audio_video",
    "live": true
  }
}
| Key | Type | Description |
|---|---|---|
| event | String | Event name |
| callAlias | String | Unique alias of the current call |
| executor | String | UserAlias of the participant that have performed the action |
| callDirection | String | Direction of the call (incoming\outgoing) |
| callParticipants | Array | Array of userAlias of the participants |
| callOptions | Object | Basic information about the call |
CallOptions:
| Key | Type | Description |
|---|---|---|
| record | Boolean | True if the call has been initialized with recording |
| creationDate | Date | Date and time of the created call |
| callType | String | audio_only, audio_upgradable, audio_video |
| live | Boolean | This param defines whether the link should trigger widget and mobile ringing or not. |
Force disconnect
Client.on('force_disconnect',(data) => {
    // your logic
});
Fired when a server close the connection due to a user disable or delete. The data in the event is an object:
| Key | Type | Description |
|---|---|---|
| reason | String | Can be user_deleted or user_disabled, specify the reason of the force disconnect |
Widget Operations
| Operation | Description |
|---|---|
| Show widget | Show the widget in the html page |
| Hide widget | Hide the widget in the html page |
| Toggle widget | Toggles the widget from open to close view or viceversa |
| Open widget | Opens the widget |
| Close widget | Closes the widget |
Show widget
.showWidget()
BandyerChat.showWidget();
Show the widget in the html page.
Returns:
Type
Type: Boolean.(true|false)>
Hide widget
.hideWidget()
BandyerChat.hideWidget();
Hide the widget in the html page.
Returns:
Type
Type: Boolean.(true|false)>
toggleWidget
.toggleWidget()
BandyerChat.toggleWidget();
Toggles the widget from open to close view or viceversa.
Returns:
Type
Type: Boolean.<(true|false)>
openWidget
.openWidget()
BandyerChat.openWidget();
Opens the widget.
Returns:
Type
Type: Boolean.<(true|false)>
closeWidget
.closeWidget()
BandyerChat.closeWidget();
Closes the widget.
Returns:
Type
Type: Boolean.<(true|false)>
Activities
To build custom business logic based on Widget activities (message sent, received, etc), the widget gives useful methods. Here a list of them:
| Method | Description |
|---|---|
| getUser | Get the user info and his current status (online, offline, busy) |
| getLastMessageReceived | Get the last message received by the user |
| getLastMessageSent | Get the last message sent by the user |
| getUnreadMessages | Get all the unread messages of the user |
getUser
.getUser(userAlias)
BandyerChat.getUser(userAlias);
Get User status
Arguments:
| Name | Type | Description |
|---|---|---|
| userAlias | String | User of whom you want to find information |
Returns:
Type {userAlias, status}
| Key | Type | Description |
|---|---|---|
| userAlias | String | Unique identifier of the user |
| status | String | Status of the user can be online, busy or offline |
getUsersStatusList
.getUsersStatusList()
BandyerChat.getUsersStatusList();
Get the list of the connected users
Returns:
Type Array<[User]>
Array of object:
| Key | Type | Description |
|---|---|---|
| userAlias | String | Unique identifier of the user |
| status | String | Status of the user can be online, busy |
getChats()
. getChats()
BandyerChat.getChats();
Get all the chat of the client.
Returns:
Type
Array of object:
| Key | Type | Description |
|---|---|---|
| chat | String | Unique identifier of the chat |
| unreadMessages | Number | Number of unread messages |
| participants | Array | Array of participants |
| lastMessage.author | String | User alias of the autor of the last message |
| lastMessage.message | String | Text of the last message |
| lastMessage.timestamp | Date | Timestamp of the last message |
getLastMessageReceived
.getLastMessageReceived()
BandyerChat.getLastMessageReceived();
Get the last message received by the widget in the current session.
Returns:
Type
| Key | Type | Description |
|---|---|---|
| id | String | Unique identifier of the message |
| chat | String | Unique identifier of the chat |
| participants | Array | Array of participants |
| text | String | Text of the message |
| timestamp | Date | When message was created |
| sender | String | User alias of the creator of the message |
getLastMessageSent
.getLastMessageSent()
BandyerChat.getLastMessageSent();
Get the last message sent by the widget in the current session.
Returns:
Type
| Key | Type | Description |
|---|---|---|
| id | String | Unique identifier of the message |
| chat | String | Unique identifier of the chat |
| participants | Array | Array of participants |
| text | String | Text of the message |
| timestamp | Date | When message was created |
| sender | String | User alias of the creator of the message |
getUnreadMessages
.getUnreadMessages()
BandyerChat.getUnreadMessages();
Get the unread messages of the user.
Returns:
Type
Array of object:
| Key | Type | Description |
|---|---|---|
| chat | String | Unique identifier of the chat |
| unreadMessages | Number | Number of unread messages |
Screen sharing
From version 1.1.0 the widget allows to publish a screen as the video source. A client connected to the widget can subscribe to the stream (and view it), just as they would subscribe to a stream that uses a camera as the source.
In Chrome with a version lower than 72, to publish a screen-sharing video, the client needs to add an extension that enables publishing screen-sharing streams for your domain. As of Firefox 52, an extension (or whitelist listing) is no longer needed for screen sharing. Firefox prompts the end user for access to a screen, window, or application, as it would for access to the camera.
In all browsers, publishing a screen-sharing stream requires the page to be loaded over HTTPS.
Set url for extension install
The BandyerChat.create() parameter screenSharingExtensionURL or the function BandyerChat.setExtensionUrl('URL_CHROME_WEBSTORE') is used to specify the URL where to download the screensharing extension from the chrome web store. It's important to set the url to allow the user to add a custom extension. (How to build a custom extension)
BandyerChat.create({
    userAlias: 'usr_123456',
    appId: 'wAppId_fake123456',
    environment: 'sandbox',
    screenSharingExtensionURL: 'https://chrome.google.com/webstore/detail/your-extension/your-extension-id'
})
or
BandyerChat.setExtensionUrl('https://chrome.google.com/webstore/detail/your-extension/your-extension-id')
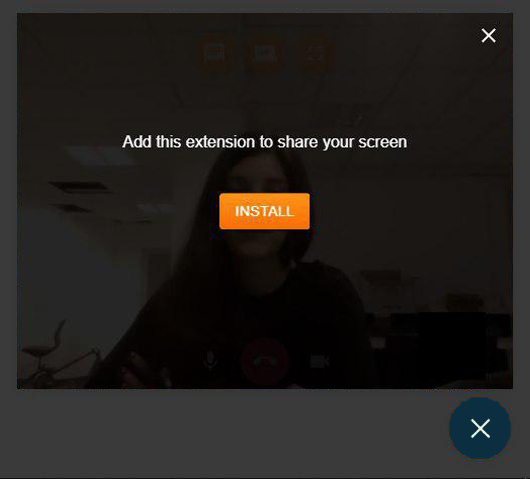
If the user requires to share the screen and hasn't installed the extension yet, the widget will display this alert:
Build a customized screensharing chrome extension
To support screen-sharing in Chrome older than v72, a Chrome screen-sharing extension must be created. Notice that the extension must be built to work in your own domain. A template extension to use as the base to build your own custom extension can be found in the extra folder. Download and unzip the ScreenShareExtension.zip file and follow this guidelines:
Modify manifest.json file
First of all open the manifest.json file, it look like this
{
   "author": "Bandyer srl",
   "background": {
      "persistent": true,
      "scripts": [ "background-script.js" ]
   },
   "description": "Extension to allow screen sharing in Bandyer playground application.",
   "homepage_url": "https://playground.bandyer.com",
   "icons": {
      "128": "icon.png"
   },
   "externally_connectable": {
      "matches": ["*://localhost/*", "*://*.bandyer.com/*"]
   },
   "manifest_version": 2,
   "minimum_chrome_version": "34",
   "name": "Bandyer Playground Screensharing",
   "permissions": [ "desktopCapture"],
   "update_url": "https://clients2.google.com/service/update2/crx",
   "version": "1.0.0",
   "web_accessible_resources": [ "icon.png" ]
}
Edit the following parameter:
- author: Insert your author parameter
- description: Briefly explain what the extension does
- homepage_url: Link to your home page
- matches: This field is the most important. List here all the domains that should have permission to access to that extension, note that the '*' character.
Further explaination
   {
  "background": {
    "persistent": true,
    "scripts": [
      "background-script.js"
    ]
  }
}
In this section there are two parameters:
- persistent: set to true, it allows the extension to keep staying active even if the user is not interacting with the page.
- scripts: specify the script name that will be executed.
Load a new icon
Substitute the icon in the directory of the extension that you have downloaded with your own. Notice that chrome require an icon for every extension. Be aware of the fact that the icon name must be exactly icon.png (This because the system uses the icon name as input to check if the extension is properly installed on the client)
Install an unpacked/unpublished extension into chrome browser (for development purposes)
- Navigate to chrome://extensions in your browser. You can also access this page by clicking on the Chrome menu on the top right side of the Omnibox, hovering over More Tools and selecting Extensions.
- Check the box next to Developer Mode.
- Click Load Unpacked Extension and select the directory for your "Custom Extension" extension.
Please take note of the extension id and remember that this id changes every time the unpacked extension is installed on a client. Once the extension has been published to the chrome web store the id will remain the same for each installation.
- Insert the extension id during the widget creation phase
BandyerChat.create({
    userAlias: 'usr_123456',
    appId: 'wAppId_fake123456',
    environment: 'sandbox',
    screenSharingExtensionId: 'Your extension id'
})
Distributing a screen-sharing extension
In order to enable screen-sharing on your website, users with a Chrome version lower than 72, need to install your custom screen-sharing extension. Once completed the previous steps, the extension is ready to be published on the chrome web store. Pack (zip) the Chrome extension folder and publish it in the Chrome Web Store
Before continue, remember to remove unwanted hosts from the manifest
Decide which Google Account is your developer account—the account that you'll use to verify ownership and publish your app. Instead of using your personal Gmail account, you might want to create a dedicated account for your apps. For details, see Choose a developer account in Publishing Your App. Note: If you created a blog, choose the account that you used to create that blog.
Go to the Chrome Developer Dashboard, and sign into your developer account. Once you sign in, you'll see a list of any installable web apps, extensions, and themes that you've already uploaded.
Click the Add new item button in the dashboard. If you've never uploaded an installable web app, extension, or theme before, you need to accept the developer agreement before going on.
Click Choose file, choose the ZIP file you created in Step 5, and click Upload. If you see an error message, fix the error, zip up the directory again, and upload the ZIP file.
Within seconds you should see the Edit page for your app. At the top, you might see a warning that you must verify ownership for whatever sites you specified in the "urls" and "web_url" fields. That warning has a link that takes you to Google Webmaster Tools, where you can verify ownership at any time before you publish the app.
After a successfull publication, your extension will have a unique id, that can be used as parameter in the BandyerChat.create() function to use it in yuor own integration.
For further info visit Chrome Developer tutorial