README
Welcome to @intercom/intercom-react-native 👋

![]()
![]()

React Native wrapper to bridge our iOS and Android SDK
🏠 Website
📚 Developer Docs
📂 Homepage
Installation
$ npm install @intercom/intercom-react-native
or
yarn add @intercom/intercom-react-native
Android
If you're using React Native v0.60 or above, the library will be linked automatically without any steps being taken.
Android: Automatic linking with React Native v0.59 and below
$ react-native link @intercom/intercom-react-native
Android: Manual linking with React Native v0.59 and below
- Add below code to
android/settings.gradle
include ':intercom-react-native'
project(':intercom-react-native').projectDir = new File(rootProject.projectDir, '../node_modules/@intercom/intercom-react-native/android')
- Then edit
android/app/build.gradle, insidedependenciesat very bottom add
implementation project(':intercom-react-native')
Android: Setup
- Add below lines to
MainApplication.javainsideonCreatemethod, replacingapiKeyandappIdwhich can be found in your workspace settings.
import com.intercom.reactnative.IntercomModule; //  <-- Add this line

// ...

@Override
public void onCreate() {
  super.onCreate();
  SoLoader.init(this, /* native exopackage */ false);

  // ...

  IntercomModule.initialize(this, "apiKey", "appId"); // <-- Add this line

  // ...
}
- Open
android/build.gradleand changeminSdkVersionto 21
buildscript {
    // ...
    ext {
        buildToolsVersion = "29.0.2"
        minSdkVersion = 21 // <-- Here
        compileSdkVersion = 29
        targetSdkVersion = 29
    }
    // ...
}
- In
android/build.gradlemake sure thatcom.android.tools.build:gradleversion is greater than4.0.0
dependencies {
    classpath("com.android.tools.build:gradle:4.0.1")
    // ...
}
Android: Permissions
You will need to include the READ_EXTERNAL_STORAGE permission if you have enabled attachments:
<uses-permission android:name="android.permission.READ_EXTERNAL_STORAGE"/>
You can also include VIBRATE to enable vibration in push notifications:
<uses-permission android:name="android.permission.VIBRATE"/>
Android: Push Notifications
For Push notification support add GoogleServices and Firebase Cloud Messagng to your app.
More information about push notification setup HERE
- Inside
android/build.gradleadd
buildscript {
    // ...
    dependencies {
        // ...
        classpath 'com.google.gms:google-services:4.2.0' // <-- Add this
    }
}
- In
android/app/build.gradlein dependencies addFirebase Messagingand at the very bottom applyGoogle Services Plugin:
// ...

dependencies{
    implementation "com.facebook.react:react-native:+"

    implementation 'com.google.firebase:firebase-messaging:20.2.+' // <-- Add this
    // ...
}
// ...

apply plugin: 'com.google.gms.google-services' // <-- Add this
apply from: file("../../node_modules/@react-native-community/cli-platform-android/native_modules.gradle"); applyNativeModulesAppBuildGradle(project)
Place
google-services.jsoninandroid/appdirectory.Create
MainNotificationService.javainside your app directory(com.example.app) with below content:Remember to replace
package com.example.app;, with your app package name
package com.example.app;

import com.google.firebase.messaging.FirebaseMessagingService;
import com.google.firebase.messaging.RemoteMessage;
import com.intercom.reactnative.IntercomModule;

public class MainNotificationService extends FirebaseMessagingService {

  @Override
  public void onNewToken(String refreshedToken) {
    IntercomModule.sendTokenToIntercom(getApplication(), refreshedToken);
    //DO LOGIC HERE
  }

  public void onMessageReceived(RemoteMessage remoteMessage) {
    if (IntercomModule.isIntercomPush(remoteMessage)) {
      IntercomModule.handleRemotePushMessage(getApplication(), remoteMessage);
    } else {
      // HANDLE NON-INTERCOM MESSAGE
    }
  }
}
- Edit
AndroidManifest.xml. Add below content inside<application>below<activity/>
Make sure that xmlns:tools="http://schemas.android.com/tools" is added to manifest tag
<!-- Add xmlns:tools to manifest. See example below-->
<manifest
  xmlns:tools="http://schemas.android.com/tools"
>
  <application>
    <activity>
      ...
    </activity>
    ...

    <!-- START: Add this-->
    <service
      android:name=".MainNotificationService">
      <intent-filter>
        <action android:name="com.google.firebase.MESSAGING_EVENT"/>
      </intent-filter>
    </service>

    <receiver
      android:name="com.intercom.reactnative.RNIntercomPushBroadcastReceiver"
      tools:replace="android:exported"
      android:exported="true"/>
    <!-- END: Add this-->

  </application>
</manifest>
- Add below code to your React Native app
  useEffect(() => {
    /**
     * Handle PushNotification
     */
    const appStateListener = AppState.addEventListener(
      'change',
      (nextAppState) =>
        nextAppState === 'active' && Intercom.handlePushMessage()
    );
    return () => AppState.removeEventListener('change', () => true); // <- for RN < 0.65
    return () => appStateListener.remove() // <- for RN >= 0.65
  }
  , [])
Android: Push notification deep links support
- Add below code to
<activity>insideAndroidManifest.xml
<activity
  android:name=".MainActivity"
  android:label="@string/app_name"
  android:configChanges="keyboard|keyboardHidden|orientation|screenSize|uiMode"
  android:launchMode="singleTask"
  android:windowSoftInputMode="adjustResize">
  <intent-filter>
    <action android:name="android.intent.action.MAIN"/>
    <category android:name="android.intent.category.LAUNCHER"/>
  </intent-filter>

  <!--  START: Add this  -->
  <intent-filter>
    <action android:name="android.intent.action.VIEW"/>
    <category android:name="android.intent.category.DEFAULT"/>
    <category android:name="android.intent.category.BROWSABLE"/>

    <data android:scheme="http" android:host="Your app url(www.app.com)"/> <!-- Edit this line -->
    <data android:scheme="Your app scheme(app)"/> <!-- Edit this line -->
  </intent-filter>
  <!--  END: Add this  -->

</activity>
See the example app for an example of how to handle deep linking in your app.
IOS
cd ios
pod install
cd ..
If you're using React Native v0.60 or above, the library will be linked automatically without any steps being taken.
iOS: Manual linking with React Native v0.59 and below
See How to manually link IOS Intercom SDK
iOS: Setup
Open
ios/AppDelegate.mthen add below code:At the top of file add the following:
#import "AppDelegate.h"
#import <React/RCTBridge.h>
#import <React/RCTBundleURLProvider.h>
#import <React/RCTRootView.h>
// ...
#import <IntercomModule.h> // <-- Add This
- Inside
didFinishLaunchingWithOptionsbeforereturn YESadd, remember to replaceapiKeyandappIdwhich can be found in your workspace settings:
  // ...
  self.window.rootViewController = rootViewController;

  [IntercomModule initialize:@"apiKey" withAppId:@"appId"]; // <-- Add this (Remember to replace strings with your api keys)

  return YES;
  }
iOS: Permissions
Add this permission to your Info.plist
<key>NSPhotoLibraryUsageDescription</key>
<string>Send photos to support center</string>
iOS: Push Notifications
Add Push Notifications and Background Modes > Remote Notifications Details HERE
Option 1: In your JavaScript code
An example using react-native-notifications:
// Request notification permissions
Notifications.registerRemoteNotifications();

// When permission is granted, send the device token to Intercom using [Intercom.sendTokenToIntercom(token)](#intercomsendtokentointercomtoken)
Notifications.events().registerRemoteNotificationsRegistered(({ deviceToken }: Registered) => {
  Intercom.sendTokenToIntercom(deviceToken);
});
Option 2: In your native code
- In
AppDelegate.mat the top add
#import <UserNotifications/UserNotifications.h>
- Request notification permissions when app launches by adding the folloowing to
didFinishLaunchingWithOptionsbeforereturn YES;:
- (BOOL)application:(UIApplication *)application didFinishLaunchingWithOptions:(NSDictionary *)launchOptions
{
    // ...

    // START: Code to add
    UNUserNotificationCenter *center = [UNUserNotificationCenter currentNotificationCenter];
    [center requestAuthorizationWithOptions:(UNAuthorizationOptionAlert + UNAuthorizationOptionSound)
                          completionHandler:^(BOOL granted, NSError *_Nullable error) {
                          }];
    [[UIApplication sharedApplication] registerForRemoteNotifications];
    // END: Code to add

    return YES;
}
- In same file, above
@endadd the following to send the device token to Intercom when permission is granted:
- (void)application:(UIApplication *)application didRegisterForRemoteNotificationsWithDeviceToken:(NSData *)deviceToken {
    [IntercomModule setDeviceToken:deviceToken];
}

@end
iOS: Push notification deep links support
Add URL types
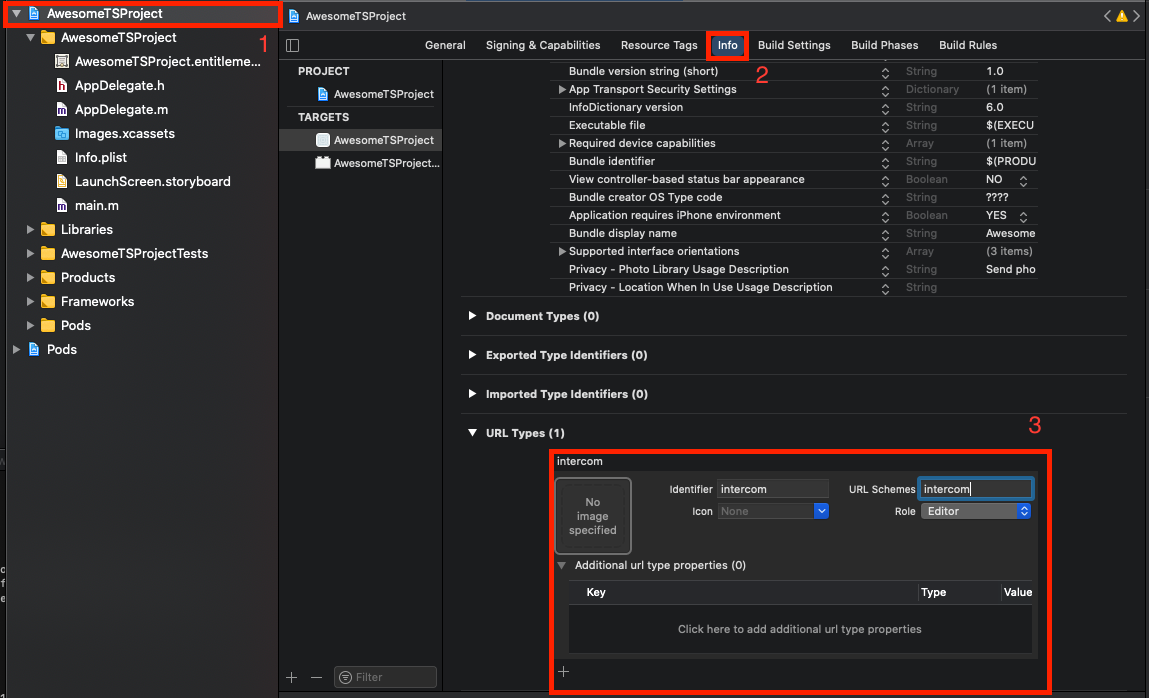
Setup of React Native deep links can be found Here
- Add import to
AppDelegate.m
#import "AppDelegate.h"

#import <React/RCTBridge.h>
#import <React/RCTBundleURLProvider.h>
#import <React/RCTRootView.h>

#import <React/RCTLinkingManager.h> <--Add this
- Add below code to
AppDelegate.mabove@end
- (BOOL)application:(UIApplication *)application
   openURL:(NSURL *)url
   options:(NSDictionary<UIApplicationOpenURLOptionsKey,id> *)options
{
  return [RCTLinkingManager application:application openURL:url options:options];
}


- (BOOL)application:(UIApplication *)application openURL:(NSURL *)url
  sourceApplication:(NSString *)sourceApplication annotation:(id)annotation
{
  return [RCTLinkingManager application:application openURL:url
                      sourceApplication:sourceApplication annotation:annotation];
}

@end
See the example app for an example of how to handle deep linking in your app.
Methods
Import
import Intercom from '@intercom/intercom-react-native';
Intercom.setUserHash(userHash) (Optional)
Sets the user hash necessary for validation when Identity Verification is enabled. This should be called before any registration calls.
Options
| Type | Type | Required |
|---|---|---|
| userHash | string | yes |
Returns
Promise<boolean>
Intercom.registerUnidentifiedUser()
Registers an unidentified user with Intercom
Returns
Promise<boolean>
Intercom.registerIdentifiedUser({email,userId})
Registers an identified user with Intercom
Options
One of below fields is required.
| Type | Type | Required |
|---|---|---|
| string | no | |
| userId | string | no |
Returns
Promise<boolean>
Intercom.updateUser(userAttributes)
Updates a user in Intercom.
You can send any data you like to Intercom. Typically our customers see a lot of value in sending data that
relates to customer development, such as price plan, value of purchases, etc. Once these have been sent to
Intercom you can then apply filters based on these attributes.
Intercom.updateUser({
  email: 'name@intercom.com',
  userId: 'userId',
  name: 'Name',
  phone: '010-1234-5678',
  languageOverride: 'languageOverride',
  signedUpAt: 1621844451,
  unsubscribedFromEmails: true,
  companies: [{
    createdAt: 1621844451,
    id: 'companyId',
    monthlySpend: 100,
    name: 'CompanyName',
    plan: "plan",
    customAttributes: {
      city: "New York"
    },
  }],
  customAttributes: {
    userCustomAttribute: 123,
    hasUserCustomAttribute: true
  }
});
Options
| Type | Type | Required |
|---|---|---|
| userId | string | no |
| string | no | |
| name | string | no |
| phone | string | no |
| languageOverride | string | no |
| signedUpAt | number (timestamp) | no |
| unsubscribedFromEmails | boolean | no |
| companies | array | no |
| customAttributes | object {key: boolean,string, number} |
no |
Returns
Promise<boolean>
Intercom.logout()
Logout is used to clear all local caches and user data the Intercom SDK has created. Use this at a time when you wish to log a user out of your app or change a user. Once called, the SDK will no longer communicate with Intercom until a further registration is made.
Returns
Promise<boolean>
Intercom.logEvent(eventName, metaData)
Logs an event with a given name and some metadata.
Options
| Type | Type | Required |
|---|---|---|
| eventName | string | yes |
| metaData | object {key: boolean,string,number} |
no |
Returns
Promise<boolean>
Intercom.sendTokenToIntercom(token)
This takes a push registration token to send to Intercom to enable this device to receive push.
Options
| Type | Type | Required |
|---|---|---|
| token | string | yes |
Returns
Promise<boolean>
Intercom.getUnreadConversationCount()
Gets the number of unread conversations for a user.
Returns
Promise<number>
Intercom.handlePushMessage()
Handles the opening of an Intercom push message. This will retrieve the URI from the last Intercom push message.
  useEffect(() => {
  /**
   * Handle PushNotification Open
   */
  const appStateListener = AppState.addEventListener(
    'change',
    (nextAppState) =>
      nextAppState === 'active' && Intercom.handlePushMessage()
  );

  return () => AppState.removeEventListener('change', () => {}); // <- for RN < 0.65
  return () => appStateListener.remove(); // <- for RN >= 0.65
}, []);
Returns
Promise<boolean>
Intercom.displayMessenger()
Opens the Intercom Messenger automatically to the best place for your users.
Returns
Promise<boolean>
Intercom.displayMessageComposer(initialMessage)
Open the conversation screen with the composer pre-populated text.
Options
| Type | Type | Required |
|---|---|---|
| initialMessage | string | no |
Returns
Promise<boolean>
Intercom.displayHelpCenter()
Open up your apps help center
Returns
Promise<boolean>
Intercom.displayHelpCenterCollections()
Present the help center with specific collections only .
Note: If the requested collections cannot be found, the full help center will be shown instead.
Options
| Type | Type | Required |
|---|---|---|
| collections | string[] | no |
Returns
Promise<boolean>
Intercom.fetchHelpCenterCollections()
Fetch a list of all Collections.
Returns
Promise<HelpCenterCollectionItem[]>
Intercom.fetchHelpCenterCollection(collectionId)
Get a list of sections/articles for a collection.
Options
| Type | Type | Required |
|---|---|---|
| collectionId | string | yes |
Returns
Promise<HelpCenterCollectionContent>
Intercom.searchHelpCenter(searchTerm)
Get a list of articles in the Help Center, filtered by a search term
Options
| Type | Type | Required |
|---|---|---|
| searchTerm | string | yes |
Returns
Promise<HelpCenterArticleSearchResult[]>
Intercom.displayArticle(articleId)
Displays article with given id.
| Type | Type | Required |
|---|---|---|
| articleId | string | yes |
Returns
Promise<boolean>
Intercom.displayCarousel(carouselId)
Displays carousel
Options
| Type | Type | Required |
|---|---|---|
| carouselId | string | yes |
Returns
Promise<boolean>
Intercom.displayArticle(articleId)
Opens an article
Options
| Type | Type | Required |
|---|---|---|
| articleId | string | yes |
Returns
Promise<boolean>
Intercom.setInAppMessageVisibility(visibility)
Toggles visibility of in-app messages.
Options
| Type | Type | Required |
|---|---|---|
| visibility | string GONE, VISIBLE |
yes |
Returns
Promise<boolean>
Intercom.setLauncherVisibility(visibility)
Toggles visibility of the launcher view. Set as Intercom.Visibility.GONE to hide the launcher when you don't want it to be visible.
Options
| Type | Type | Required |
|---|---|---|
| visibility | string GONE, VISIBLE |
yes |
Returns
Promise<boolean>
Intercom.setBottomPadding(bottomPadding)
Set the bottom padding of in app messages and the launcher.
Setting the bottom padding will increase how far from the bottom of the screen the default launcher and in app messages will appear
Options
| Type | Type | Required |
|---|---|---|
| bottomPadding | number | yes |
Returns
Promise<boolean>
Intercom.setLogLevel(logLevel)
Set the level of the native logger
Options
| Type | Type | Required |
|---|---|---|
| logLevel | string(ASSERT, DEBUG, DISABLED, ERROR, INFO, VERBOSE, WARN) |
yes |
Returns
Promise<boolean>
Intercom.addEventListener(event,callback)
Sets a listener for listed events:
| Event | Platform |
|---|---|
| IntercomUnreadConversationCountDidChangeNotification | IOS, Android |
| IntercomHelpCenterDidShowNotification | IOS |
| IntercomHelpCenterDidHideNotification | IOS |
| IntercomWindowDidShowNotification | IOS |
| IntercomWindowDidHideNotification | IOS |
useEffect(() => {
  const listener = Intercom.addEventListener('IntercomUnreadConversationCountDidChangeNotification', ({count}) => alert(count);
  return () => {
    listener.remove();
  }
}, [])
Options
| Type | Type | Required |
|---|---|---|
| event | string (IntercomEvents) |
yes |
| callback | function ({count?: number, visible?: boolean}) => void |
yes |
Returns
EmitterSubscription
Types
type HelpCenterArticle = {
  it: string;
  title: string;
};

type HelpCenterSection = {
  name: string;
  articles: HelpCenterArticle;
};

type HelpCenterCollectionItem = {
  id: string;
  title: string;
  summary: string;
};

type HelpCenterCollectionContent = {
  id: string;
  name: string;
  summary: string;
  articles: HelpCenterArticle[];
  sections: HelpCenterSection[];
};

type HelpCenterArticleSearchResult = {
  id: string;
  title: string;
  matchingSnippet: string;
  summary: string;
};
Usage
Troubleshooting
This project uses AndroidX dependencies, but the 'android.useAndroidX' property is not enabled.
- To enable
jetifier, add those two lines to yourgradle.propertiesfile:android.useAndroidX=true android.enableJetifier=true
- To enable
When Android app keeps stopping (E/AndroidRuntime: FATAL EXCEPTION: mqt_native_modules)
- Add those lines to
dependenciesin./android/app/build.gradle:implementation 'androidx.appcompat:appcompat:1.1.0' implementation 'androidx.swiperefreshlayout:swiperefreshlayout:1.1.0-alpha03'
- Add those lines to
Author
👤 Intercom (https://www.intercom.com/)
Show your support
Give a ⭐️ if this project helped you!
📝 License
This project is MIT licensed.
Created with ❤️ by Intercom