README
Geoprocessing
A framework for publishing low-cost and low-maintenance geoprocessing services and reports in the cloud. Part of the SeaSketch ecosystem.
What is this for?
This frameworks niche is running spatial analysis and generating reports quickly and simultaneously at scale, with different input, over and over again, such as part of a collaborative spatial planning process.
Often, the original analysis might be prototyped in an environment like R, Jupyter Notebook, ArcGIS, etc. and this framework can be used to "operationalize" the analysis at a cost, speed and scale that other products out there can't match.
Who is this for?
It's specifically targeted to code-savvy folks that want to create and host geoprocessing projects themselves and plug it into their SeaSketch project, though it is not dependent on SeaSketch. The SeaSketch team uses it for all projects, here are some public ones
Goals
- Spins up to meet high demand, then spins down to near zero cost when not in use.
- Plug-and-play with the SeaSketch platform
- Make it relatively easy to create, publish and manage a geoprocessing project with data, functions, and reports in the cloud
Features
- Cloud-optimized techniques for indexing, storing and retrieving from big datasets to power analysis including Flatgeobuf, Cloud-optimized GeoTIFFs (COGs), and subdivision.
- Core library with command-line interface (CLI) for managing geoprocessing projects, and a straightforward upgrade path to new versions.
- Docker workspace packed with open source tools for scripting data prep workflows.
- Toolbox of geoprocessing functions utilizing Turf JS, Geoblaze, Simple Statistics.
- Library of React components ready to add to report clients.
- Templates for common planning use cases that can be installed into your project.
- Cloud-native serverless architecture with automated provisioning and migration as a project evolves.
- APIs for accessing project resources and integration including REST, Web Socket, and IFrame postMessage.
Limitations
Javascript-only
- The current version of the library only supports spatial libraries written in Javascript. This includes Turf JS, Geoblaze, cheap-ruler and anything else you can find. There is discussion about supporting any analysis that can be packaged into a Docker container now that Lambda has added container support. This will be done as need arises.
WGS84
- Geoprocessing functions in this library currently only support GeoJSON data in the World Geodetic System 1984 (WGS 84) [WGS84] datum (aka Lat/Lon), with longitude and latitude units of decimal degrees.
Calculation Error
Since the data is spherical (WGS84), most geoprocessing functions in this library (particularly Turf.JS) measure distance and area by approximating them on a sphere. Algorithms are typically chosen that strike a balance between speed and accuracy. So choose accordingly. That said:
- If the geographic area of your project is small, on the order of a few hundred to a thousand miles, and not at high latitudes, then error is usually acceptable.
- Reporting the percentage of an area is not subject to the error of the algorithm for calculating the area. For example, if you write a function to calculate the % of a particular habitat captured by a polygon that overlaps the habitat, as long as the area of the total habitat, and the area overlapping the habitat are calculated using the same formula, then the percentage of the two should be the same as if it were calculated using a more accurate area formula.
Sources:
- Fast Geodesic Approximations
- Calculate distance, bearing and more between Latitude/Longitude points
- Haversine Formula on Wikipedia. Used by turf-distance. Error up to 0.5%
- Some algorithms for polygons on a sphere - used by turf-area. Greater error at higher latitudes vs. Vincenty.
- Vincenty algorithm used by turf-vincenty-inverse
- GeoJSON spec WGS84 requirement.
System Components
Geoprocessing projects consist of geoprocessing or preprocessing functions, client javascript components and data prep scripts. Functions are bundled into services that are deployed to AWS Lambda. The advantage of running on lambda is that costs are based directly on use, and are typically very low compared to a server running 24/7. They also scale up to hundreds of simulateous users very quickly. Client code is stored on AWS S3 and distributed via CloudFront. The SeaSketch platform runs these report clients inside a sandboxed iframe to protect user data.
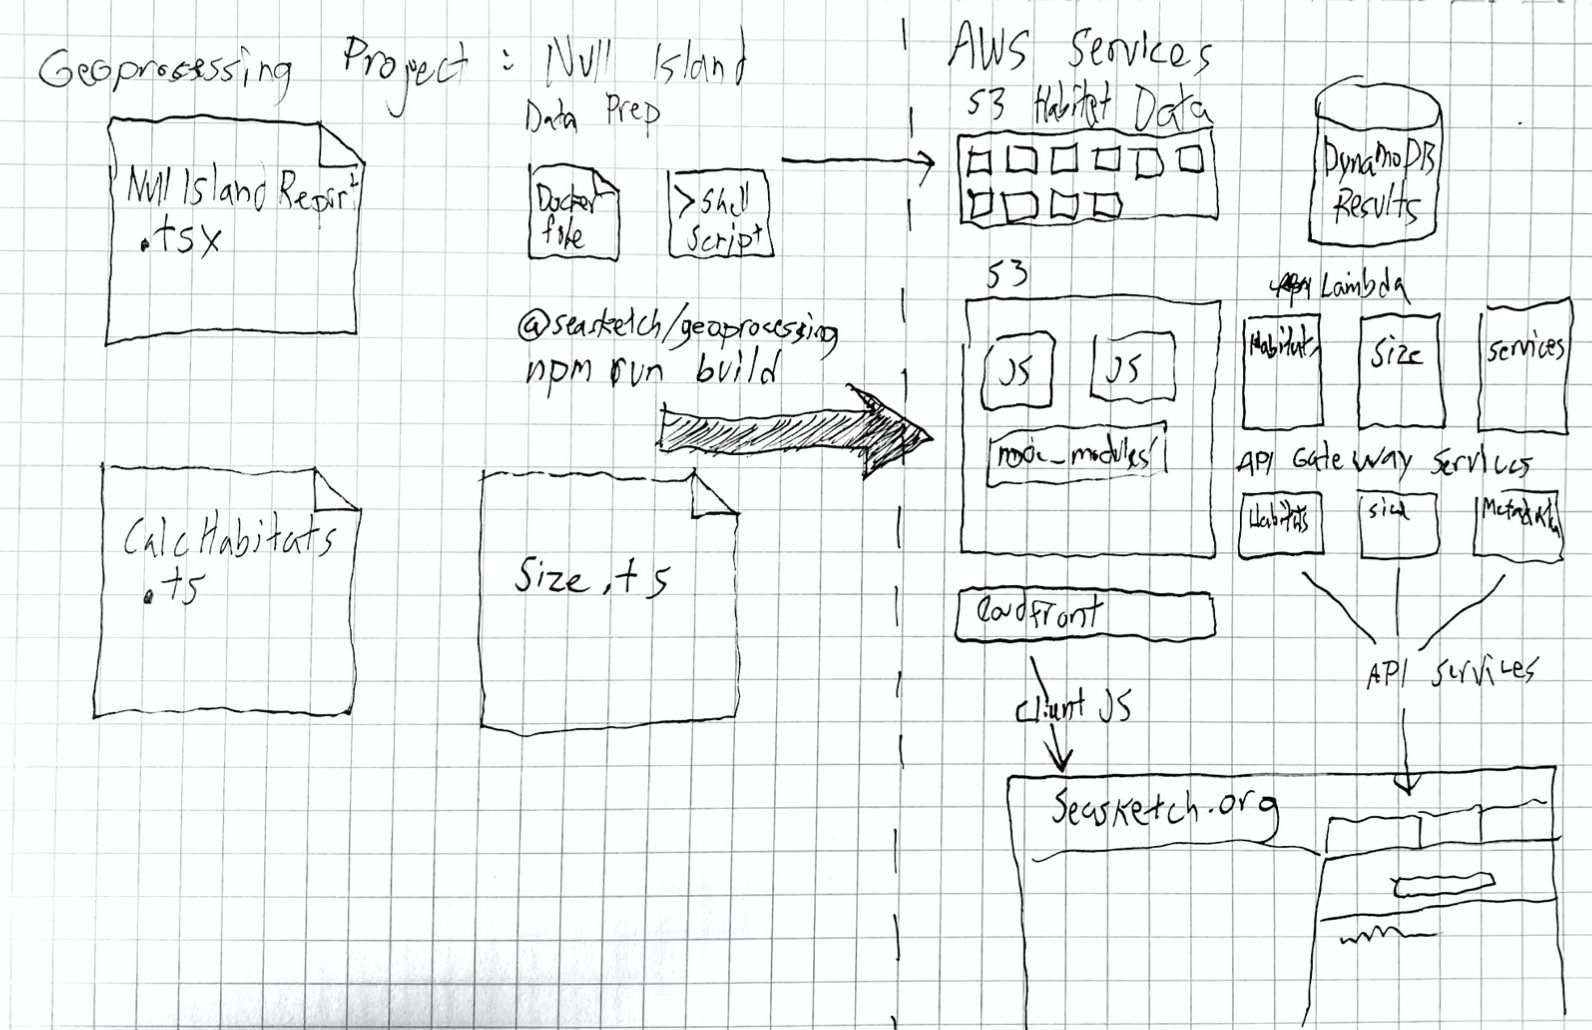
All the infrastructure pictured above is created for each geoprocessing project implementation. Resources are not shared in order to avoid issues of version mismatches and so that report authors can deploy to their own AWS account.
Getting started
To develop projects initially on your local system you will need to:
- Install Node JS version 14 or greater and the NPM package manager (these often come together).
- Install Docker Desktop
When you're ready to deploy your first project to the Amazon Cloud you will need to:
- Create an Amazon [AWS account] such that you can login and access the main AWS Console page (https://aws.amazon.com/premiumsupport/knowledge-center/create-and-activate-aws-account/). You will find there is a fairly generous free tier
- Create an AWS IAM admin account. This is what you will use to manage projects.
- Install the AWS CLI and configure a new or default profile with your admin credentials in your shell environment
Creating a new project
Use the init command to create a new project
npx @seasketch/geoprocessing init
This will download the framework, prompt you for project metadata, and then prompt you for which templates you would like to install. Templates are sets of ready-to-use geoprocessing functions and clients using pre-compiled datasets. You can extend them, install them at a later time, or quickly remove them if unused. Finally, your new codebase will be initialized.
Each geoprocessing project you create may contain multiple data preparation routines, functions, and report clients. For the most part it makes sense to create one new geoprocessing project for each SeaSketch project.
Templates
Templates are bite-sized bundles that can be installed into your project to get you going quickly. Dependening on their purpose they may include data prep scripts, geoprocessing functions, and report clients.
After creating your project you can add templates at any time by running:
geoprocessing add:template
This will copy template files directly into your project. If there happens to be a naming collision, for example if you attempt to install a template twice, then you will get an error and the installation will stop.
Available templates include:
Upgrading
When you create a geoprocessing project, it will be pinned to a specific version of the geoprocessing library in package.json. You can update to the latest by running:
npm update @seasketch/geoprocessing@latest
You should then run npm test and npm build to see if anything is broken. As long as this project is below version 1.0 then there could be breaking changes at any time but it should be limited to minor release increments (0.x) and not point releases (0.x.y). Consults the CHANGELOG for tips on where to look, and what new features you can now take advantage of.
Configuring your editor
The first version of @seasketch/geoprocessing support only Typescript and having an appropriately setup editor is crucial to taking advantage of this system. It is highly recommended you use VSCode. Projects are automatically initialized with settings in .vscode, and when prompted you should choose to Install All extensions for the best development experience.
Populating the project with example inputs
Before working on any code your first step should be populating the project with example sketches. When added, your unit tests will automatically be run against these shapes and the client authoring environment will show them while working on ui outputs. These examples should be encoded as GeoJSON and can be downloaded from SeaSketch by using the Export GeoJSON context menu action.
  /examples/
    sketches/ # <-- examples used by geoprocessing functions
    features/ # <-- examples used by preprocessing functions
It's easy to generate these examples using SeaSketch, so be sure to make lots of examples that cover all edge cases. Will your function work with both Sketches and Sketch Collections? Then include both types. Maybe even include Sketches outside the project bounds to make sure error conditions are handled appropriately.
Creating a geoprocessing function
Geoprocessing projects have a number of npm scripts available. Run npm run create:function, and choose "Geoprocessing" for the function type. After following the prompts a template function implementation and unit test file will appear under src/functions, as well as a new entry in geoprocessing.json. Run npm test to run these new unit tests against your examples and verify the initialization of the project if you'd like.
To implement the geoprocessing function, modify the template to incoporate new spatial operations or data. The framework expects your function to accept a Sketch or Sketch Collection (GeoJSON will certain required properties), and it can return any json-serializable object. It can be very helpful to implement a Typescript interface definition to help debug your function and aid the development of the report client ui, and the template includes such a definition to start with.
Preparing data for geoprocessing
Implementing geoprocessing for vector data typically will involve data encoded as GeoJSON for use with libraries such as turf and martinez-polygon-clipping. The efficiency of functions is largely determined by how these data are represented. Here are a few important points to keep in mind when preparing data:
- Lambda functions are limited to 3gb of memory, max
- Lambda "cold-starts" will start to slow with bundle sizes > 1-2 MB
- A decimal precision of 6 digits in GeoJSON represents 10 cm of resolution (Anything higher is a waste, but by default most datasets are wasteful)
- A large driver of size in many datasets is often the complex shoreline, which may be simplified without harm in some cases.
Projects start with a location under data/ designed to facilitate workflows to turn raw data into efficient encodings for use with lambda functions. It includes a Dockerfile and docker-compose setup with a PostGIS database and OGR/GDAL tools that can run data prep tasks without dependence on the configuration of the author's desktop machine. More details on this setup can be found in the data/README.md file.
Packaging data with lambda vs serving over the network
For small datasets there's no need to complicate deployment. GeoJSON encodings of these data can be directly imported as a module and the framework will bundle these data into the lambda javascript code using webpack.
import ports from "../../data/dist/ports.json"; // 12kB
When building lambda functions, the system will warn when the bundle size exceeds 500kB and that threshold can be reached very quickly. Exceeding these guidelines may mean increasingly slower cold-starts. The limit may be closer to multiple megabytes now. Cold starts occur when the AWS Lambda system starts a new Lambda instance rather than reusing one already in memory and ready to go. With even a 30mb file this can take longer than 10 seconds.
The solution for large datasets is to subdivide them into reasonably sized chunks stored in network storage (s3), create an spatial index of bundle locations, and then have Lambda functions load just the subset of the data they need for analysis in a particular region. Geoprocessing function handlers can then use these data services by creating a new VectorDataSource. Instances of VectorDataSource can efficienctly fetch files for a bounding box and even cache them for use in requests for nearby regions.

Deploying raster data for use in reports
Most raster datasets will require separate processing and uploading to s3 for use within geoprocessing functions. Rasters should be converted to cloud optimized geotiffs (COGs) that can be retrieved in an efficient manner from cloud storage. Converting a geotif to a COG can be done by using gdal libraries. An example of this process can be found here. (NOTE: the raster functionality uses the geoblaze.js library, which does not currently support COGs, so the full raster will be downloaded for processing. Running the COG conversion is still useful, though, for when COGs are fully supported in the code).
Running unit tests
When generating geoprocessing function templates using npm scripts, two test files will also be created (e.g. functions/myFunctionSmoke.test.ts and functions/myFunctionUnit.test.ts ). The smoke tests have 2 objectives: make sure your function exists and write out the results of the runs with the example sketches. The unit tests execute the functions and can be used to test correct output values. All unit tests can be run using npm test. This template by default will run your function against all sketches in examples/sketches and save the output to examples/output, which will be used when debugging the geoprocessing clients.
Be default, each smoke test will be added to the @smoke group, and unit tests will be added to the @unit group. (Groups are specified in the docstring at the top of the file). To pass flags from npm to jest during tests, separate the npm test command from the jest flags using '--'. For example, to run just the smoke or unit test groups, you can send the --group flag to jest:
npm test -- --group=smoke #run only the smoke tests in a project
You can also run a target test by using the -t option, for example, running just a test called 'areaTest':
npm test -- -t=areaTest #run target test 'areaTest'
Debugging unit tests
Each project you create includes a debug launcher which is useful for debugging your function. With the geoprocessing repo checked out and open in VSCode, just add a breakpoint or a debugger call in one of your tests or in one of your functions, click the Debug menu in the left toolbar (picture of a bug) and select the appropriate package. The debugger should break at the appropriate place.
More resources
Creating a geoprocessing client
Client report UI's are React components that run in iframes within SeaSketch. To generate a new report, run npm run create:client. This will create a template under src/clients/ along with a simple unit test and entry in geoprocessing.json.
The framework uses Storybook to provide a environment to test your client using the results of your geoprocessing functions run on examples/sketches. To start, run npm run storybook. Be sure to run npm test to generate or update test outputs before using the storybook.
Deployment
npm run build # first create lambda and client bundles
AWS_PROFILE=my-profile npm run deploy # deploy using aws credentials
After running deploy the service metadata endpoint will be shown. This can be referenced when linking to SeaSketch.
Integration with SeaSketch
You will need the url shown after deploying the project, or need to retrieve it using AWS_PROFILE=my-profile npm run url. This url, along with the name of the report client, can be entered into the Sketch Class admin interface.

Contributing
To contribute to @seasketch/geoprocessing please create a new branch for feature work and a pull request when ready to merge into master. Setting up your development environment as detailed below will make for a smoother process.
Quickstart
npm install- installs dependencies and runs postinstall scripts for all packages usinglerna bootstrapnpm test- runs test suite for all packagesnpm run clean- clean up build artifacts by recursively removing files and directories not under version control including git ignored files.
Installation
This repository is setup as a "monorepo" managed by Lerna, with two packages under packages/. These include the geoprocessing library itself and an example project that can be used to test functionality. To work on the library, checkout the repo and run the install script. This will install lerna, bootstrap each package, and prepare an initial build of the geoprocessing library.
git clone https://github.com/seasketch/geoprocessing.git
cd geoprocessing
npm install
You should now be able to run unit tests for all packages
npm run test
Editor setup and style guidelines
You can use whatever code editor you want, however VS Code provides some nice nice features for Typescript development and this project is configured to take advantage of them. To start using them, simply open the root folder of this repo in VS Code.
- autocompletion
- built-in type docs
- hide generated files
- run build steps, etc
- geojson file Intellisense and error detection - open a file and hover over features and red error squiggles to get information
Extensions
A number of VSCode extensions are also recommended by the workspace for installation. If you are not prompted to install, you will need to go to the Extensions screen and look for the Workspace recommended. You can filter for this.

- TSLint - provides
- Prettier - automatic code formatting on save
- Map preview - open a geojson file and click the globe icon to view the features on a map in another vscode tab
Make code changes
Any changes you make to the Typescript code in src won't be reflected in the Javascript code in dist until you compile it. You can do this a few different ways. Watch modes are useful for active development, new changes will be compiled automatically as you go.
VS Code - Press Command+Shift+B to open the build menu
geoprocessing build- build core librarygeoprocessing build scripts- build scripts onlygeoprocessing watch- build core library and watch for changesgeoprocessing watch scripts- build scripts only and watch for changes
CLI - from packages/geoprocessing folder
npm run prepare- compile core Typescript library and scripts usingtsc. Also runs automatically on initial install and publishnpm run watch- build core library and watch for changesnpm run watch:scripts- build scripts only and watch for changes
Debugging
The geoprocessing library and example-project both provide debug launchers for their test suite, just as the project template does. With the geoprocessing repo checked out and open in VSCode, just add a breakpoint or a debugger call in one of the core tests, click the Debug menu in the left toolbar (picture of a bug) and select the appropriate package. The debugger should break at the appropriate place.
Debugging Functions
As you build report functions, using console logging or inspecting with a VSCode debugger may not be enough. You may want to make sure the output is properly formatted JSON/GeoJSON, or looks appropriate on a map, or try using the file in another software library. Here's a simple workflow that can make this easier:
- Write a unit test that calls your function
- In your function, use the
toJsonFilehelper to write out any Javascript object to a nicely formatted file. - If you output a
.geojsonfile you can open it in vscode, check for errors, and view it using the Map Preview extension. - Make any necessary changes to your code and run the test again to regenerate the files.
- Clean up your temporary files when done
Storybook components
The framework has it's own storybook project that can be launched using npm run storybook. These components and their stories can be found under packages/geoprocessing/components/. As common ui patterns are developed the intention is to create a library of useful components with good documentation that report authors can use.
Testing integration with project implementations
Testing modifications to the framework, particularly build steps, can be tricky because of the varying environments under which the code may run. A good methodology is to first create unit tests and verify that they run, then modify packages/example-project and its unit tests and verify the tests run and npm run build steps work. It is not uncommon for these steps to pass and for bugs to still appear after publishing of the framework, so manual testing after publishing should be done as well.
To test with projects other than example-project on your local machine, npm link is a handy tool. From within packages/geoprocessing run the command npm link. This will make the library available to other packages locally (assuming the same version of node. watch out nvm users!). Then change to you project directory and run npm link @seasketch/geoprocessing. Any changes you make to the library will automatically be reflected in your geoprocessing implementation. Just watch out for a couple common problems:
- Make sure VSCode is running the two build processes, and they complete without errors. Implementations import code from
dist/, not the source typescript files. - Running npm install within your geoprocessing project can interact oddly with npm link and produce errors. If you suspect problems redo the linking process again after all your installs. You will need to run
npm unlink @seasketch/geoprocessing --no-savein your project directory. You can then try and relink.
Further link troubleshooting steps:
- If still issue you can fully unlink and relink the geoprocessing project as a global npm package.
npm unlink @seasketch/geoprocessingin the geoprocessing package. If you runnpm list -g --depth 0and still see the geoprocessing package globally then also runnpm unlink -g @seasketch/geoprocessing. Now follow the complete steps again to relink. - If still issue, then consider also deleting your
node_modulesdirectory andpackage-lock.jsonfile in your project directory to start fresh as they may have been put into an incosistent state by the linking.
Publishing
To publish a new release of the framework, make sure you are in the master branch with no outstanding code changes. Then run the following:
npm run publish:stable
Please follow semantic versioning conventions. This will generate new build artifacts in the dist folder first using the prepare script.
Alpha releases
By default, a release will be tagged as latest so that users installing from npm will get it by default. You can also publish an alpha release out-of-band to offer new features out for early testing/adoption.
npm run publish:alpha
Roadmap
- v0.7 testing on simple vector reports with legacy version of SeaSketch
- Replace recent geoprocessing functions and use for new projects
- Build out component library as needed
- Add benchmarking and VectorDataSource stats tool
- v0.9 Add support for async execution model for longer running reports with progress bars
- v0.9.1 Add
requiresPropertiessupport - Log access
- v1.0 - Authorization for protected datasets
- v1.1 Docker container-based geoprocessing
- v1.2 Open/encourage use by 3rd party developers