README
![]()
Ant:Viber
Tiny but powerful framework for Viber chat bots.
This framework is viber adaptation of Ant:Telegram.
![]()


List of content
About:
- Basic features
- Instalation
- Basic usage
- Ant anatomy
- Deep linking
- Rich media, payload data handling
- Request retries
- Config
- Examples
Basic features
- Status-based user dialog stage managment.
- Easy-to-use.
- Based on official Node.js Viber library.
- All in one: all official API methods and types, flexible dialog flow control.
- w/o functional overkill, nothing extra.
Instalation
Basic usage
Ant:Viber require to provide 2 basic status managment async methods: for getting status to user by viber id, and for setting it.
Feel free to chose storing way (architecture, database etc.). We require next interfaces only:
getStatus(id: string): Promise<String>;
setStatus(id: string, status: String): Promise<any>;
Just put in on Ant:Viber initialization with viber bot access token, bot name and avatar link:
const { AntViber } = require('ant-viber');

const bot_token  = '...'; // Your viber bot access token token
const bot_name   = 'my_bot';
const bot_avatar = 'https://www.domain.com/avatar.jpg'; // Image direct link

const Ant = new AntViber(bot_token, bot_name, bot_avatar, {
    getStatus: (id) => { ... },
    setStatus: (id, status) => { ... },
});
Notice: you must pass empty string ('') if you don't need to override avatar for viber client or viber admin pannel:
const Ant = new AntViber(bot_token, bot_name, '', { ... })
Explore quick start example using MongoDB + mongoose.
Next you need to configure webhook and add middleware (using Express.js in example):
const express = require('express');
const app = express();
const webhookUrl = '/webhook';

app.use(webhookUrl, Ant.middleware());
app.listen(async () => {
    await Ant.setWebhook('https://www.domain.com' + webhookUrl);
})
Notice: https support required for viber webhook. Self-signed SSL certificates not supported!
Also notice: you need to start your server before webhook setting.
Now you ready to use Ant:Viber.
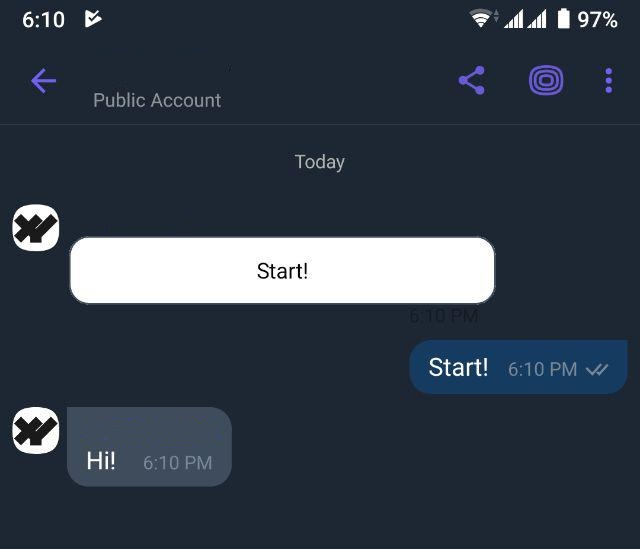
When new user connect to your bot (create subscription), bot will send start button using RichMedia. Text on button you can change using startButtonText parameter in config. This button send /start command when pressed.
Let's add handler for /start command:
Ant.command('/start', async user => {
    await Ant.sendMessage(user, [ Ant.Types.TextMessage('Hi!') ]);
})
Your bot ready to start. Run script and make sure it works:
Ant anatomy
Viber API
Ant:Viber use official API so you can use Ant.sendMessage method for sending message to user:
Ant.sendMessage(user: userProfile | string, messages: Viber.message[])
userProfile is viber user object. Each listener returns userProfile. You also can pass user id string (userProfile.id) instead of whole object.
Ant.api contains other methods from official API:
getBotProfile(): Promise<BotProfile>- get bot info.getUserDetails(user: ViberUserProfile): Promise<BotUserDetails>- get detail info for provided user.getOnlineStatus(ids: string[]): Promise<BotOnlineStatus>- get connection status for multiple users by their ids.onConversationStarted(handler: OnConversationStartedHandler): void- handler that called when user start conversation with bot (reconnections also counted).onSubscribe(handler: OnSubscribeHandler): void- handler that called when user subscribed on bot messages (both on start and manually).onUnsubscribe(handler: OnUnsubscribeHandler): void- handler that called when user unsubscribed on bot messages.
Events
Error handling:
// Viber API response errors
Ant.on('error', err => { ... })
Also Ant:Viber has Error generalization:
Ant.on('Error', err => { ... })
Error will fire on any error. If error caused during user's scenario, error will have user_id extra field.
Statuses
Set status for user:
await Ant.status(id, 'my_status');
Notice: id is user.id so you can easily get id from userProfile.
And add listener for this status:
Ant.add('sticker', 'my_status', (user, stickerId) => { ... })
First argument is user interaction type, second - our status, third - callback.
Callback will invoke every time when user with this status send sticker to bot.
Full list of available types and callbacks you can check here.
user is userProfile (see Viber API).
Commands
Add command handlers using Ant.command:
Ant.command(command, (user, params, user, message) => { ... })
Command may contain / if needed (example: /start).
Callback will invoke every time when user send this command to chat (either as text message or from rich message payload). Status will be ignored (works with any user's status).
Ant.command support url params for commant that will returns as params in callback. Empty object will returns if params not provided.
For example:
| User input | params value |
|---|---|
/cmd |
{} |
/cmd?item=apple&amount=2 |
{ item: 'apple', amount: '2' } |
Notice: all param values are strings. You need to parse params by youself if you need to support other types in command params.
Masks
You can use multi-leveled statuses using level separator (: by default). It can be changed using maskSeparator field in initial config.
For example:
await Ant.status(id, 'buy:fruit:apple')
Provided status has 3 levels: action (buy), category (fruit), item (apple) and can be used during user interaction with shopping cart.
You not need to set listeners using Ant.add for each item on third level. You can use mask (*):
// Mask value (item, in our case) will be provided as third callback parameter.
Ant.add('message', 'buy:fruit:*', (user, text, item) => {
    console.log(item) // apple
})
Callback will invoke for any text message send by user with any item in status.
Builders
See Ant.Types
Ant:Viber simplifies api methods and types usage with builders.
Let's check examples:
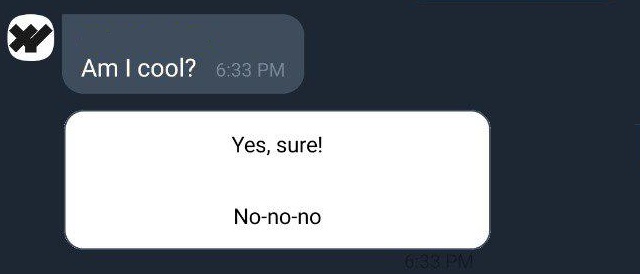
await Ant.sendMessage(user, [
    Ant.Types.TextMessage('Am I cool?'),
    Ant.Types.RichMedia([
        Ant.Types.RichKeyboardButton('Yes, sure!', 'coolmenu:yes'),
        Ant.Types.RichKeyboardButton('No-no-no', 'coolmenu:no'),
    ], 2)
])

await Ant.sendMessage(user, [
    new Ant.Types.Location(41.2362873, -87.6504762),
    new Ant.Types.Url('https://www.google.com'),
])
In first example we use builders instead of define options object. This code will send rich media with two buttons:
In second example we use types which don't need extra options.
Notice: types without extra options can be used either as functions or as classes (with new). Types with extra options (RichMedia, Keyboard, ReplyKeyboardButton, RichKeyboardButton, UrlKeyboardButton) can't be used as classes for context lossing preventing.
Deep linking
Viber supports deep linking so you can create link like:
viber://pa?chatURI=<URI>&context=<Your Context>
which start user scenario with context value. You can handle context easily:
// Via viber://pa?chatURI=yourbot&context=value
Ant.command('/start', async (user, params) => {
    console.log(params); // { context: 'value' }
    console.log(params.context) // 'value'
})
Ant.command listener provide params object as second parameter. It will be empty when user has been connected to bot
without deep link.
Rich media, payload data handling
Using builders you can define rich_payload type and data directly (second and third parameter in Ant.Types.RichKeyboardButton).
Example:
await Ant.sendMessage(user, [
    Ant.Types.TextMessage('Click button below for getting colorful gift'),
    Ant.Types.RichMedia([
        Ant.Types.RichKeyboardButton('Click!', 'gift', 'red'),
    ], 2)
])
It will send test message with text and rich media below with one button that have gift type and data.
How to handle it? Use known Ant.add handler!
Ant.add('rich_payload', 'gift', async (user, payload) => {
    console.log(payload) // "red"
})
Notice: Ant:Viber Ant.Types.RichKeyboardButton builder add data to message.
So final payload is string that created as:
payload = type + separator + string
Separator is equal to $: by default and can be changed using richPayloadDataSeparator field in initial config.
So payload for expample will be equal to 'gift$:red'.
Request retries
Ant:Viber can repeat your API requests via sendMessage method automatically. You just need to enable request retries using config retryRequest.enable parameter (retries are disabled by default). You also can set retries amount and interval.
Example:
const Ant = new AntViber(token, name, avatar, {
    setStatus, getStatus,
    retryRequest: {
        enable: true,
        retries: 3,
        interval: 1000,
    }
})
await Ant.sendMessage(user, [...]) // Potentially rejected messages
In this case request will be repeated for a maximum 3 times with 1 second interval (1000ms) if original request failed. Repeating works till successful request (status = 0) or out of retries.
Config
Ant:Viber init config contain next fields:
| field | type | default | description |
|---|---|---|---|
setStatus |
Promise |
See basic usage. | |
getStatus |
Promise |
See basic usage. | |
maskSeparator |
string |
: |
See masks. |
richPayloadPrefix |
string |
[VCD] |
Prefix for marking payload source: rich media if message with prefix, either text or reply message otherwise. Using if internal Ant:Viber processes only. |
startButtonText |
string |
Start! |
Text on dialog start button (when new user subcribed), see basic usage. Work only when autoStartMessage=true. |
richPayloadDataSeparator |
string |
$: |
See Rich media, payload data handling. |
autoStartMessage |
boolean |
true |
Default rich keyboard with start button will be send when user subscribed if true is passed. |
keyboardSettings.backgroundColor |
string |
#FFFFFF |
RGA or HEX color of button panels (both reply and rich media) background. |
keyboardSettings.buttonColor |
string |
#FFFFFF |
RGA or HEX color of button (background color). |
keyboardSettings.frameColor |
string |
#665CAC |
RGA or HEX color of button frame . |
keyboardSettings.BorderWidth |
number |
0 |
Button border width in pixels. |
retryRequest.enable |
boolean |
false |
Repeat API request on error if true passed. |
retryRequest.retries |
number |
0 |
Retries amount. Reject request only when out of retries. |
retryRequest.interval |
number |
100 |
Retries interval in MS. |
Examples
- Location Echo Bot - echo bot (using Express.js) that send longitude & latitude to user, every time when user sent location.