README
Mint Node - Apigee Monetization tool
This tool allows you to interact with Apigee Monetization settings and entities through commands, automated scripts and YML config files.
- Install & Prepare
- Prerequisites
- About
- Common Parameters
- What can I do with it?
- Commands
- Konwn Issues
Latest Updates 🎉
2020-01-06
- The config directory has been restructured to allow for further templating, putting the default kickstart config into
/configs/kickstart/default - Additional Kickstart template - you can now create a boilerplate for a custom attribute, i.e. credit-based rate plan. Go to /configs/kickstart to read more
Install & Prepare
Install with NPM
npm i apigee-mint -g
NOTE: The -g option places the apigee-mint command in your PATH. On "*nix"-based machines, sudo may be required with the -g option. If you do not use -g, then you need to add the apigee-mint command to your PATH manually.
Run from repository
cdto your local target directory and clone the GitHub repo:
git clone git@github.com:mikesson/apigee-mint-node.git
- Change directory
cd apigee-mint-node
- Install packages
npm install
- Run command with:
./bin/mint.js <commands> <args>
Prerequisites
- Apigee Edge account
- User credentials with the
Organization Administratorrole. - Monetization enabled on your Apigee organization (How do I enable it?)
- Familiarity with the basic features and concepts of Apigee such as API Proxies, API Products and environments
For more information about Apigee, refer to the Apigee Docs.
About
This tool uses Apigee's Monetization module. If you want to learn more about it, read about our API monetization concepts within Apigee.
This high-level diagram shows the entities involved when using Apigee with Monetization:

Common Parameters
The parameters below are used across all operations. For more specific parameters, please refer to the commands list below.
| Parameter | Description | Env. Variable | Required? | Default |
|---|---|---|---|---|
--username -u |
Your Apigee account username | APIGEE_USERNAME |
Yes | / |
--password -p |
Your Apigee account password | APIGEE_PASSWORD |
Yes | / |
--organization -o |
The name of the organization to operate on | APIGEE_ORGANIZATION |
Yes | / |
--logLevel -l |
Log level, defaults to info if not specified |
LOG_LEVEL |
Optional | info |
It is a best practice to store these parameters in environment variables, such as:
export APIGEE_USERNAME="user@domain.com"
export APIGEE_PASSWORD="pwd"
export APIGEE_ORGANIZATION="org-name"
export LOG_LEVEL="debug"
The following log levels are available:
debug, info, warning, error, off
Recommendation is to keep log level at debug when facing issues, info when using the tool ad-hoc and error when integrated into other systems.
What can I do with it?
Jump to the details from this table:
Commands
This section describes all available commands with examples and syntax.
kickstart
Deploys a chain of entities for a ready-to-use sample configuration. This command makes use of a config directory where all YML files reside. Familiarize yourself with the Apigee Monetization concepts and entities before customizing the config files.
Recommendation: Keep the versioning tags in the entity names & IDs to increment in case of a failed execution.
Examples
Executes kickstart configuration for specified organization and environment, considering existing settings (What does that mean?)
apigee-mint kickstart -u user@domain.com -o my-nonprod -e test -l info -c true
Executes kickstart configuration for specified organization and environment, overwriting/ignoring existing settings
apigee-mint kickstart -u user@domain.com -o my-nonprod -e test -l info -c false
Parameters
--environment -e
(required, the name of the target environment)
Specify the environment name for the setup, e.g. dev/test/prod
--directory -d
(optional, the directory where the config files reside, default: config)
Note: If it starts with a /, it is considered an absolute path, otherwise relative.
You can also store this in an environment variable:
export DIR_CONFIG="config-myorg"
--considerExistingSettings -c
(optional, true/false, default: true)
As the kickstart command modifies a range of settings from the organization profile over to currencies and T&Cs, you can choose to (a) overwrite all settings or (b) keep them and add the proxy, product and bundle to your existing configuration.
Choose false if you run this command on a clean/empty environment, choose true if you have already run this command before or if you would like to keep your existing org settings. Please be aware that config file changes might be necessary in order for the kickstart setup to work (e.g. clash of supported currencies and necessary changes to the organization profile).
In more detail, the -c false flag executes two additional steps:
- Checks whether the currency specified in
1-orgProfile.ymlis already available. Iftrue, no new currency is being added - Checks whether there are existing T&Cs which have not expired yet. If
true, no new T&Cs are added.
Steps
Follow these steps to run the kickstart setup
Clone this repo to your local workspace
Create a copy of the config directory for your own setup, with e.g. the target org name as suffix
cp -r config config-{yourSuffix}
- Set environment variables
export APIGEE_ORGANIZATION={orgName}
export APIGEE_USERNAME={username}
export APIGEE_PASSWORD={password}
export LOG_LEVEL=info
export DIR_CONFIG=config-{yourSuffix}
- Prepare configuration files (Required)
4.1 Set start date of T&Cs (e.g. today and now + 1 hour)
3-termsAndConditions.yml -> startDate4.2 Set start date of rate plan (e.g. today 00:00:00)
8-ratePlan.yml -> startDate4.3 Set end date of rate plan (any date in the future)
8-ratePlan.yml -> endDate
- Make sure you're in the repo's root directory
cd [where_you_cloned_this_repo]/apigee-mint-node
- Run the command
apigee-mint kickstart -e test -l info -c false
(Note that -c false indicates that default org values are being overwritten)
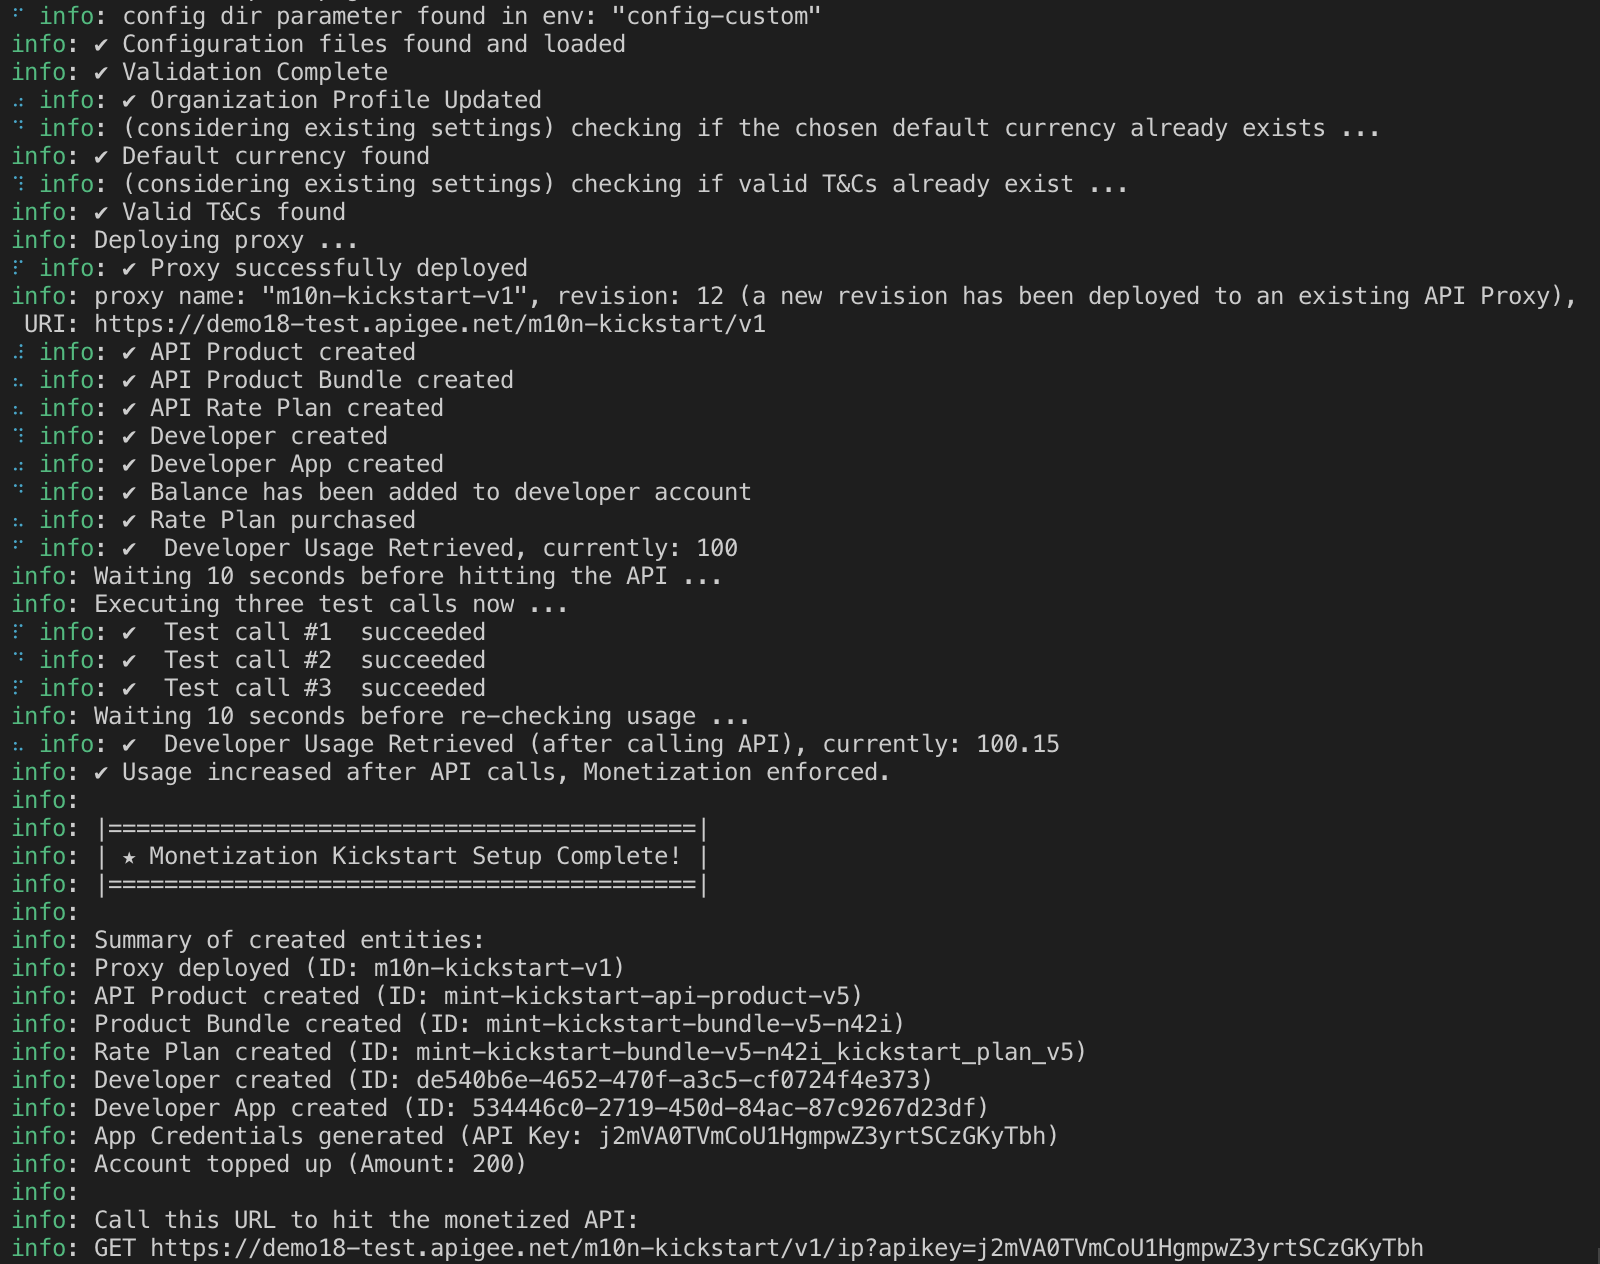
For reference, this is how a successful kickstart execution looks like:
Customizations
You can use tour copied config directory to adjust all setup settings. Here's a list of common customizations, referencing the target file name and attribute:
Set new API Proxy name:
4-apiProductMint.yml -> proxies[0]
Set new API Product Name:
4-apiProductMint.yml -> name
4-apiProductMint.yml -> displayName
The API Product name also appears in the following files, so change the name there, too:
7-productBundle.yml -> product.id
10-developerApp.yml -> apiProducts[0]
Set new default currency for organization:
1-orgProfile.yml -> currency
2-currency.yml -> name
As you change the currency code, you might want to change the display name and description, too:
2-currency.yml -> description
2-currency.yml -> displayName
Set new developer name and email
9-developer.yml -> email
9-developer.yml -> firstName
9-developer.yml -> lastName
As you change the currency code, you might want to change the display name and description, too:
2-currency.yml -> description
2-currency.yml -> displayName
Configuration Reference
This section lists all available config files and a link to the full Apigee Docs page
| File | Description |
|---|---|
1-orgProfile.yml |
Docs Link |
2-currency.yml |
Docs Link |
3-termsAndConditions.yml |
Docs Link |
4-apiProductMint.yml |
Docs Link |
5-transactionRecordingPaths.yml |
Docs Link |
6-transactionRecordingPolicy.yml |
Docs Link |
7-productBundle.yml |
Docs Link |
8-ratePlan.yml |
Docs Link |
9-developer.yml |
Docs Link |
10-developerApp.yml |
Docs Link |
11-purchaseRatePlan.yml |
Docs Link |
12-reloadAccountBalance.yml |
Docs Link |
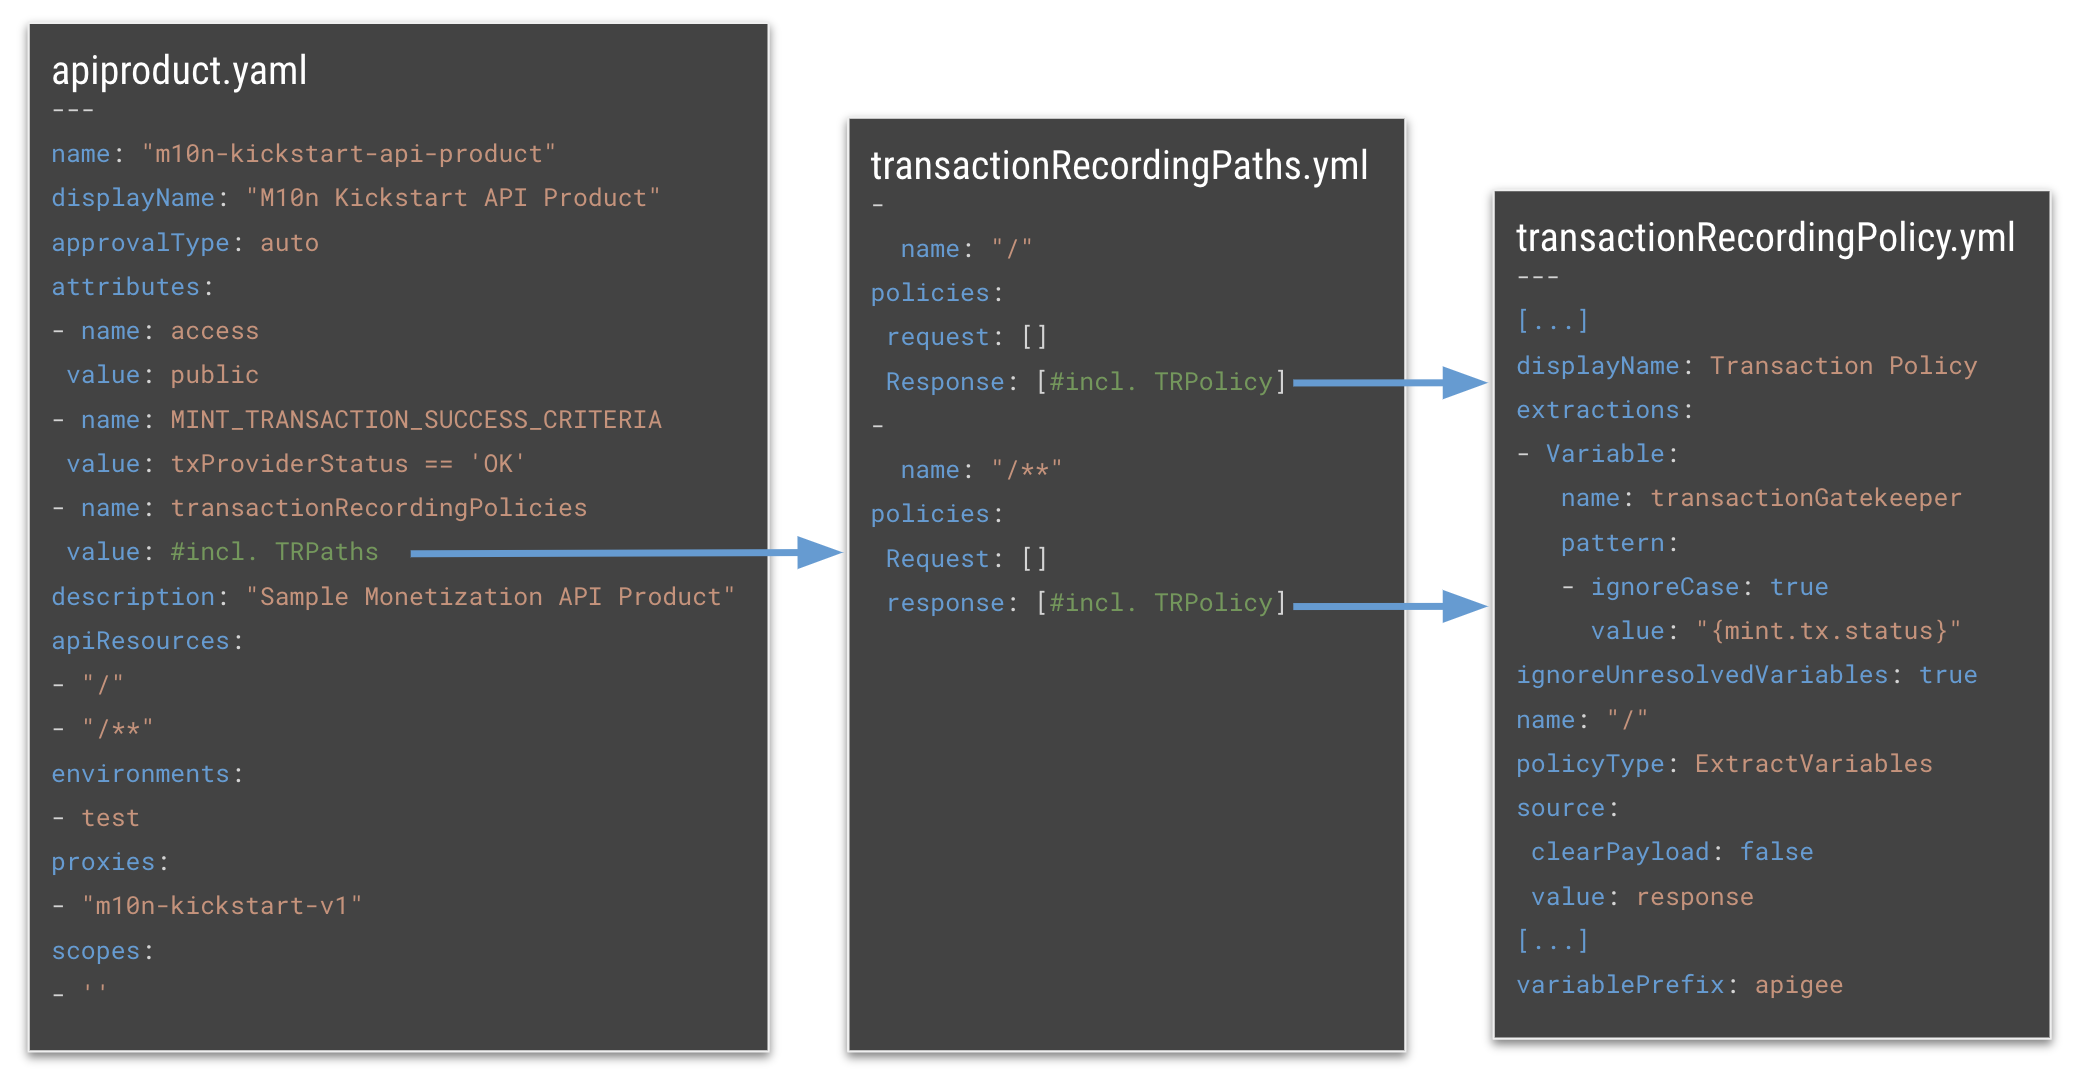
Transaction Recording Policy Details
The API Product YML config has been split for more flexibility with Transaction Recording Policies. The dependencies are as follows:
do
Perform common CRUD operations, view data points and find Monetization resources.
Parameters
--action -a
(required, list/delete/..., default: N/A)
The action you want to perform.
--resource -r
(required, apiproxy/apiproduct/..., default: N/A)
The resource type you want to perform the action on.
--id -i
(required, <identifier>, default: N/A)
The resource or search identifier. For some commands, multiple of those input parameters are required (order matters).
Available actions
Summary
The table below lists available actions and required parameters for each.
| Action | Parameter 1 | Parameter 2 | Parameter 3 | Parameter 4 | Parameter 5 | Parameter 6 |
|---|---|---|---|---|---|---|
list |
-r resourceType |
/ |
/ |
|||
get |
-r resourceType |
-i resourceID |
/ |
|||
delete |
-r resourceType |
-i resourceID |
/ |
|||
find |
-r searchTag |
-i resourceID |
/ |
|||
addPrepaidBalance |
-i developerId |
-i amount |
-i currencyCode |
|||
issueCredit |
-i packageId |
-i ratePlanId |
-i developerId |
-i currencyId |
-i creditAmount |
-i creditDescription |
Available resources per action
get
| Available Resource | Description | Example |
|---|---|---|
developerRatePlan |
details of a developer's rate plan | do -a get -r developerRatePlan -i <developerID> -i <ratePlanID> |
list
| Available Resource | Description | Example |
|---|---|---|
apiproxy |
list of API proxies per org | do -a list -r apiproxy |
productbundle |
list of API product bundles per org | do -a list -r productbundle |
rateplan |
list of rate plans per org | do -a list -r rateplan |
find
| Available Search Tag | Description | Example |
|---|---|---|
apps-byDevEmail |
finds apps by developer email | do -a find -i apps-byDevEmail |
apps-byDevId |
finds apps by developer ID | do -a find -i apps-byDevId |
apiProductBundles-byDevId-activeOnly |
finds active only API product bundles by developer ID | do -a find -i apiProductBundles-byDevId-activeOnly -i <id> |
apiProductBundles-byDevId-includeExpired |
finds all API product bundles by developer ID | do -a find -i apiProductBundles-byDevId-includeExpired -i <id> |
acceptedRatePlan-byDevId |
finds accepted rate plans by developer ID | do -a find -i acceptedRatePlan-byDevId -i <developerId> |
delete
| Available Resource | Description | Example |
|---|---|---|
apiproxy |
deletes an API proxy | do -a delete -r apiproxy -i <id> |
productbundle |
deletes an API product bundles | do -a delete -r productbundle -i <id> |
rateplan |
deletes a rate plan | do -a delete -r rateplan -i <id> |
Add prepaid balance to a developer account
Example:
apigee-mint do -a addPrepaidBalance -i fdd76-2578f-df9f-1ca23f -i 100 -i gbp -l debug
Issue credit to a developer
Example:
apigee-mint do -a issueCredit -i product-bundle-1 -i product-bundle-1-rateplan-1 -i fdd76-2578f-df9f-1ca23f -i gbp -i 100 -i 'sample refund'
cleanup [experimental]
This command cleans up an organization's Monetization data. This is currently an experimental feature as some enties might need manual removal.
Example:
apigee-mint cleanup -l info
You can read more about deleting Monetization data on Apigee docs here
wheresMyConfig
This command helps you verify the currently selected target directory for the configuration files. Use this command if you're unsure about where the kickstart command will pick up the YML files.
Example:
apigee-mint wheresMyConfig
Known Issues
Error when adding developer balance
error: ✖ Error when adding developer balance, find more details below:
error: HTTP 400 | {"code":"mint.invalidTransaction","message":"Invalid transaction: Datastore Error","contexts":[],"cause":{"message":"Invalid transaction: Datastore Error","contexts":[]}}
Retry the operation if the above error message appears
apigee-mint not executable
apigee-mint: command not found
To resolve this, make sure the npm /bin or /apigee-mint directory is in your $PATH variable.
- Check the npm prefix with
npm get prefix - Check if the above prefix is part of the PATH variable with
echo $PATH - If not, add it as follows:
sudo nano /etc/paths- enter your password when prompted- go to the bottom of the file and enter the path from
npm get prefix+/bin, e.g. /Users/user123/.npm-global/bin - Hit CONTROL + X to quit, enter Y to save and ENTER to save to existing file
- To test it, enter
echo $PATHin a new terminal window. You should see the added path now
Also, if you don't want to use npm, you can alawys clone the GitHub repo and run all commands with ./bin/mint.js <command> from the repo's root directory
This is not an officially supported Google product