README
args-command-router
Nodejs opinionated command-line argument router.
The idea behind Args Command Router is from the ExpressJS package, in which you can define different routes for different routines and functions based on the request.


![]()
Installation
npm install --save args-command-router
Executing
JavaScript
$ node index.js
Typescript
$ npx -p typescript tsc index.ts
$ node index.js
Usage
Lets say we want to create a simplified git command line interface:
$ git add ./files1 ./file2
$ git commit -a -m "My message"
$ git branch
$ git push origin master --force
You can implement the routing of commands above like this:
const { argsCommandRouter } = require('args-command-router')

const app = argsCommandRouter({
  applicationName: 'git',
})

app
  .route('/add/...files')
  .description('Add file contents to the index')
  .callback(() => {
    /* Add command routine */
  })

app
  .route('/commit')
  .description('Record changes to the repository')
  .optionalSwitch('a', 'all', 'commit all changed files')
  .optionalSwitch('m', 'message', 'commit message', ['message'])
  .callback(() => {
    /* Commit command routine */
  })

app
  .route('/branch')
  .alias('b')
  .description('List, create, or delete branches')
  .callback(() => {
    /* Branch command routine */
  })

app
  .route('/push/:remote/:branch')
  .description('Update remote refs along with associated objects')
  .requiredSwitch('f', 'force', 'force updates')
  .callback(() => {
    /* Push command routine */
  })

app.run()
In Typescript and JavaScript ES6, import argsCommandRouter using code below instead of
require('args-command-router'):import { argsCommandRouter } from 'args-command-router'
Routes
The route() method maps patterns to callbacks. It receives a series of names separated by / and series of optional switch patterns at the end of the path each inside [].
app.route('/say/:greet/...names[age=21][s]')
On each run, Application goes through the routes in order they are defined and compares the passed arguments (commands and switches) with each route, and execute the first matched route callback.
All arguments below, would matched the route above:
$ APP say hi john --age 21 -s
$ APP say hey john marry -s --age 21
$ APP say hello 'everyone here' -s --age 21
The say, :greet, ...names and [age=21][s] are called PathItem.
sayis a Static PathItem, since it always tries to match the exact name.:greetis a Dynamic PathItem, and it matches to any value in its place....namesis a Spread PathItem, and it matches to one to any number of values in its place.[age=21][s]is a Switch PathItem, and it is matched to existence of switch-s(either with value or not) and existence of switch--agewith the exact value of 21.
Callbacks
Callbacks specifies what routine (function) should be called when a matched route is found.
route('/say/:greet/...names[age=21][s]').callback(function(inputs) {
  const {
    commands,
    pathParams,
    shortSwitches,
    longSwitches,
    switches,
    context,
  } = inputs

  const pathItem = this
})
Your callbacks are called with data about the current execution of your application.
- commands is an array of strings passed to your application as commands.
- pathParams is an object of dynamic and spread pathItem names and values passed for those.
- shortSwitches is an object of short switch names with values passed to those switches.
- longSwitches is an object of long switch names with values passed to those switches.
- switches is shortSwitches and longSwitches in one object.
- context is an object that hooks can use to pass values to the next hooks and callbacks.
- this points to the matched pathItem or it's null if no pathItem is associated with the callback.
You can also add new properties to the input object in hooks and access them in the your callbacks.
Considering our example for route('/say/:greet/...names[age=21][s]') and execution $APP say hey john marry -s --age 21 the inputs parameter will be:
{
  commands: [ 'say', 'hey', 'john', 'marry' ],
  pathParams: { greet: 'hey', names: [ 'john', 'marry' ] },
  shortSwitches: { s: [] },
  longSwitches: { age: [ '21' ] },
  switches: { s: [], age: [ '21' ] },
  context: {}
}
Remember if you mention switches in your route patterns, you need to define them as requiredSwitch on your routes otherwise they won't get matched.
Switches
In order to pass switches to your application, you need to define them on your routes.
Switches can be either Required or Optional.
Required Switches
These switches should be present when running your application for a specific route, otherwise your callback won't be called, even if you are mentioning them in your route string. (This behavior can be changed by the configuration option strictSwitchMatching)
app
  .route('/video/download')
  .requiredSwitch('u', 'url', 'URL of the video', ['address'])
  .callback(input => console.log(input.switches.url))
Here we are defining a Required Switch u, url for /video/download that gets one parameter with a name address. So an example of a shell execution could be:
$ App video download -u http://myvideo.com/v.avi
$ App video download --url http://myvideo.com/v.avi
Optional Switches
These switches can be absent when running your application.
app.route('/video/formats').optionalSwitch('a', 'all', 'Show all formats')
Examples of a shell execution could be:
$ App video formats
$ App video formats -a
$ App video formats --all
If your switch expects parameters, you can list them in the switch definition.
app
  .route('/video/formats')
  .optionalSwitch('f', 'filter', 'Filter format lists', ['pattern'])
The option method can be used interchangably as an alias to optionalSwitch method.
app
  .route('/video/formats')
  .option('f', 'filter', 'Filter format lists', ['pattern'])
Common Required, Optional Switches
These type of switches can be defined on a route and will be inherited by all the subordinate routes.
app
  .route('/video')
  .commonRequiredSwitch('k', 'key', 'Api key', ['key'])
  .commonOptionalSwitch('v', 'verbose', 'Verbose output')
Examples of a shell execution could be:
$ App video -k abc123
$ App video download --key abc123
$ App video formats --key abc123 -v
The commonOption method can be used interchangably as an alias to commonOptionalSwitch method.
Aliases
Static pathItems along with their name can also have aliases.
app
  .route('/say')
  .alias('shout')
  .alias('whisper')
Now calling the route /say/:greet can be done using any lines below:
$ App say 'my name'
$ App shout 'my name'
$ App whisper 'my name'
Hooks
Hooks are functions that are getting executed at different stages of the execution of the application. You can view the order of execution of the callback and hooks from this diagram.
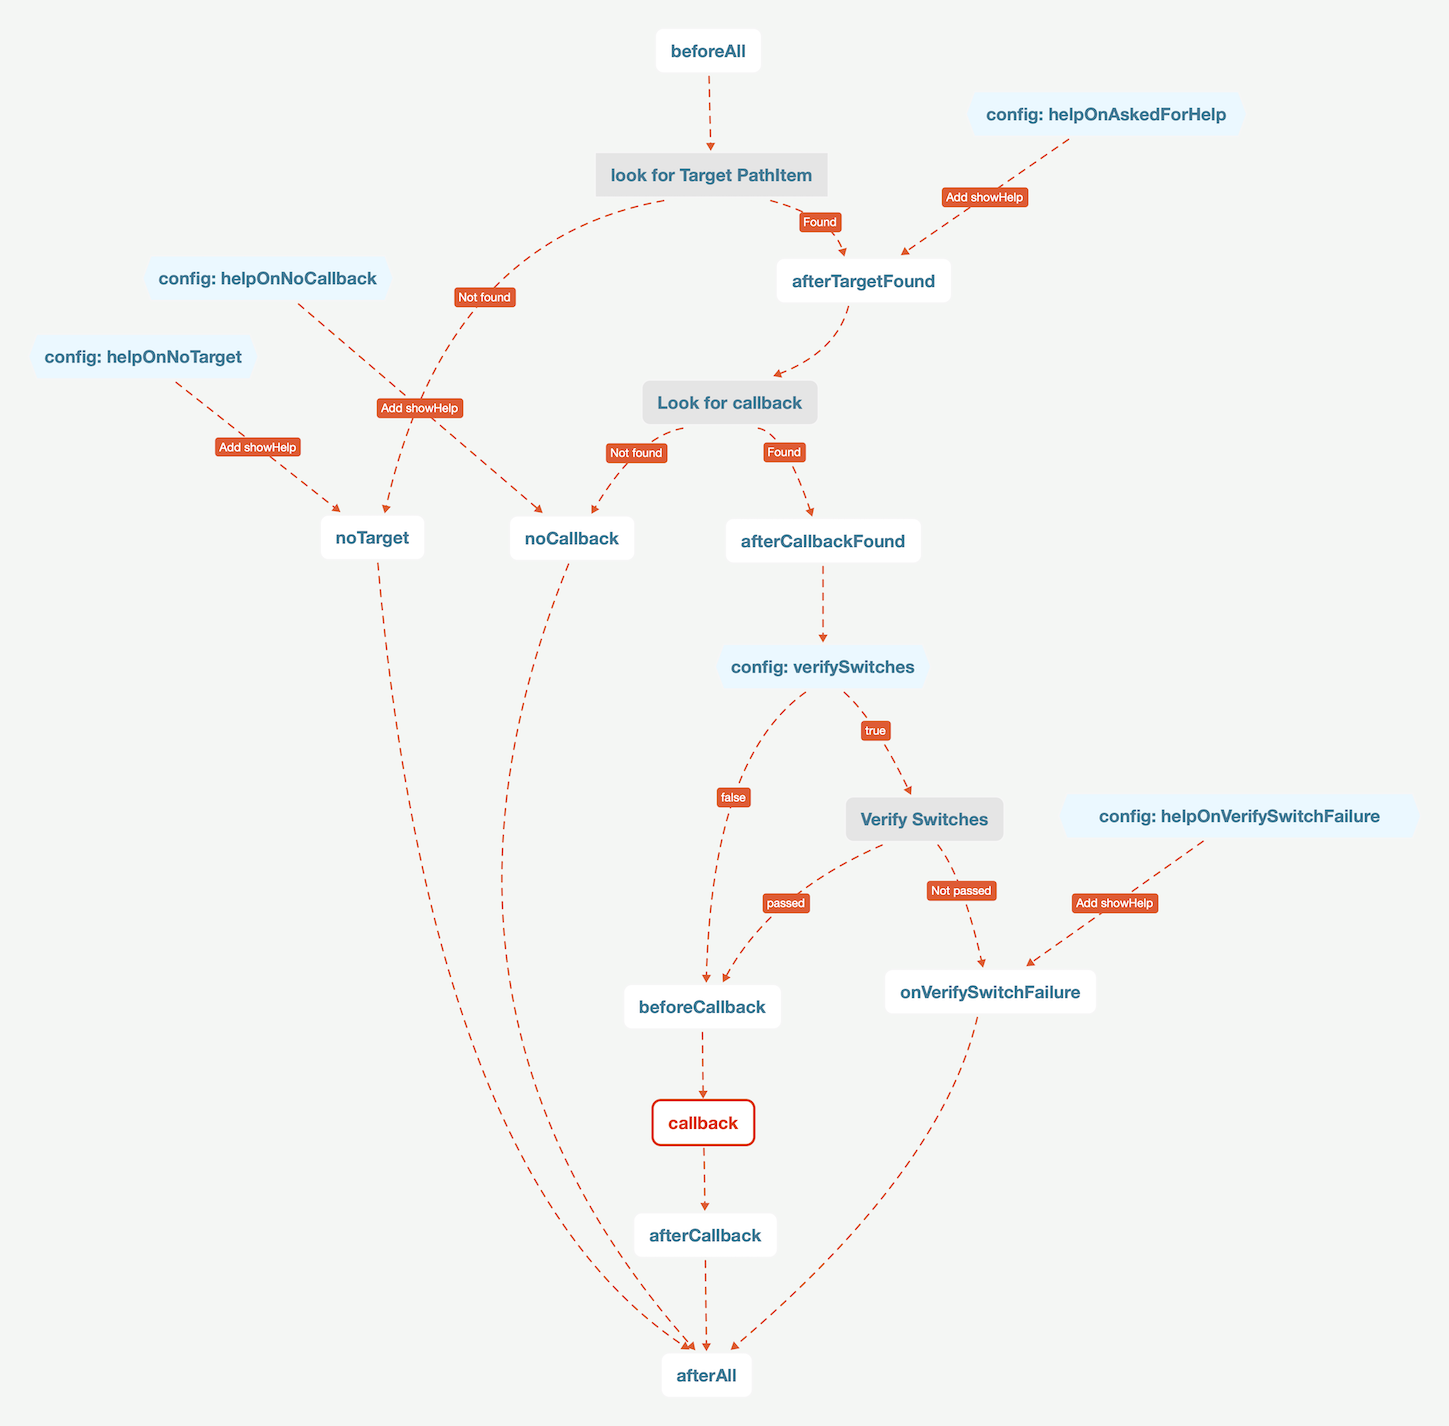
- beforeAll Hook: is called before all executions.
app.beforeAll(inputs => {
  // do some stuff
})
- afterTargetFound Hook: is called after a PathItem for the passed commands is found.
app.afterTargetFound(inputs => {
  // do some stuff
})
- afterCallbackFound Hook: is called when PathItem is found and at least one callback is set on it.
app.afterCallbackFound(inputs => {
  // do some stuff
}
- beforeCallback Hook: is called right before callback execution.
app.beforeCallback(inputs => {
  // do some stuff
}
- afterCallback Hook: is called right after callback execution.
app.afterCallback(inputs => {
  // do some stuff
}
- noTarget Hook: is called when no PathItems could be associated with passed commands.
app.noTarget(inputs => {
  // do some stuff
}
- noCallback Hook: is called when PathItem is found but no callbacks are set on the PathItem.
app.noCallback(inputs => {
  // do some stuff
}
- onVerifySwitchFailure Hook: is called when Callback is found but passed switches are not matched with defined switches for that PathItem.
app.onVerifySwitchFailure(inputs => {
  // do some stuff
}
If you want to stop the next hooks and callbacks to be called, return a string 'stop' from your callbacks.
app.beforeAll(inputs => {
  if (new Date().getHours() < 6) {
    return 'stop'
  }
})
Context
You can also add new properties and values to your inputs for the next hooks and callbacks. In order to do that just return an object with those properties. Those will be available in the following hooks and callbacks in the context object.
app.beforeAll(inputs => {
  return {
    hello: 'hi',
  }
})

app.route('/video/formats').callback(inputs => {
  console.log(inputs.context.hello)
})
Hide Path
In order to prevent displying some paths in help and auto completion output, you can hide them.
app.route('/_hideme').hide()
This is can be useful to hide some functionality from users. You can still chain the hidden path with other route methods.
Plugin
Plugins allow to add functionality from internal or external sources. Plugins are simply functions that receives the Application instance as their first argument.
function myDebugPlugin(app) {
  app.route('/_debug').callback(() => {
    console.log('debug output.')
  })
}
In order to use plugin in your application, you can pass the plugin function to plugin method.
app.plugin(myDebugPlugin)
Be careful of plugins you import. If you don't know or trust a plugin, proceed with cautious.
Builtin Plugins
help plugin
You can use the builtin help plugin to add help outputs to your application.
const { argsCommandRouter, plugins } = require('args-command-router')

const app = argsCommandRouter({
  applicationName: 'myApp',
})

app.plugin(plugins.help())
By default help plugin uses -h and --help switches for displaying help, but this is configurable through help options.
These are the options and their default values that can be configured on the help plugin:
app.plugin(
  plugins.help({
    helpType: 'switch', //set null to disable
    helpShortSwitch: 'h', //short switch to show help
    helpLongSwitch: 'help', //long switch to show help
    helpOnNoTarget: true, //show help when no pathItem found
    helpOnNoCallback: true, //show help when callback not exist
    helpOnVerifySwitchFailure: true, //show help when switches not match
    helpOnAskedForHelp: true, //show help when help switches are provided
  })
)
help sets a property SKIP_matchRuntimeAndDefinedSwitches on the context object to prevent mismatch failures on switches.
autoComplete plugin
In order to add shell autocompletion, you can use the builtin autoComplete plugin. Right now it supports only bash shell autocompletion. In order to set it up:
- Include the autoComplete plugin.
const { argsCommandRouter, plugins } = require('args-command-router')

const app = argsCommandRouter({
  applicationName: 'myApp',
})

app.plugin(plugins.autoComplete)
- Create an executable with the exact name you instantiated your Application with and Add it to the
PATHenvironment variable. For example here we are usingaliasbash builtin to create a temporary executable in the current bash session and assuming that nodejs is already installed on the machine and been added to thePATHenvironment variable.
alias myApp="node <ABSOLUTE PATH>/index.js"
- Get the bash autocomplete script in bash shell and append it to your .bash_profile file.
myApp __AUTOCOMPLETE__ generate bash >> ~/.bash_profile
tree plugin
After a while, number of routes can increase and gets complicated. Tree plugin adds a route to the application instance to print a application tree on console.
const { argsCommandRouter, plugins } = require('args-command-router')

const app = argsCommandRouter({
  applicationName: 'myApp',
})

app.plugin(plugins.tree('/_tree'))
Application Configuration
You can configure the args-command-router behavior when instantiating the Application.
These are the default values:
const app = new Application({
  applicationName: '<App>',
  checkForSwitchConflicts: true,
  strictSwitchMatching: true,
})
applicationName: The name of the application used in generating the help (usage) output.checkForSwitchConflicts: Verify Switch names are not conflicting in your Application. You can disable this after you're done with your application development to improve performance.strictSwitchMatching: Verify if the passed switches are matched with switches defined on the found pathItem. If it's set to false, the requiredSwitches won't be enforced, and switched that are not defined are accepted.