README
Custom-Code-Editor ApostropheCMS Schema

An ApostropheCMS Custom Schema for your own custom-code-editor field.
This schema uses Ace Editor library that you may found here Ace Editor
Falling in love with custom-code-editor module ? Send love ❤️ through Paypal here :
Paypal.me/AminShazrin
Install
From within your apostrophe project npm install --save custom-code-editor
Include in app.js:
// In app.js
  modules: {
    'custom-code-editor': {},
    // ... other modules
}
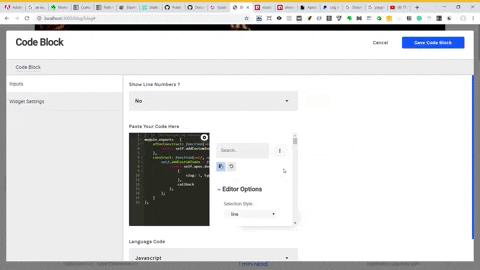
Enable Code Editor Schema
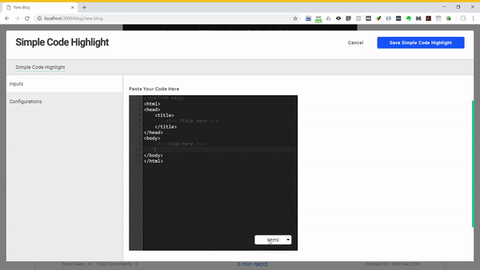
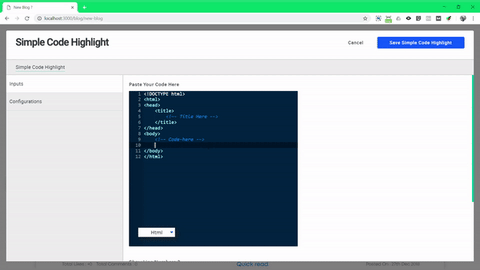
Simple :
addFields : [
    {
        type : 'custom-code-editor',
        name : 'mycode',
        label : 'Paste your code here'
    }
]
Widget.html Get custom-code-editor Value
This custom-code-editor schema returns an object.
{
    code : '<string code value>',
    type : '<modes>'
}
If you did an example above , in widget.html you can simply get an object like this :
{{ data.widget.mycode.code }}
{{ data.widget.mycode.type }}
or you can simply use apos.log() to see what's available on custom-code-editor objects :
{{ apos.log(data.widget.mycode) }}
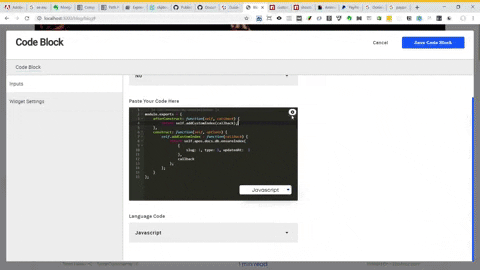
Custom-Code-Editor Options Available
// in lib/modules/custom-code-editor/index.js
module.exports = {
    ace : {
        theme : 'tomorrow', // themes available : https://github.com/ajaxorg/ace/tree/master/lib/ace/theme (Case Sensitive)
        defaultMode : 'javascript',
        options : {
            // All options available in : https://github.com/ajaxorg/ace/wiki/Configuring-Ace
        },
        modes : [
            {
                title : 'Javascript', // Title to Override Name
                name : 'javascript', // Name of the mode (Case-Sensitive)
                snippet : '// Content Start Here \n print(\"Hello World\") \n @code-here', // Default Value (String)
                disableSnippet : true // Disable default snippet value when switching (OPTIONAL - Boolean)
            }
        ],
        config: {
            fontSize: 16, // Editor Font Size (Number or String)
            editorHeight: 500, // Editor Height (Number or String)
            dropdown: {
                enable: true, // Enable it for switching modes button (Boolean)
                height: 30, // Height Dropdown (Number or String)
                borderRadius: 5, // Border Radius Dropdown (Number or String)
                fontFamily: "Mont-Regular", // Font Family Dropdown (String)
                backgroundColor : "Orange", // Background Color Dropdown (String)
                textColor : "white", // Text Color Dropdown (String)
                fontSize: 16, // Font Size Dropdown (Number or String)
                position: {
                    // All top , left , right , bottom dropdown position enable for configs
                    bottom: 20,
                    right: 20
                },
                arrowColor: "blue" // To change arrow color in dropdown (String)
            }
        }
    }
}
List of default modes available
- ActionScript
- Bash
- C++
- C#
- PHP
- HTML
- Javascript
Name Of The Modes References
List of all Modes
How to Override Existing Mode ?
Simple , make sure the name of the mode is similar to default modes provided.
Default Mode
By default , defaultMode : 'javascript' enable. But you can choose a default mode by yourself ! Name any mode available for you. Let say you want 'css' to be in default mode.
ace : {
    defaultMode : 'css' // Same as `name : 'css' in mode : []`
}
This will open a starting mode , then you can choose other mode by choosing modes on your dropdown
Enable Snippet
To enable your snippet added automatically when this schema is open , you have to enable dropdown
ace : {
    config : {
        dropdown : {
            enable : true
        }
    }
}
WARNING ! Once enable your dropdown , you will frustated with the position of dropdown is on top left corner. It is because the dropdown do not have customized position. Let's position the dropdown on bottom left corner with some offset of 30px from the container
ace : {
    config : {
        dropdown : {
            enable : true
            position : {
                bottom : 30,
                left : 30
            }
        }
    }
}
Disable Snippet
If you want it to disable snippet for specific mode. Write the name of the modes and insert your disableSnippet :
ace : {
    modes : [
        {
            name : "html",
            disableSnippet : true // This will not automatically change snippet when you change mode on dropdown
        }
    ]
}
Override Snippet
Also , if you wanted to override default snippet for specific mode. Write the name of the modes and insert your snippet :
ace : {
    modes : [
        {
            name: 'javascript', // name must be the same as existing default mode
            snippet: "document.addEventListener(\"DOMContentLoaded\" , function(){\n
            @code-here\n
        });"
        }
    ]
}
@code-here On Snippet
What is that syntax for ? Well , whenever you change your mode on dropdown , existing codes on schema will replace automatically on new snippet on @code-here. Amazing right ? If you did not provide that syntax , your existing value on editor schema will be lost. Let's make a new override snippet and has our own @code-here on it :
      modes : [
         {
            name :'javascript',
            snippet : "// Content Start Here \n print(\"Hello World\") \n @code-here"
         }
      ],
Title of Dropdown
By default , the name of a dropdown will be on name property. But some of the name does not make sense ! Can I change it ? Yes you can , simply add title property like existing mode called bash :
ace : {
    modes : [
        {
            name : 'sh',
            title : 'Bash' // This will make dropdown name as Bash instead of Sh
        }
    ]
}
Clear Default Modes
What if I want to clear all default modes and define them myself ? Easy , add an option to clearModes : true :
ace : {
    clearModes : true
}
Once you clear your mode , you can define your own modes without considering any overrides mode. Isn't this makes your life easier ?
ace : {
    modes : [
        {
            // List of all modes that you want to define. The options you may write like this
            title : '<title of your mode>',
            name : '<name of your mode (case sensitive)>',
            snippet : '<code snippet>'
        }
    ]
}
Don't worry about indent in Snippet , it will automatically beautify the codes whenever you enter your new content
Insert My Own Theme
By default , theme : 'ambiance' . If you wish to change theme (Case Sensitive). You can find all available themes here All Ace Editor Themes Available :
ace : {
    theme : 'monokai'
}
Ace Editor Options
Now this one , I just extend it for you to enable ace editor options. Reference : Ace Editor Options
ace : {
    options : {
        // Same property and value as in : https://github.com/ajaxorg/ace/wiki/Configuring-Ace
        // Example :
        cursorStyle: "smooth",
        useSoftTabs: true
    }
}
Enable Emmet Option
By default , emmet is not enable and you need to configure it yourself. But Ace Editor provides a simple options to enable emmet. However, you need a library to load it to Ace Editor. You can find any emmet libraries available online but I provide some sample to you below that works :
ace : {
    options : {
        enableEmmet : true
    }
}
Then load emmet library in your template views :
<!-- load emmet code and snippets compiled for browser -->
<script src="https://cloud9ide.github.io/emmet-core/emmet.js"></script>
Custom-Code-Editor & Dropdown Configurations
Well , you also can customize your own dropdown/ace editor css styles. All dropdown configuratins available for you are :
ace : {
    config : {
        fontSize : '<Number or String>', // Editor Font Size
        editorHeight : '<Number or String>', // Editor Height
        dropdown : {
            enable : '<Boolean>', // Enable it for switching modes button
            height : '<Number or String>', // Height Dropdown - Default : 30
            borderRadius : '<Number or String>', // Border Radius Dropdown
            fontFamily : '<String>', // Font Family Dropdown
            fontSize : '<Number or String>' , // Font Size Dropdown
            backgroundColor : "<String>", // Background Color Dropdown (String)
            textColor : "<String>", // Text Color Dropdown (String)
            position : {
                top : '<Number or String>',
                bottom : '<Number or String>',
                right : '<Number or String>',
                left : '<Number or String>'
            },
            arrowColor : '<String or Hex or RGB or RGBA>' // To change arrow color in dropdown - Default : "black"
        }
    }
}
You must be thinking , why fontSize and editorHeight is available for editor options ? While we can do it in :
ace : {
    options : {
        // all editor options
    }
}
Because we have a css issue on
!importantto override apostrophe css default normalize. So I did it for you to easily override it onconfigoptions. Or maybe you can push your own file to override it. Either way , both are possible override options :)
Specific Field Customization
Well, I know some of you don't want some specific editor to be in the same options to all custom-code-editor field type, right ? To make it backward compatibility, only some of the options can be overridden on your schema fields. Here is an example :
addFields : [
    {
        type : 'custom-code-editor',
        name : 'mycode',
        label : 'Paste your code here',
        ace : {
            defaultMode : "html"
            config : {
                // All config options here
            }
        }
    }
]
Why
modesandthemeare not available to override ? This will against the rule optimizing push asset feature that only project level options module by your own defined modes and theme get push to browser. This is because Ace JS contains 10 and more JS files available to use. Alloptionsvalues must be configure in project level moduleindex.jsor directly onapp.jsinmodules: {}
If you wish to disable some options, just set it to null on that property option. It will removed from your specific field option. For example :
addFields : [
    {
        type : 'custom-code-editor',
        name : 'mycode',
        label : 'Paste your code here',
        ace : {
            defaultMode : "html"
            config : {
                saveCommand : null
            }
        }
    }
]
Warning ! If you did not set any config value, config will not be available on specific field. To use existing config, simply set it as empty object
config : {}
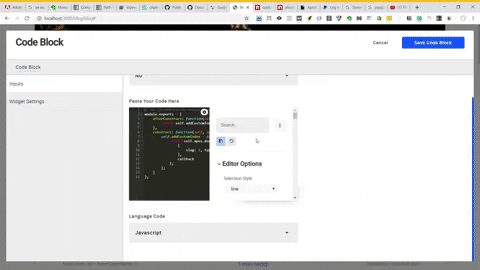
How To
Search Bar
Ace got it owns search bar. Simply hit Ctrl + F !
Save Selection
Now this one is a new function ONLY for ApostropheCMS . If you hit Ctrl + Shift + S while selecting new code, it will replace an existing highlighted text previously when you change your mode. Don't believe me ? Check it out !

Wait ! Can I change save command ? Yup , you can. Add options like this :
ace : {
    config : {
        saveCommand : {
            win : 'Ctrl-Shift-F', // Windows Key
            mac : 'Command-Shift-F',// Mac Key,
            message : 'Your Selected Text Saved ! ' // Your custom save message
        }
    }
}
New Custom-Code-Editor V3 (Options Customizer)
Have you ever wonder that you are tired of testing options by restarting the app and adjust your options all over again ?
Say no more ! Introducing new Options Customizer !

What does it do ?
It brings you more features that you can't live without ! All options available for you to modify are now can be save to each logged in user or even you could copy all the desired options and paste it to your project level module ! Here are four core features for Options Customizer :
- Copy Options
- Undo Options
- Save Options
- Reset Options
These options will make your editor change live upon options modified.
Copy Options
You can copy your modified options and paste it on your project level module that will apply to all ! The copy features uses Clipboard JS to make it work. Below are the demonstration on how to use it :
NOTE : It only copies from modified changes, not on its entire options. If your module options are already configured, it will not copy your module options. Instead, it will copy all your changes options that you did on On/Off Toggle(s), Select Input(s) and Range Input(s).
Undo Options
You can undo your modified options to default settings. This will help you reset your changes to default options.
NOTE : This will not undo saved options to default setting. If you wish to reset from saved options, refer to section "Reset Options" below.
Save Options
You can also saves all your modified options. This will keep all your modified options apply to all custom-code-editor types !
In MongoDB, you will see this data directly on type : apostrophe-user :
"customCodeEditor" : {
    "highlightActiveLine" : false
}
NOTE : Save options will not apply to all users. It will load current users saves options and apply it to all editors. This will brings each types of users to their own desired options.
Reset Options
You can also reset all options. This will remove current saves options and change it to default module options settings. Let say you have follows save options demonstration above, you simply click Reset like example below :
NOTE : This will only affect to current logged in user only. It will not removes any other users options.
Modify Options
What if you want to add your own help text, you could simply done it in project level module like this :
// In custom-code-editor/index.js :
module.exports = {
    ace : {
        optionsTypes : [
            {
                name : "highlightActiveLine",
                help : "This will highlight active line cursor position"
            }
        ]
    }
}
NOTE : If you wish to add more options, take a look at
aceTypes.jsinnode_modules/custom-code-editor/aceTypes.jsto see how it is done. And MAKE SURE you do it in an ARRAY like above example.
Remove Options
You wish to remove options customizer ? You don't like it ? Don't worry, just set it to enable : false like this :
// In custom-code-editor/index.js :
module.exports = {
    ace : {
        config : {
            optionsCustomizer : {
                enable : false
                // More configuration coming soon
            }
        }
    }
}
Why some other options are missing ?
Well, some other options will break apostrophe's UI and also against the rule of pushing assets. For instance, we cannot set other themes via Options Customizer because we will only push desired theme configuration from your project level module. This is because Ace contains more than 10 js files for each modes and themes available.
Browser
Browser Object
How can I get this schema browser object for my custom-code-editor ?
Simply you can find it on :
apos.customCodeEditor
Get Editor Browser Object
How can I get from the one that defined in javascript browser at var editor = ace.edit("editor") as in Ace Editor Website has telling you about ?
You can get it via browser scripting
apos.customCodeEditor.editor
By that , you can test anything on browser-side. For example you open on Chrome Developer Tools and enter :
apos.customCodeEditor.editor.session.getValue()
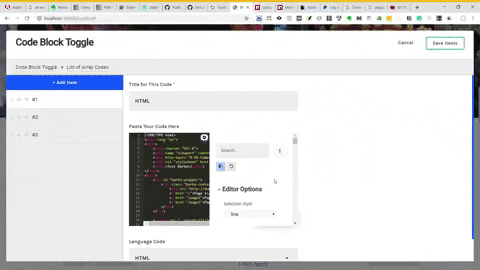
Get Multiple Editor Browser in Single Schema
Oops ! How can I get specific editor browser object if I have two fields in a same schema ? I made a simple for you , let say you have this fields :
addFields : [
    {
        type : 'custom-code-editor',
        name : 'mycode',
        label : 'Paste Your First Code Here'
    },
    {
        type : 'custom-code-editor',
        name : 'mysecondcode',
        label : 'Paste Your Second Code Here'
    }
]
Next, simply get the name property to get specific schema in browser object :
// First Editor
apos.customCodeEditor.mycode.editor

// Second Editor
apos.customCodeEditor.mysecondcode.editor
Easy right ? Hell yeah it is ! :D
Advanced Configuration (Skip this if you comfortable with current feature)
How To Insert My Stylesheets/Scripts Files ?
I provide a simple object for you. Behold !
Stylesheets inside public/css/<all css files>
ace : {
    // All ace options
},
stylesheets : {
    files : [
        {
            name : 'style.min', // This will get style.min.css
            when : 'user'
        },
        {
            name : 'parentFolder/style', // This will get style.css inside parentFolder
            when : 'user'
        }
    ],
    acceptFiles : ["css" , "sass" , "less" , "min.css"] // List of all accept files (Less , CSS and SASS are push by default)
}
Default
acceptFiles:css,sassandless
Scripts inside public/js/<all js files>
How about javascripts files ? Same as above example :
ace : {
    // All ace options
},
scripts : {
    files : [
        {
            name : "custom", // This will get custom.js
            when : "user"
        }
        {
            name : 'parentFolder/myScript', // This will get myScript.js inside parentFolder
            when : 'user'
        }
    ],
    acceptFiles : ["js" , "min.js"] // List of all accept files (js and min.js are push by default)
}
Default
acceptFiles:jsandmin.js.
Error on pushing file assets
If you receive an error while pushing files assets to browser , please make sure your directory is in correct path without extension name and accept any files extension name by your own modified extension names. For example
ace : {
    // All ace options
},
scripts : {
    files : [
        {
            // Or you can manually get custom.js inside parentFolder for specific js file
            name : 'parentFolder/custom',
            when : 'user'
        },
        {
            // If got subfolder inside parentFolder
            // Include it too
            name : 'parentFolder/subFolder/custom',
            when : 'user'
        },
        {
            name : 'index', // get index.js
            when : 'user'
        }
    ]
    acceptFiles : ["con.min.js"] // and other prefix extension file names available
}
NOTE : You don't have to include
'js/filedirectory'or'css/filedirectory'in it. APOSTROPHECMS will push based onself.pushAsset()that you may found in ApostropheCMS Push Asset Documentation. Easy right ?
Why I cannot switch other themes or other modes by scripting ?
As I already mentioned in Push Asset section , by default we only push asset that are ONLY defined modes. It detect by your modes name and push. The rest of the modes will not be available in your browser. This is due to performance where Ace Editor contains more than 10 js files for all modes. If you really want to do by scripting that can switch themes or maybe other modes via scripting , you have to push ALL ACE's JS files in order to do that. Here is the code :
ace : {
    // all ace options
},
scripts : {
    pushAllAce : true
}
NOTE : Beware that this push ALL ACE JS files including your own mode. Enable this only when you wanted to configure more ace on your own script. This might decrease performance and may require long time page loads.
Add More Methods/Commands/Event Listener To Your Ace Editor
Let say you want to add MORE commands that you already refer to Ace Editor HOW TO or maybe add new events by yourself. First , let's create new js file to any name you like and push like this :
// In custom-code-editor/index.js
ace : {
    // All ace options
},
scripts : {
    files : [
        {
            name : 'custom', // will get /js/custom.js
            when : 'user'
        }
    ]
}
And inside custom.js :
// In custom-code-editor/public/js/custom.js

apos.define('custom-code-editor', {
    construct : function(self,options){
        // create superPopulate to extend method
        var superPopulate = self.populate;

        // Get extension self object
        var _this = self;

        self.populate = function(object, name, $field, $el, field, callback){
            // Locate the element on specific schema
            var $fieldSet = apos.schemas.findFieldset($el, name);

            // Get Editor
            var $fieldInput = $fieldSet.find("[data-editor]").get(0);

            // Init Editor
            var editor = ace.edit($fieldInput);

            // Add my own custom command
            editor.commands.addCommand({
                name: 'myCommand',
                bindKey: {win: 'Ctrl-M',  mac: 'Command-M'},
                exec: function(editor) {
                    //...
                },
                readOnly: true // false if this command should not apply in readOnly mode
            });

            // ... your custom codes here

            superPopulate(object, name , $field , $el , field , callback);
        }
    }
})
Methods available
These methods are available for you to use :
| Method | Description |
|---|---|
| self.populate | Run once. If contain any bind event like clickEvent, mouseEvent and etc, it will execute normally like your javascript browser. Check documentation here : self.populate |
| self.convert | Run multiple times. It will trigger on submission. Check documentation here : self.convert |
| _this | Just an example use of self . Because inside self.populate ,you cannot access self directly. You have to define it to a new variable. It returns all methods & options. |
| self.has / _this.has | self.has/_this.has accepts object and a string of path. This works similar as _.has in lodash but to access nested object , you only can use dot notation in that string. It returns boolean. |
How to use .has() method ?
How to use ? Simple :
var myObject = {
    nested : {
        anotherNested : {
            valueHere : true
        }
    }
}

// _this from extension object from self as shown example previously
_this.has(myObject , "nested.anotherNested.valueHere");
// Returns true

_this.has(myObject , "nested.anotherNested.getValue");
// Returns false since there is no getValue property inside anotherNested.getValue
Access all options available in ace : {} object
Simple , you can access it via self.ace or _this.ace
Changelog
3.1.8
- Add
appearance : noneto checkbox to remove default checkbox CSS - Fix all codes by removing ES6 codes for minifying ApostropheCMS issue
3.1.7
- Fix DOM where warnings occured on same values of id.
3.1.6
- Build Passing
- Add Unit Tests
3.1.4
- Adjust Readme to use proper configuration
3.1.3
- Using _.assign() to assign existing config options
- Make merge options to be able on undefined some property that are will not be use or override.
3.1.1
- New feature, specific field customization available to override
3.0.2
- Fix README and typos.
- Bug Fixes.
3.0.1
- Button Options display issue.
3.0.0
- New feature released, Options Customizer. Also change a bit stylish UI for user friendly.
2.9.0
- Update CSS to be cursor:pointer for better mouse hover experience
2.8.6
- Adjust README for better "first setup" experience to beginners.
2.8.0
- Push Asset Feature where push modes & themes that are only defined by User. The rest of the JS files will not be pushed. However , you can push All Ace JS files by configure option in scripts object. Refer the documentation.
2.6.7
- Fix every
nameof the modes into lowerCase(). This to avoid errors when developers setting it to capitalize words or any uppercase letters (tested). Also fixgetTitlewhere.capitalize()helper is removed from that variable.
2.6.5
- Fix CSS where code folding can't be seen in your code editor. Now you can press it on gutter area.
2.6.0
NEW SAVE FEATURE ADDED ! Provide new shortcut key to save your own selection and switch dropdown with your own selection ! . Adjust README to have better documentation to all developers.
Fix if got empty modes when
clearModes : trueand should return text ofobject[name].type. This will not return empty text on dropdown when you have an existing value in schema.
2.5.0
- Fix default mode name should be show in dropdown if got
object[name]. This will not be return empty text on dropdown.
2.3.0
- Adjust README and FIXED on existing dropdown
titlebug that would not update if open the schema again