README
WHQ Generator
A yeoman generator for simple PHP projects and Wordpress themes, to be used as a starter kit for WHQ projects.
Installation
First, install Yeoman globally:
npm install -g yo
Then, install the WHQ Yeoman generator:
npm install -g generator-whq
Usage
cd into the directory in which you want to generate a new project. Run the following command:
yo whq
Follow the command prompts to customize your project.
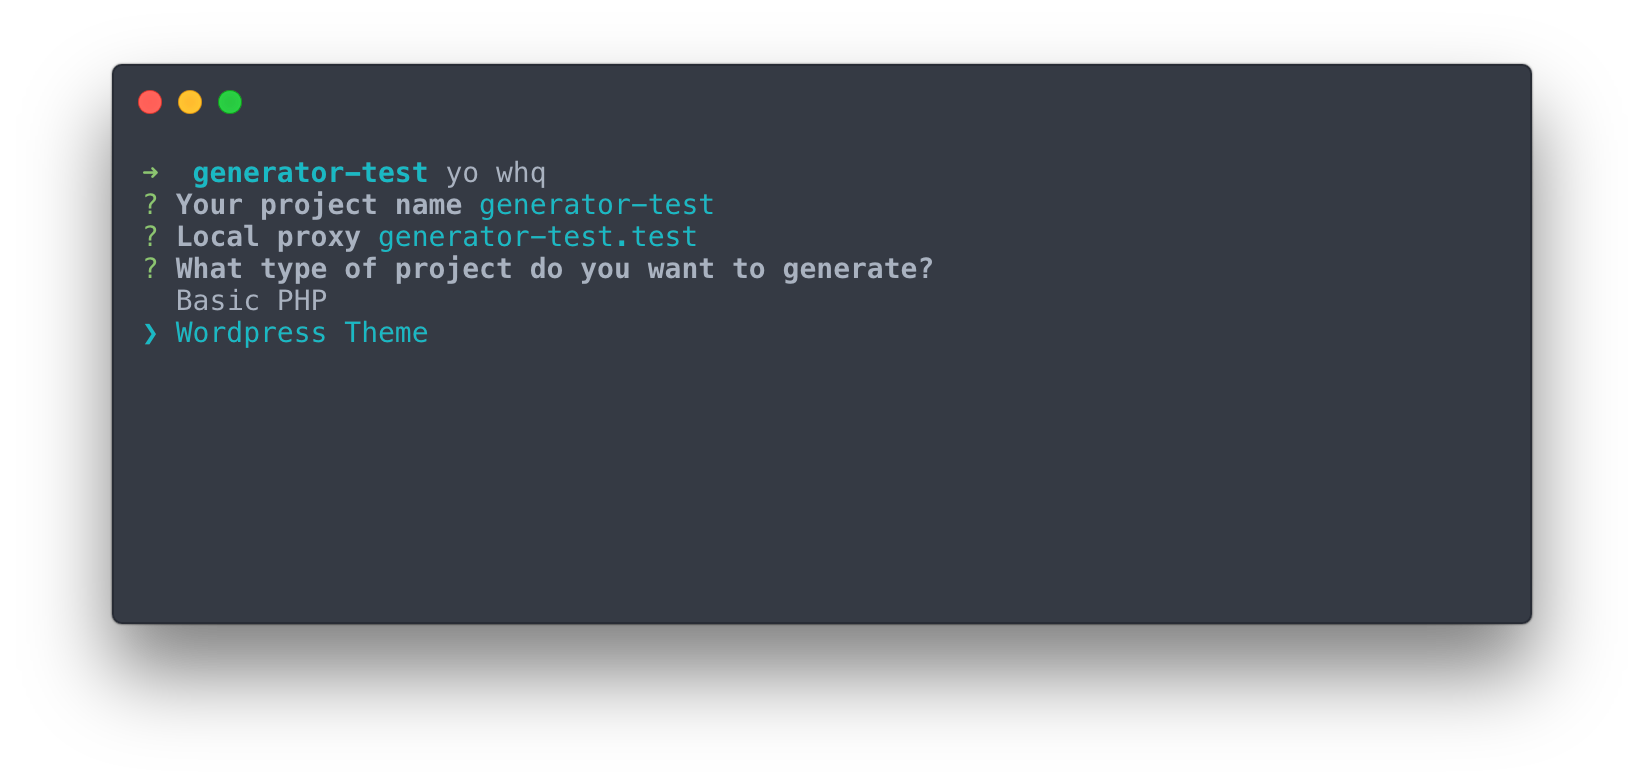
Local Proxy
Local proxy is the local host name at which you plan to run your project. The generated project will run on localhost with a proxy to whichever hostname you define.
What type of project do you want to generate?
You can choose from two project types. A Basic PHP project will generate an index.php file, as well as header.php and footer.php partials. A Wordpress Theme will include a style.css file with the theme name and necessary Wordpress tags to make your project a valid theme.
What style processor do you want to use?
You can choose Sass or PostCSS as your CSS processor, which will add the appropriate loaders to the generated webpack file.
After you have chosen your options, the generator will run npm install to get all dependencies and will then run webpack in watch mode. You can immediately start writing HTML, CSS or JavaScript and see your project live reload when viewing at localhost in the browser.
Scripts
| Script name | Purpose |
|---|---|
| dev | Run dev build |
| watch | Run dev and put project into watch mode with hot reloading |
| production | Run production build (includes minification) |
Tools & Configuration
The generated project uses several packages and plugins to make development easier. Following is an overview of these tools and notes on configuration options you may want to change.
BrowserSync
The WHQ generator will use BrowerSync to serve a hot reloading version of the project. You may need to add or change the proxy defined in the BrowserSync options (in the webpack config file if using webpack). The proxy will be used if you are running your project on MAMP or a virtual machine. The proxy should match the host name. If you are not using a virtual machine, you will not need the proxy.
new BrowserSyncPlugin({
    host: 'localhost',
    port: 3000,
    proxy: 'my-project.test',
    files: [
        path.join(__dirname, '**/*.php'),
        path.join(__dirname, 'build/*')
    ],
    open: false,
    notify: false
})
Node Version
Different projects will have different node version dependencies and it can get difficult to manage these. We use avn to automatically switch node versions.
We place a .node-version file at the root of every project. This simply contains the version number of node the project should use.
6.7.0
Then, whenever you change into the project directory, avn will automatically change to the version of node defined in the .node-version file.
Webpack
Webpack is a module bundler. It takes modules and builds out static assets. The configuration for Webpack is defined in webpack.config.js. It is responsible for:
- Bundling scripts together and minifying them in production mode
- Converting Sass, Less or PostCSS to CSS
- Bundling stylesheets together and minifying them in production
- Extracting fonts and putting them in the build folder
- Extracting and optimizing images and putting them in the build folder
- Linting scripts and stylesheets
- Hashing assets and generating a manifest
- Starting up a live reloading a dev server in development mode
There a few special tools and plugins that are part of our webpack setup:
Vendor Bundling
Extracting common packages into bundles is a feature that is now built into webpack. This is useful for bundling together vendor assets.
entry: {
    'vendor': [
        'vue',
        'vue-resource',
        'vue-router'
    ]
}
Modernizr
Modernizr provides powerful browser feature detection that can be tremendously useful when developing more complex interactions.
This loader allows you to configure modernizr directly in the webpack config file. The modernizr package is included in the generated dependencies list, so all you need to do is add your configuration to the options object in the loader configuration:
{
    loader: 'webpack-modernizr-loader',
    options: {
        'feature-detects': [
            'css/objectfit'
        ]
    },
    test: /modernizr\.js$/
}
Then, comment in the modernizr alias under the resolve property:
resolve: {
    alias: {
        'modernizr': path.resolve(__dirname, 'modernizr.js')
    }
},
The modernizr plugin uses a blank modernizr.js file at the root of the project and writes the modernizr build to this file. If you plan on using modernizr, make sure you don't delete this file.
MiniCSSExtractPlugin
This plugin extracts any styles from JavaScript files and puts them into a separate CSS file.
PurifyCSSPlugin
This plugin removes any unused styles. Pay attention to the configuration of this plugin. If your styles don't seem to compiling as expected, there's a good chance this plugin needs modifying.
The plugin is given certain paths to look at the see if styles are being used or not. You may need to change these patterns to match your setup:
new PurifyCSSPlugin({
    paths: glob.sync([
        path.join(__dirname, '**/*.php'),
        path.join(__dirname, 'js/*.js')
    ])
})
Here, we are looking in all PHP and JavaScript files. You may need to look elsewhere. You may also want to add a node_module to this list.
It is important to note that the plugin will remove any classes that don't exist in your markup. So any classes added through JavaScript (including classes coming from external libraries or other sources), will be removed. In order to prevent this, you can whitelist certain patterns:
new PurifyCSSPlugin({
    purifyOptions: {
        whitelist: ['*gform*', '*gfield*']
    }
})
ManifestPlugin
This plugin generates a manifest.json file with a list of filenames in your build. The primary benefit of this is cache-busting. In production mode, Webpack generates a unique hash on each build which is tacked onto each filename.
An example of the manifest file:
{
  "main.css": "main.9b3c6727e78e6f8f429c.css",
  "main.css.map": "main.9b3c6727e78e6f8f429c.css.map",
  "main.js": "main.9b3c6727e78e6f8f429c.js",
  "main.js.map": "main.9b3c6727e78e6f8f429c.js.map"
}
When using a basic PHP project, you can use these assets by accessing the manifest file contents and adding the appropriate file reference in the head of your document:
<?php
    $manifest = file_get_contents('build/manifest.json');
    $assets = json_decode($manifest, true);
?>
<link rel="stylesheet" href="build/<?php echo $assets['main.css']; ?>">
When using the Wordpress theme setup, the WHQAssets PHP class reads this file and makes these assets globally available to you inside the $GLOBALS variable:
<link rel="stylesheet" href="<?php echo $GLOBALS['assets']->get(get_template_directory_uri() . '/build', 'main.css'); ?>">
WorkboxPlugin
Workbox by Google provides some helpful tooling around creating service workers. The workbox plugin for webpack takes this a step further. To enable workbox, comment in the plugin in webpack.config.js:
new WorkboxPlugin.GenerateSW(),
Then, comment in the code that will register the service worker. In a basic PHP project this will be an inline script tag in your head:
if ('serviceWorker' in navigator) {
    window.addEventListener('load', function () {
        navigator.serviceWorker.register('/build/service-worker.js', {scope: '/'})
            .then(registration => {
                console.log('SW registered: ', registration)
            }).catch(registrationError => {
                console.log('SW registration failed: ', registrationError)
            })
    })
}
In the Wordpress setup, this has been extracted to a partial:
<?php get_template_part('partials/service-worker', 'index'); ?>
By default, the workbox plugin with precache any assets built through Webpack. You can add configuration options to perform additional runtime caching. For example, here we are caching every request at our current service worker scope, as well as any request to the google fonts api.
new WorkboxPlugin.GenerateSW({
    clientsClaim: true,
    skipWaiting: true,
    runtimeCaching: [
        {
            urlPattern: new RegExp('/*'),
            handler: 'staleWhileRevalidate'
        }, {
            urlPattern: new RegExp('https://fonts.(?:googleapis|gstatic).com/(.*)'),
            handler: 'staleWhileRevalidate'
        }
    ]
}),
Note that you may want to alter the scope of the service worker to look outside of the wepback build directory. The generator automatically changes the scope when register the worker. For all this to work, you will need to make sure your server configuration is set up to remove caching from the service worker file, and allow root scope. Here is the configuration needed for nginx:
location ~* (service-worker\.js)$ {
    add_header 'Cache-Control' 'no-store, no-cache, must-revalidate, proxy-revalidate, max-age=0';
    expires off;
    proxy_no_cache 1;
    add_header Service-Worker-Allowed '/';
}
Babel
Babel is a JavaScript compiler that converts newer JavaScript syntax into syntax that is readable by older browsers. Babel can be configured with the babel property in package.json.
In the generated setup, Babel is configured automatically based on the browserslist.
ESLint
ESLint is a JavaScript linter. It can be configured using the eslintConfig property in in package.json.
WHQ manages its own custom linter configuration that extends the JavaScript Standard Style.
You can find the WHQ config here: https://github.com/worldhqinc/eslint-config-whq.
Prettier
The generated eslint configuration includes a prettier plugin which enables automated code formatting with the Prettier tool. Since Prettier is included as part of the eslint configuration, you can use the Fix ESLint Problems command in Webstorm or PHPStorm to not only apply ESLint formatting rules, but Prettier rules as well.
Stylelint
Stylelint is a stylesheet linter for CSS, Sass, Less, and PostCSS. It can be configured using the stylelint property in package.json.
WHQ manages its own custom linter configuration that extends the standard config.
You can find the WHQ config here: https://github.com/worldhqinc/stylelint-config-whq.
PostCSS
PostCSS is a CSS transformation tool. It is used in most WHQ projects for autoprefixing. This eliminates the need for manually writing browser prefixes.
Some WHQ project styles are also written in PostCSS as a replacement for Sass or Less.
PostCSS is configured using the postcss property in package.json. Numerous plugins can be installed and included here to add functionality.
BrowsersList
Browserslist is a config within package.json that accepts a list of browsers. These are the browsers that you want to support on a particular project. The browsers defined here will influence the following tools:
- Autoprefixer: Prefixes will be generated for the browsers specified
- Babel: Polyfills will be used to satisfy the browsers specified
- ESLint: You will be warned when using JavaScript that is not supported by any of the browsers specified
- Stylelint: You will be warned when using CSS that is not supported by any of the browsers specified
EditorConfig
EditorConfig helps us define and maintain consistent coding styles between different editors and IDEs. Most editors and IDEs have packages to interpret the settings contained within the .editorconfig file.
The settings that EditorConfig controls are things like whitespaces, tabs, etc.