README
homebridge-denon-heos
![]()
![]()

A Plugin for Homebridge to control a Denon AVR
This is a Homebridge plugin to control all types of Denon AVRs and possibly Marantz AVRs (some are tested with positive results). The plugin uses the HTTP commands as default. As newer Denon receiver doesn't support HTTP commands anymore, Telnet control is also possible. Since I found these less stable than the HTTP commands, I still prefer the HTTP commands. This git has been forked from nneubauer/homebridge-denon which was the basis for version 1 of this plugin.
Note: I'm not a javascript coder at all, so be easy on code feedback ;), though please if you have feedback or ideas, let me know.
Install
The plugin registers as homebridge-denon-heos. I found that the original homebridge-denon and all other plugins I tested were not working with newer Denon AVR generations (mine is X1400) or used the unstable telnet commands. I'm asking you to post an issue if you have problems or an idea about this plugin. You can install the package with the following command:
(sudo) npm install -g homebridge-denon-heos
For a specific version number use (change the number after the @ to the desired version):
(sudo) npm install -g homebridge-denon-heos@2.0.0
The changelog of the version can be found in the git.
Idea
Since there is no HomeKit AVR accessory type, nneubauers idea was to create a bunch of switches. Each switch signifies an input source which I forked to a version I use now for over a year without any problems. Now with the TV accessories in Homekit, I wanted to make it possible to control my receiver with a TV accessory block and the control widget.
TV Accessories
Since version 2.0, this plugin is extended with support for TV accessories. This means that you can add your receiver as a TV to your Homekit. This enables the possibility to change the input and the power state in one Homekit block. It also makes it possible to use the remote widget (or how it's called) to control the receiver and change the volume. This tv service is added to the plugin, so you can still use the switches if you want. An important note is that if you use the tv service, you have to add them manually to your Home app, after registering Homebridge. This way it is possible to have more than one accessory which has remote widget support.
You can add multiple receivers by adding more than one Device in your config file. Every receiver must be registered manually ones after registering Homebridge. You can choose your input settings yourself. I added a list with all possible input settings I know of in Possible_inputs.json. You can add them all, but I only added the once I use, so the list stays short. It is also possible to change the name of the input to one with a personal touch ;).
A TV accessory has support for an info and a settings button. Normally the settings button is accessible in the Home app and the info button is accessible through the remote widget. As I don't use the info button but do use the settings button, I made it possible to switch the functionality of these buttons. This way you can have the settings menu under the I button in the remote widget. The volume control works in steps of 0.5. In the future, this must be updated so you can hold the button to increase the volume by more.
Switches
The standard switches, which are available for all different input types, are 'on' if the receiver is turned on and when the input is set to the specific switch. This allows you to create one switch for each input source and switch between input sources when the AVR is powered by just tapping the switch for that source. There is a polling loop embedded which checks every couple of seconds what input source is currently selected and will update the switches accordingly. It will push the new state of the TV to other all other accessories, so these should be updated immediately
I add the option to make a general switch that polls for the state no matter the selected input. With this option, it is possible to have one main switch to turn on and off the receiver. You can still choose the default input when turning on the receiver with this switch. This functionality is configurable in the config with: pollAllInput.
Volume control
With volume control, you can set the volume level of your receiver. It adds a lightbulb which stands for the absolute volume level of your receiver. The volume limit is used as security. If you accidentally say to Siri: Set receiver volume to 100, your eardrums will at least survive.
Demo images
Both: Two times the same receiver as tv. Four separate switches added which also control a predefined input. The volume is set through a default volume level of each input. Left: By switching the input of the TV accessory, the input of the receiver is changed. This is directly updated in the other accessories. Right: The seperate switches stand for an input. Setting these switches will change the input of the receiver. One switch is a general power switch. Turning off a switch will turn off the receiver

Both: Two times the same receiver as tv. Four separate switches added which also control a predefined input. The volume is set through a default volume level of each input. Left: Changing the volume bulb will change the volume of the receiver. If you set a volume level higher than the maximum level, it will set the maximum volume level of that volume bulb. Right: When pressing a volume bulb, the volume of the receiver will be muted.
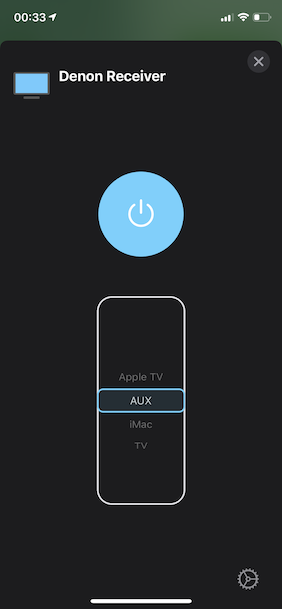
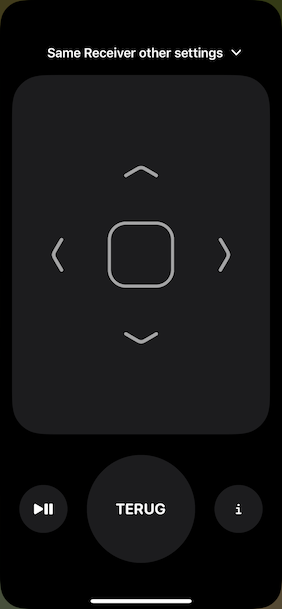
Left: The receiver added as tv. This enables the possibility to control the input and the power state in one tv block. Right: When the receiver is added as tv, the receiver can be controlled with the remote. The volume buttons can be used to control the volumes. The info button can be configured as info menu and settings menu.
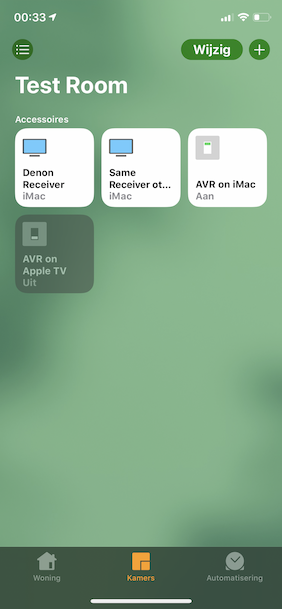
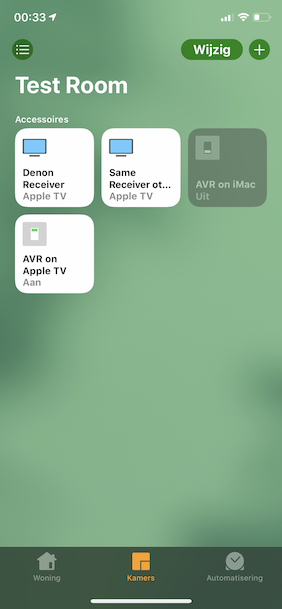
Left: A sample dedicated switch is added. This switch can be used to turn on the receiver and set it to the correct input. Right: When settings the second dedicated switch, the input switches to Apple TV. The other switches are updated, and thus, turned off.
Config
See sample-config.json for a complete sample JSON file. It is possible to add switches and tv services at the same time in one platform. The "pollInterval" is an optional value. Default is 3 seconds. If you want a lower or higher polling interval, set this value to a time in seconds. The following examples are given:
TV Accessories
TV accessories are added as devices. The "switchInfoMenu" can be set to true if you want to switch the settings and info button functionality. Default is false. The inputs are automatically ordered alphabetically in homekit, so the order in the JSON doesn't matter. Check the InputsSample.json for the correct inputs ID's. When the "defaultInputID" is set, it will automatically select that input when starting up the receiver. After that input is set, the default volume wil be triggered too. "zone" can be set if you want to control the second or the third zone. Default is 1. The available inputs for zone 2 are different than for zone 1. "port" is optional and its standard value is "auto". You can set "defaultVolume" if you want the plugin to set a volume when changing to that input. If the plugin is not working, you can try to set it to 8080 for newer receivers, 80 for older ones and "telnet"for brand spanking new ones (first try auto as this automatically chooses the right ones). The found port used when on auto, is visible in the Homebridge log as: port.
{
    "platforms": [{
        "platform": "DenonAVR",
        "pollInterval": 3,
        "devices": [{
            "name": "Denon Receiver",
            "ip": "192.168.1.45",
            "switchInfoMenu": true,
            "defaultInputID": "MPLAY",
            "zone": 1,
            "port": 8080,
            "inputs": [{
                "inputID": "MPLAY",
                "name": "Apple TV",
        "defaultVolume": 32
            },
            {
                "inputID": "GAME",
                "name": "iMac"
            },
            {
                "inputID": "TV",
                "name": "TV"
            },
            {
                "inputID": "AUX1",
                "name": "AUX"
            }]
        }]
    }]
}
Switches
Set "pollAllInput" to true if you want a main switch to turn off the receiver no matter the selected input. Default is false. "zone" can be set if you want to control the second or the third zone. Default is 1. The available inputs for zone 2 are different than for zone 1. "port" is optional and its standard value is "auto". You can set "defaultVolume" if you want the plugin to set a volume when changing to that input. If the plugin is not working, you can try to set it to 8080 for newer receivers, 80 for older ones and "telnet"for brand spanking new ones (first try auto as this automatically chooses the right ones). The found port used when on auto, is visible in the Homebridge log as: port.
{
    "platforms": [{
        "platform": "DenonAVR",
        "pollInterval": 3,
        "switches": [{
            "name": "AVR on Apple TV",
            "ip": "192.168.1.45",
            "port": 8080,
            "inputID": "MPLAY",
            "pollAllInput": false
        },
        {
            "name": "AVR on iMac",
            "ip": "192.168.1.45",
            "inputID": "GAME",
        "defaultVolume": 35
        },
        {
            "name": "AVR Zone 2",
            "ip": "192.168.1.45",
        "zone": 2,
            "inputID": "TUNER"
        }]
    }]
}
Volume control
Volume control accessories are added as volumeControl. The "volumeLimit" is the maximum volume you can set with this control. "zone" can be set if you want to control the second or the third zone. Default is 1. "controlType" can be used to change the volume control from a bulb to a fan or a speaker. This can be handy if you don't want to mute your receiver when you say to Siri "Turn on all lights". The speaker type is not yet supported in the Home app, but it is supported in 3rd party home applications like Home+. "port" is optional and its standard value is "auto". If the plugin is not working, you can try to set it to 8080 for newer receivers, 80 for older ones and "telnet"for brand spanking new ones (first try auto as this automatically chooses the right ones). The found port used when on auto, is visible in the Homebridge log as: port.
{
    "platforms": [{
        "platform": "DenonAVR",
        "pollInterval": 3,
        "volumeControl": [{
            "name": "Receiver Volume",
            "ip": "192.168.1.45",
            "volumeLimit": 60,
        "zone": 1,
            "controlType": "bulb"
            "port": 8080
        }]
    }]
}
Choosing the correct inputIDs
If you are not sure what the name of the inputID is that you are using, you can use the following links to check what the current source inputID is. You need to change the IP address to your receivers IP and then paste it in your browser. http://192.168.1.45:8080/goform/formMainZone_MainZoneXmlStatusLite.xml or http://192.168.1.45:80/goform/formMainZone_MainZoneXmlStatusLite.xml in case of older AVR's. The result will look like the following:
<item>
  <Power>
    <value>ON</value>
  </Power>
  <InputFuncSelect>
    <value>SAT/CBL</value>
  </InputFuncSelect>
  <VolumeDisplay>
    <value>Absolute</value>
  </VolumeDisplay>
  <MasterVolume>
    <value>-50.0</value>
  </MasterVolume>
  <Mute>
    <value>off</value>
  </Mute>
</item>
You can see that it is currently on SAT/CBL. This means that you need as input ("name" is something you can change to something personal):
{
    "inputID": "SAT/CBL",
    "name": "Satellite/Cable"
}
For the second and the third zone, you can use the following link: http://192.168.1.45:8080/goform/formZone2_Zone2XmlStatusLite.xml or http://192.168.1.45:80/goform/formZone2_Zone2XmlStatusLite.xml. Change zone2 to zone3 if you want to search for the inputs of zone 3.
Possible errors
The following errors can be expected:
Some manual port number are not equal in the config file with receiver: xx.xx.xx.xx.If you have multiple switches and/or tv accessories with the same IP but with different manual port settings, you get this error. Only set one port on one receiver.Current port xx with ip: xx.xx.xx.xx, is not suitable. Use 80 or 8080 manually instead.The non-Heos receivers use80as the port and the Heos receivers use8080as the port. If you set a different port, you get this error.Can't connect to receiver with ip: xx.xx.xx.xx and port: xxIf this happens sometimes, it is not an issue. If this happens more often and you notice unresponsiveness in your home app, it is an issue. This might be due to a wrong IP or a wrong manual port number. It is also possible that the receiver is not accessible in the network. You can try to manually access your receiver with the following command in your browser:http://xx.xx.xx.xx:xx/goform/formMainZone_MainZoneXmlStatusLite.xml. The xx.xx.xx.xx is your IP and the xx is the manual port. If your network connection is the issue, try setting a static IP for your receiver and if you use wifi, try a LAN cable.Can not access receiver with IP: xx.xx.xx.xx. Might be due to a wrong port. Try 80 or 8080 manually in the config file.The software might not be able to extract the correct port from the available receivers. Make sure to connect the receivers to the network when (re)starting Homebridge. If this doesn't fix the problem, try to set a manual port.80is for non-Heos models and8080is for Heos models.Receiver with ip: xx.xx.xx.xx is disabled. Can't connect through HTTP or Telnet.The specified receiver is not found in the network with the auto-discover function. This means that the auto port set will not work and the device information can not be set in Homebridge. If you can control your device, you can ignore this warning. If the plugin is not working. You can try to set a manual port or set it to telnet and check if the plugin is working in the home app. Otherwise, try checking the network connection of the receiver.Can't connect to receiver with IP: xx.xx.xx.xxThe plugin can't connect to the receiver over Telnet. This might be due to a faulty network connection or something in the router. You can test this to open a manual Telnet connection with the receiver on port 23. Please Google if you don't know how this is possible.Can't login at receiver with IP: xx.xx.xx.xxThe plugin can't connect to the receiver over Telnet. This might be due to a faulty network connection or something in the router. You can test this to open a manual Telnet connection with the receiver on port 23. Please Google if you don't know how this is possible.
Further Reading and Thanks
Thanks to nneubauers for making a stable version that worked with newer Denon models like my AVR x1400. Thanks to stfnhmplr, as I looked a bit to his Telnet implementation of the Denon. Also thanks to Jer G who took the time to inform me on the volume control of Denon receivers and input settings with special characters.
Future work
- Improve volume control for the remote widget.
- Add option for auto-discovery IP address.
Add support for multi-zone.Add default volume levels for specific inputs.Add default inputID.Improve updating state of the multiple switches when changing one.Improve polling code for more efficiency.Add volume control with a Light Bulb for Siri volume control.Add support for Telnet communication.Auto discovery of communication method.