README
homebridge-platform-azure-servicebus
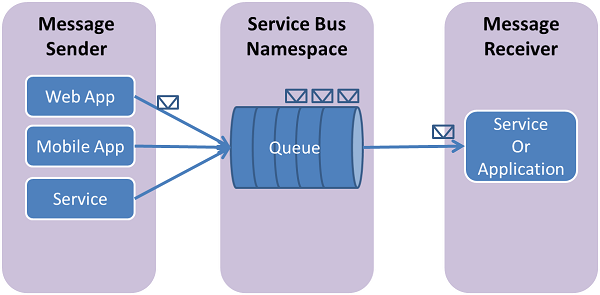
An Azure Service Bus plugin for homebridge.
This plugin allows both incoming service bus messages from a queue. These messages will trigger a switch based on the name of the accessory defined in the config.json as described below.
This plugin also allows different switches to trigger the sending of messages to a queue. These messages will contain the source button name in the message. It is advised to make these switches to a timeout switch to make them act like a button.
My setup
I have a homebridge running on a Raspberry Pi 4. Controlling a Nest Thermostat and this plugin.
Why?
Why on earth would someone need a service bus queue to control home automation? Service Bus seems to be a very affordable solution for queueing messages. I selected Service Bus due to my familiarity with it. The Cloud Based Queues are significantly more reliable than public free eventing platforms such as If This Then That.
My primary use case was connecting my home automation kit to events from Office365 for notification of upcoming meetings.
Primary Workflow
- Meeting is created in Office 365.
- Microsoft Flow is triggered when an upcoming meeting (Authenticated)
- Microsoft Flow gets details of the meeting.
- Microsoft Flow checks to see if the categories include the category
Critical - If the category is contained, send a message using Service bus to my service bus queue (Authenticated);
- Queue receives Message
- Homebridge plugin receives message using AQMP listener (Authenticated).
- Homebridge plugin checks to see if the target accessory of the message, the ID of the accessory is simply the name.
- If the accessory is contained in the list, it will be toggled. This change is observable by HomeKit and can be used to trigger automation.
- if the accessory is not found, the message will be deleted.
Installation
Install the plugin at the global scope.
sudo npm install -g https://github.com/nicwise/homebridge-platform-sqs.git
Once the plugin is installed, it must be configured.
Config
This example is also contained within /sample-config.json.
{
            "platform": "AzureServiceBus",
            "name": "ServiceBusButtons",
            "incommingMessageConnectionString": "connectionStringFromAzurePortalOrCmd",
            "outgoingMessageConnectionString": "connectionStringFromAzurePortalOrCmd",
            "incomingQueueName": "The name of the queue. Also specified in the EntityPath",
            "outgoingQueueName": "The name of the queue. Also specified in the EntityPath",
            "incomingSwitches": [
                {
                    "name": "TestButton1"
                },
                {
                    "name": "TestButton2",
                    "isTimeoutButton": true,
                    "buttonTimeout": 1500
                }
            ],
            "outgoingButtons": [
                {
                    "name": "foo",
                    "isTimeoutButton": true,
                    "buttonTimeout": 500
                }
            ]
        }
You must use a SharedAccessSignature to send or receive messages from a service bus queue. The two queues (incoming and outgoing) must be individually specified. In addition, the queue name for each must match.
Incoming Switches
Incoming switches are accessories that will respond to messages on the incoming queue. They are specified in an array in the incomingSwitches section of the config.
Example Message:
This message will cause the switch to toggle, and due to its timeout property, its state will reset in 1500ms. Using the isTimeoutButton property will cause the switch to act like a sticky button.
{
  "target": "TestButton2"
}
Outgoing Buttons
Outgoing Buttons are accessories that will cause a service bus message to be sent to the outgoing queue. The message will simply contain the name of the accessory that was pushed. These accessories will always timeout after 500ms and will act like buttons. Unfortunately as of this version, buttons dont work as expected.
Sample Message: This is the sample message that will be generated.
{
  "source": "Foo"
}
Azure setup
This plugin expects a basic understanding of Azure and ServiceBus programming. This guide is not a comprehensive guide on how to use or setup servicebus.
Please follow the Full Guide to creating a service bus queue for additional information.
- Create a Service Bus Namespace. This namespace is a container that can contain multiple queues.
- Create a Queue for Incoming Messages in the new Namespace.
- Create a SharedAccessSignature within the queue to for authorization. It is recommended to use the queue level Shared Access Signature, instead of the root SAS signature.
- The Connection string should be placed in the
incommingMessageConnectionStringelement. - The Queue Name should be placed in the
incomingQueueNameelement. This can either be copied from the portal, or from theEntitiyPath=YOUR_QUEUE_NAME_HEREsection of the connection string sourced from a queue level SAS.
- The Connection string should be placed in the
- Create a Queue for Outgoing Messages in the new Namespace.
- Create a SharedAccessSignature within the outgoing queue for authorization.
- The Connection string should be placed in the
outgoingMessageConnectionStringelement. - The Queue Name should be placed in the
outgoingQueueNameelement. This can either be copied from the portal, or from theEntitiyPath=YOUR_QUEUE_NAME_HEREsection of the connection string sourced from a queue level SAS.
- The Connection string should be placed in the
WARNING: The Connection String is a credential and should be treated as such. Any party with the SAS connection string can send or receive messages to and from the queue.