README
homespun
This is the root of the homespun family of repositories: you run a server in your home that collects sensor readings and uploads them to the management cloud of your choice. At present, upload to only one cloud is available: numerous. It is meant to be easy to add support for other clouds.
Note that this repository does not have the "Wiki" section -- if you want to discuss the homespun framework, please send an email to the maintainer requesting to be added to the homespun team. Or, send an SMS to the homespun hotline.
homespun is neither a home automation (HA) systen
nor an Internet of Things (IoT) system.
It simply moves transcodes data for different kinds of sensors and stores them in different kinds of cloud services.
There are many great HA and IoT systems available.
For example,
the Wink platform is an example of a commercial system for consumers,
and the Thing system is an example of an open-source system for makers.
Although they target different groups,
they both offer vastly superior functionality to what homespun provides.
(Disclaimer: I used to work at Wink, and I was one of the original curators of the Thing system...
I am very big fans of both!)
Theory of Operation
In your home, you connect sensors to either a micro-controller (e.g., an Arduino) or a micro-processor (e.g., a Raspberry Pi, BeagleBone Black, or BeagleBone Green). Sensor readings are then sent to an "always-on" computer termed a "sensor platform". The sensor platform then uploads these readings to a management cloud, which can then be monitored, used as triggers for robots, and so on.
The sensor platform can be either an "always-on" spare computer such as a dedicated micro-processor. The sensor platform should never be your desktop computer or a computer that isn't always on or has poor network access.
Here is an end-to-end example:
        +--------------+ +--------------------+            +-----------------------+
        |    sensor    |-|  micro-controller  |  talks to  |   sensor platform     |
        |              |-|                    |  ------->  |                       |
        |  e.g. TMP36  |-|   e.g., Arduino    |            |   running homespun    |
        +--------------+ +--------------------+            +-----------------------+
                                                                       |
    home network                                                       |
    --------------------------------------------------------------------------------
    the Internet                                                       |
                                                                       |
                                                                      \|/
                                                             +--------------------+
                                                             |     the cloud      |
                                                             +--------------------+
                                                                      /|\
                                                                       |
                                                                       |
                                                                      \|/
                                                             +--------------------+
                                                             |     cloud app      |
                                                             +--------------------+
There are many ways to connect a sensor to an Arudino. In many cases, you'll use a shield. There are many sources of Arduino-compatible shields. There are also several good sources for shields and sensors, e.g., Maker Shed, Adafruit, and Seeed Studio.
An alternative architecture is to attach the sensor directly to the sensor platform,
and have homespun read directly from the GPIO pins or the USB port:
                         +---------------+ +-----------------------+
                         |    sensor     |-|   sensor platform     |
                         |               |-|                       |
                         |  e.g., TMP36  |-|   running homespun    |
                         +---------------+ +-----------------------+
                                                       |
    home network                                       |
    ----------------------------------------------------------------
    the Internet                                       |
                                                       |
                                                      \|/
                                             +--------------------+
                                             |     the cloud      |
                                             +--------------------+
                                                      /|\
                                                       |
                                                       |
                                                      \|/
                                             +--------------------+
                                             |     cloud app      |
                                             +--------------------+
For the Raspberry Pi, you may want use a shield to connect a sensor. There are many sources of RPi-compatible shields. There are also several good sources for shields and sensors, e.g., Maker Shed, Adafruit, Dexter Industries, MikroElectronika, and Seeed Studio.
For the BeagleBone Black, generally you'll use a cape to connect a sensor. When looking at the list of capes keep in mind that not all are compatible with the BB Black. Several of these capes support multiple sensors. For example, the mikroBUS cape supports over a hundred different click boards.
There is a Grove Cape for the BeagleBone series, that has six connectors for the Grove family of sensors. Alternatively, the BeagleBone Green comes with two onboard Grove connectors!
If you're interested in USB sensors, Yoctopuce makes a wide range of prosumer (Swiss-made) sensors:
You can also plug the Yoctopuce sensors into an Ethernet or Wi-Fi hub to make the readings available on your local network.
Finally, you may already have a sensor in your home that talks to a third-party cloud service, If the vendor already has a consumer API, you could use this architecture:
        +--------------+                                   +-----------------------+
        |    sensor    |    talks to          talks to     |   sensor platform     |
        |              |  ------------+    +-------------  |                       |
        |  e.g. TMP36  |              |    |               |   running homespun    |
        +--------------+              |    |               +-----------------------+
                                      |    |                            |
    home network                      |    |                            |
    --------------------------------------------------------------------------------
    the Internet                      |    |                            |
                                      |    |                            |
                                     \|/  \|/                          \|/
                                 +----------------+           +-------------------+
                                 | vendor's cloud |           |     the cloud     |
                                 +----------------+           +-------------------+
                                                                       /|\
                                                                        |
                                                                        |
                                                                       \|/
                                                              +-------------------+
                                                              |     cloud app     |
                                                              +-------------------+
Installation
To begin, you will need to have Node.js running on a sensor platform.
Node.js is available on many, many different computing platforms. If you are familiar with JavaScript, then you can learn to program in Node.js very quickly -- and if you aren't familiar with JavaScript, you can become familiar with it easily.
Get a sensor platform
If you are starting from scratch, you have many excellent options. Here's one: the Raspberry Pi 2 Model B. For less than USD40, you get a very powerful, very small ARM-A7 computer. When you purchase the RPi2 model B, you will probably have the option of also purchasing a Micro SD card containing the filesystem. One option is a 4GB SD card with Raspian Wheezy already installed.
The next step is to configure an RPi for secure local access and install Node.js and node-gyp.
The instructions are here.
Install homespun
Go to the directory where you have downloaded homespun
and run npm -l install:
    pi@raspberrypi ~ $ cd homespun-master/
    pi@raspberrypi ~/homespun-master $ npm -l install
    ...
Management Clouds
To be documented once the configurator is implemented.
For now,
create a file called datastore/clouds/numerous.json.
Here is what it should contain:
    [
      {
        "cloud"       : "numerous",
        "id"          : 1,
        "server"      : "https://api.numerousapp.com/",
        "api_key"     : "..."
      }
    ]
You can determine the value of apiKey by running the numerous mobile application and looking under
Settings > Developer Info.
Numerous
numerous is a cloud-service and a set mobile applications.
In addition to both Android
and iOS apps,
numerous supports the concept of embedded information.
To look at an example,
download this repo
and open the file examples/numerous.html in a browser.
Sensor Drivers
homespun comes with several sensor drivers to help you get started!
It is easiest to integrate using TSRP. At present, there are two repositories that contain TSRP transcoders:
homespun-arduino, which contains examples sketches for the Arduino Ethernet; and,
homespun-grovepi, a Node.js module for the Raspberry Pi and a GrovePi+ Shield.
homespun also knows how to talk to Yoctopuce sensors.
It also knows how to talk to the CubeSensors, Foobot, and Netatmo clouds, although configuration isn't automated as it is with the TSRP and Yoctopuce drivers.
TSRP
First read this file.
The easiest way to integrate your sensor with homespun is to have write code that reads the sensor value and uses
the TSRP to report values.
Take a look at the examples for the Arduino
and for the GrovePi.
For example,
looking at Arduino example
you'll see a file called WaterSensor.ino -- this is an Arduino sketch file (a program),
that is compiled with the Arduino IDE.
It expects that digital pin 7 is connected to
a Grove Water Sensor.
You can either connect the sensor directly or using a
Grove Shield for the Arduino.
The sketch starts by getting a DHCP address for the Arduino,
it prints out the MAC and IP addresses,
and then opens up the multicast UDP port for TSRP.
It reads from pin D7 and constructs a TSRP packet that is then multicast to the local network.
The TSRP driver for homespun listens for these packets,
transcodes them into a format suitable for the configured cloud,
and then uploads them.
The GrovePi example is a little more complicated.
It expects that you have a Raspberry Pi with a GrovePi+ Shield.
A configuration file (config.json) tells the program (multi-sensor.js) what sensor is on each port -- in this case,
pin D7 also has a Grove Water Sensor.
Yoctopuce
Yoctopuce makes a wide range of prosumer (Swiss-made) sensors.
You can either plug them into the USB ports on your sensor platform and run a program called
VirtualHub that makes them available,
or you can attach them to a Yoctopuce Ethernet or Wi-Fi hub to make the readings available on your local network.
Either way,
homespun will automatically discover the sensors and report their values.
At present, any sensors reporting this values are supported:
altitude, co, co2, humidity, light, no2, pressure, temperature, voc
If you are using either the Yocto-0-10V-Rx
or Yocto-4-20mA-Rx
to read an industrial sensor following either of these two standards,
then you must set the Mapped value unit to reflect what is being measured.
In this example,
the leads for genericSensor1 are connected to a co sensor,
and the leads for genericSensor2 are connected to a no2 sensor:
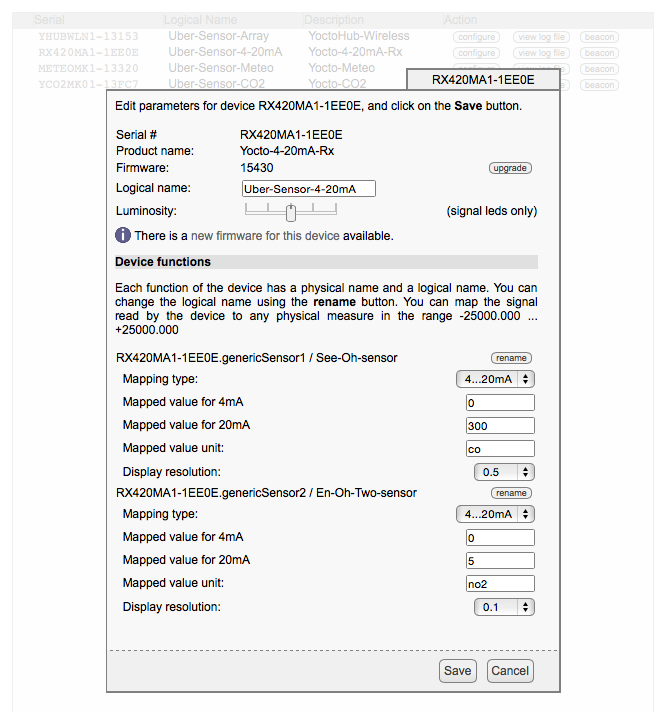
Optionally,
you can also define the Logical name of each sensor.
In the example above,
the logical name is Uber-Sensor-4-20mA.
SNMP
Although the Simple Network Management Protocol is intended for managing networks, some vendors make sensor information available using this protocol.
At present,
homespun supports only the ServersCheck sensors.
Take a look at drivers/driver-snmp.js to see how dispatch is done based on the sysObjectID of the SNMP agent.
CubeSensors
To be documented once the configurator is implemented.
Foobot
To be documented once the configurator is implemented.
Netatmo
To be documented once the configurator is implemented.
Measurement Taxonomy
The homespun family divides the "sensor world" into three parts: unit-based, percentage-based, .σ-based.
Unit-based
Unit-based sensors report values that are based on some kind of standardized metric:
|property|SI or derived units|expressed using| |-|-| |altitude|meters|float| |airflow|meters/second|float| |co|ppm|float| |co2|ppm|float| |distance|meters|float| |gustheading|degrees|float| |gustvelocity|meters/second|float| |hcho|ppm|float| |hydrogen|ppm|float| |light|lux|float| |location|coordinates|quad| |methane|ppm|float| |no|ppm|float| |no2|ppm|float| |noise|decibels|float| |particles.2_5|micrograms/cubicmeters|float| |particulates|particles/cubicmeters|float| |pH|pH|float| |pressure|millibars|float| |rainfall|millimeters|float| |smoke|ppm|float| |temperature|celcius|float| |uvi|uv-index|float| |vapor|ppm|float| |velocity|meters/second|float| |voc|ppm|float| |windheading|degrees|float| |windvelocity|meters/second|float|
Percentage-based or Boolean-based
Percentage-based sensors report values that are based on a ratio,
either as a float in the range 0.0 to 1.0, or as a boolean.
In the case of a ratio,
the value being reported refers to the sensor's reporting range:
|property|expressed using| |-|-| |aqi|percentage| |battery|percentage| |brightness|percentage| |flame_detected|boolean| |humidity|percentage| |liquid_detected|boolean| |moisture|percentage| |motion|boolean| |opened|boolean| |powered|boolean| |pressed|boolean| |signal|percentage| |sonority|percentage| |tamper_detected|boolean| |vibration|boolean|
σ-based
Sensors that report uncalibrated data, are useful only in the context of previous data. These raw values are reported directly (typed as "epsilon") which transcodes them into standard deviation values that are uploaded to the management cloud (typed as "sigmas"):
|property|raw value| |-| |aqi.σ|aqi.ε| |co.σ|co.ε| |co2.σ|co2.ε| |flow.σ|flow.ε| |gas.σ|gas.ε| |hcho.σ|hcho.ε| |hydrogen.σ|hydrogen.ε| |methane.σ|methane.ε| |no.σ|no.ε| |no2.σ|no2.ε| |smoke.σ|smoke.ε| |vapor.σ|vapor.ε|