README
![]()
A simple yet effective web game development framework that knows its place!
If you're looking for a package that implements rendering, sounds, assets and input, while keeping it low level and simple, this is the library for you!
Table Of Content
About
Shaku is a pure JavaScript framework for web games development that emphasize simplicity, flexibility and freedom.
Let's take a sneak peek on gamedev with Shaku!
// main loop (do update step + request next step)
function step()
{
    // start a new frame and clear screen
    Shaku.startFrame();
    Shaku.gfx.clear(Shaku.utils.Color.cornflowerblue);

    // draw a texture at 256,256 with size 100,150
    Shaku.gfx.draw(texture, new Shaku.utils.Vector2(256, 256), new Shaku.utils.Vector2(100, 150));

    // end frame and request next step
    Shaku.endFrame();
    Shaku.requestAnimationFrame(step);
}
So, what does simplicity, flexability and freedom in Shaku actually means?
Simplicity
Shaku is mostly made of straightforward methods and barely have any setup code or configuration. It's a lean and mean package with zero dependencies and only minimal necessary abstraction.
Flexibility
Shaku is easy to extend and tweak. The code is well documented and many of the framework components can be replaced or modified.
Freedom
Shaku values your freedom. It will not push any design pattern on your code and will integrate nicely into whatever it is you're making.
Features
Shaku provides the following key features:
- Assets loader fetch textures, sound effects, JSON, and other game resources.
- WebGL-based 2d rendering engine.
- Custom effects, render targets, batching and other graphics essentials.
- Input manager for mouse & keyboard input, plus query changes from last frame.
- Playing sound effects, music, change pitch and mix tracks.
- Basic utility objects such as Vectors, Matrices, Rectangles, GameTime and more.
- Animator helpers to animate any built-in component or numeric value.
- Tiny lib with no dependencies! All you need to use Shaku is a single minified JS weighting less than 100Kb.
Plus, Shaku is written in pure modern JavaScript.
If you want to play with Shaku while reading the docs, you can check out the Sandbox Demo. See the demos assets folder to see which assets you can use for the sandbox (or load from external sources).

Installation
Using Shaku is super easy!
- Get either
shaku.jsorshaku.min.jsfrom the dist folder and include it in your page. - Init Shaku and append the canvas to your document (or init Shaku on an existing canvas instead).
- Write your game loop with
Shaku.startFrame()andShaku.endFrame().
Note that you can also get Shaku via NPM:
npm install shaku
HTML Boilerplate
The following is a boilerplate HTML with Shaku, running an empty main loop:
<!DOCTYPE html>
<html>
  <head>
    <title>Shaku Example</title>
    <script src="dist/shaku.js"></script>
  </head>
  <body>
      <!-- demo code -->
      <script>
        (async function runGame()
        {
          // init shaku
          await Shaku.init();

          // add shaku's canvas to document and set resolution to 800x600
          document.body.appendChild(Shaku.gfx.canvas);
          Shaku.gfx.setResolution(800, 600, true);

          // TODO: INIT STUFF AND LOAD ASSETS HERE

          // do a single main loop step and request the next step
          function step()
          {
            // start a new frame and clear screen
            Shaku.startFrame();
            Shaku.gfx.clear(Shaku.utils.Color.cornflowerblue);

            // TODO: PUT YOUR GAME UPDATES / RENDERING HERE

            // end frame and request next step
            Shaku.endFrame();
            Shaku.requestAnimationFrame(step);
          }

          // start main loop
          step();
        })();
      </script>
  </body>
</html>
You can find the above boilerplate HTML here.
Online Demo Projects
Online demo projects can be found here. The demos illustrate basic features and components, and implement 3 basic "games": Snake, Tilemap Editor, and Fishy.
Using Shaku
Shaku's API mostly consist of five main managers, each solve a different domain of problems in gamedev: graphics, sounds, assets, collision and input.
In this doc we'll explore these managers and cover the most common use cases. If you want to dive into the full API, you can check out the API Docs, or browse the code instead.
Setup
Everything in Shaku is wrapped under the Shaku object.
Since the initialization process and asset loading is mostly asynchronous operations, its best to wrap everything with an async method so that we can use await. Then we can setup Shaku with something like this:
(async function runGame()
{
    // init shaku
    await Shaku.init();

    // add shaku's canvas to document and set resolution to 800x600
    document.body.appendChild(Shaku.gfx.canvas);
    Shaku.gfx.setResolution(800, 600, true);

    // load assets...

    // start main loop
    function step()
    {
        Shaku.startFrame();

        // TODO: PUT YOUR GAME LOGIC HERE

        Shaku.endFrame();
        Shaku.requestAnimationFrame(step);
    }
    step();
})();
Let's go over the code above line by line:
await Shaku.init(): Initialize Shaku's components. You must call this before doing anything with Shaku.document.body.appendChild(Shaku.gfx.canvas): Add the default canvas created by Shaku to the document body. You can also use an existing canvas instead, more on that later.Shaku.gfx.setResolution(800, 600, true): Set both canvas size and renderer size to 800x600 px.Shaku.startFrame(): Must be called at the beginning of every game frame.Shaku.endFrame(): Must be called at the end of every game frame.Shaku.requestAnimationFrame(step): Set the next update frame to be called when its time to redraw screen. Basically this is just a wrapper around window.requestAnimationFrame with few fallbacks.
As you can see from the example above, our step() method represent a single iteration in our game main loop. It handles both rendering and updates.
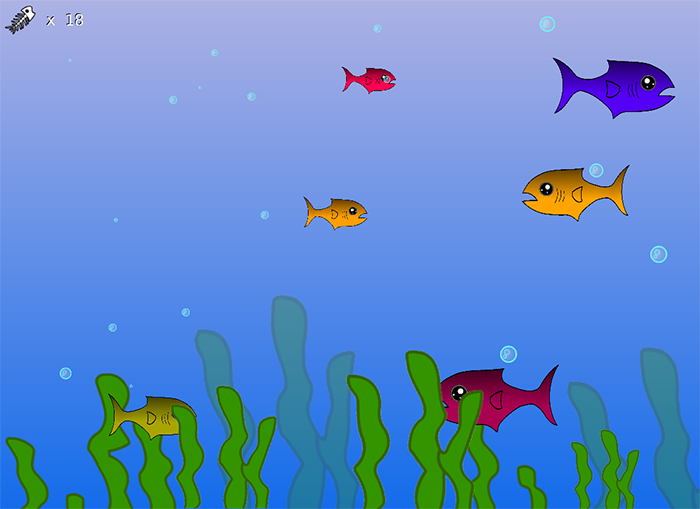
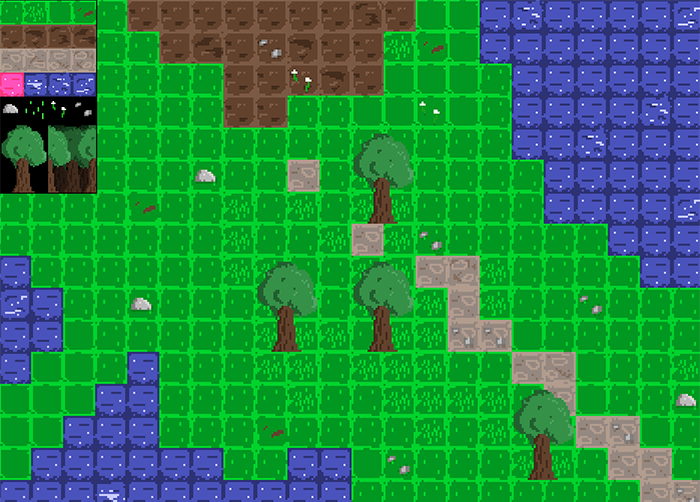
That's pretty much it in terms of setup. Here's a random screenshot to break the wall of text:
graphics
Let's start exploring the APIs from the graphics manager, accessed by Shaku.gfx.
This doc don't cover the entirely of the API, only the main parts of it. To see the full API, check out the API docs.
Draw
To draw a simple texture on screen:
// load texture (only need to call this once outside the main loop)
let texture = await Shaku.assets.loadTexture('assets/my_texture.png');

// draw texture
let position = new Shaku.utils.Vector2(100, 125);
let size = new Shaku.utils.Vector2(32, 64);
Shaku.gfx.draw(texture, position, size);
Now let's draw with some more parameters:
let texture = await Shaku.assets.loadTexture('assets/my_texture.png');
let position = new Shaku.utils.Vector2(100, 125);
let size = new Shaku.utils.Vector2(32, 64);
let sourceRect = new Shaku.utils.Rectangle(32, 0, 32, 64);
let color = Shaku.utils.Color.red;
let blendMode = Shaku.gfx.BlendModes.Additive;
let rotation = Math.PI / 2;
let origin = new Shaku.utils.Vector2(0.5, 1);
let transform = Shaku.gfx.Matrix.translate(10, 10, 50);
Shaku.gfx.draw(texture, position, size, sourceRect, color, blendMode, rotation, origin, transform);
sourceRectis the region we want to draw from source texture.coloris an overlay color to apply on the texture. note that if you exceed the 0-1 range, you can amplify existing colors.blendModeis how to blend the texture with the already existing buffer. More on that later.rotationwill rotate the drawing (in radians).originis the point relative to texture size from which the texture will be painted. this affects both positioning and rotation. 0,0 = top left, 1,1 = bottom right.transformoptional transformation matrix. Used internally (for example with groups drawing) but you can also use it by providing a transformation matrix. More on matrices later.
A demo page that draw textures can be found here.
Cover
cover draws a texture using a destination rectangle, instead of position, origin and size.
For example, the following will cover the entire canvas with a texture:
Shaku.gfx.cover(texture, Shaku.gfx.getRenderingRegion());
Draw Rectangles
fillRect will draw filled colored rectangles.
For example the following will draw a red rectangle at position 100,100 and size 50,50.
Shaku.gfx.fillRect(new Shaku.utils.Rectangle(100, 100, 50, 50), Shaku.utils.Color.red);
You can also draw a rectangle outlines with outlineRect:
Shaku.gfx.outlineRect(new Shaku.utils.Rectangle(100, 100, 50, 50), Shaku.utils.Color.red);
Shaku will use whatever effect is currently set to draw the rectangle, with a single white pixel as the texture.
If you change the default effect, it may affect how rectangles draw as well. More on effects later.
A demo page that draw rectangles can be found here.
Draw Circle
fillCircle will draw filled colored circles.
Shaku.gfx.fillCircle(new Shaku.utils.Circle(new Shaku.utils.Vector2(100, 100), 285), Shaku.utils.Color.red);
You can also draw a circle outlines with outlineCircle:
Shaku.gfx.outlineCircle(new Shaku.utils.Circle(new Shaku.utils.Vector2(100, 100), 285), Shaku.utils.Color.red);
Shaku will use whatever effect is currently set to draw the circle, with a single white pixel as the texture.
If you change the default effect, it may affect how circles draw as well. More on effects later.
A demo page that draw a circle can be found here.
Draw Lines
drawLinesStrip will draw a strip of colored lines.
For example the following will draw lines from 50,50 to 150,50 and then 150,150 with random colors:
let lines = [new Shaku.utils.Vector2(50,50), new Shaku.utils.Vector2(150,50), new Shaku.utils.Vector2(150,150)];
let colors = [Shaku.utils.Color.random(), Shaku.utils.Color.random(), Shaku.utils.Color.random()];
Shaku.gfx.drawLinesStrip(lines, colors);
And drawLines will draw a set of lines, not connected as a strip:
let lines = [new Shaku.utils.Vector2(50,50), new Shaku.utils.Vector2(150,50), new Shaku.utils.Vector2(150,150), new Shaku.utils.Vector2(300,150)];
let colors = [Shaku.utils.Color.red, Shaku.utils.Color.red, Shaku.utils.Color.blue, Shaku.utils.Color.blue];
Shaku.gfx.drawLines(lines, colors);
Or, if you need just a single line, you can use drawLine instead:
Shaku.gfx.drawLine(new Shaku.utils.Vector2(50,50), new Shaku.utils.Vector2(150,50), Shaku.utils.Color.red);
Shaku will use whatever effect is currently set to draw the lines, with a single white pixel as the texture.
If you change the default effect, it may affect how lines draw as well. More on effects later.
A demo page that draw lines can be found here.
Blend Modes
Blend Modes are different methods to blend new rendering with the existing buffer / texture we draw on.
The following screenshot illustrate the different blend modes Shaku supports, and how it would look like when using them:
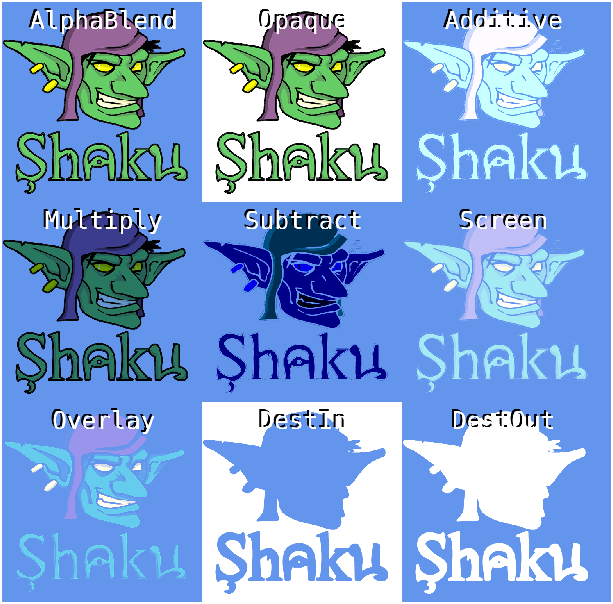
Or, you can watch the live demo here.
Sprites
Sprites are entities that store all the parameters required to make a draw call.
Lets create a sprite and set all its members:
// load texture and create sprite
let texture = await Shaku.assets.loadTexture('assets/my_texture.png');
let sprite = new Shaku.gfx.Sprite(texture);

// set sprite members
sprite.position = new Shaku.utils.Vector2(100, 125);
sprite.size = new Shaku.utils.Vector2(32, 64);
sprite.sourceRect = new Shaku.utils.Rectangle(32, 0, 32, 64);
sprite.color = Shaku.utils.Color.red;
sprite.blendMode = Shaku.gfx.BlendModes.Additive;
sprite.rotation = Math.PI / 2;
sprite.origin = new Shaku.utils.Vector2(0.5, 1);

// draw sprite
Shaku.gfx.drawSprite(sprite);
Sprite may seem like just a sugarcoat for draw() at this point, but next we'll learn about SpritesGroup and how we use it for batch rendering.
Sprites Group
As the name implies, a sprites group is a collection of sprites. Let's see how we use it:
// create group
let group = new Shaku.gfx.SpritesGroup();

// set group position, scale and rotation
group.position.set(100, 100);
group.rotation = Math.PI / 2;
group.scale.set(2, 2);

// add sprites to group
let texture = await Shaku.assets.loadTexture('assets/my_texture.png');
for (let i = 0; i < 3; ++i) {
  let sprite = new Shaku.gfx.Sprite(texture);
  sprite.position = new Shaku.utils.Vector2(i * 100, 0);
  sprite.size = new Shaku.utils.Vector2(50, 50);
  sprite.origin = new Shaku.utils.Vector2(0, 0);
  group.add(sprite);
}

// draw group
let batching = true;
Shaku.gfx.drawGroup(group, batching);
A demo page that draw with sprites group can be found here.
Notice that let batching = true in the end - that's a very important optimization that batch together multiple sprites and reduce draw calls.
If you draw lots of sprites that share the same texture and blending mode, always use batching. It will significantly increase your performance.
More on batching here.
Or a demo page with performance test can be found here.
Draw Text
To draw a text with Shaku we need to perform 3 steps:
- Load a
Font Textureasset, which is essentially a texture atlas with all the font characters, generated in runtime from a loaded font. - Generate a group of sprites to represent the string with the given
Font Texture. - Draw the group with batching.
Sounds like a lot of work, but its actually very simple. Lets take a look:
// load font texture
let fontTexture = await Shaku.assets.loadFontTexture('assets/DejaVuSansMono.ttf', {fontName: 'DejaVuSansMono'});

// generate 'hello world!' text (note: you don't have to call this every frame, only when you want to change text)
let text1 = Shaku.gfx.buildText(fontTexture, "Hello World!");

// set text group position and draw it with batching
text1.position.set(40, 40);
Shaku.gfx.drawGroup(text1, true);
When loading the FontTexture you can provide additional parameters, to learn more about them check out the API Docs.
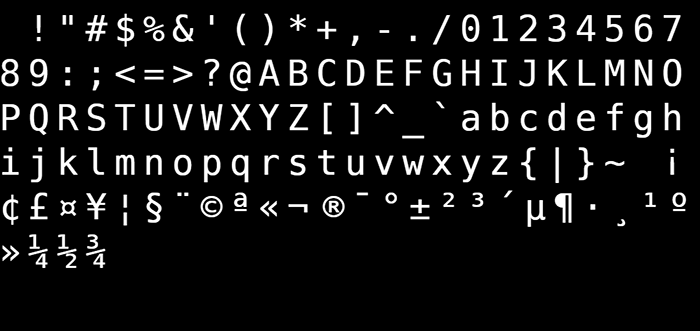
To illustrate the concept of Font Textures better, here's a saved font texture that was generated via assets.loadFontTexture() in the drawing texts demo:
Note that buildText accepts some additional params that were not covered in the example above.
Lets draw text with all advanced options:
let fontSize = 16;
let color = Shaku.utils.Color.blue;
let alignment = Shaku.gfx.TextAlignment.Left;
let marginFactor = Shaku.utils.Vector2.one;
Shaku.gfx.buildText(fontTexture, "hello world.", fontSize, color, alignment, marginFactor)
fontSize: font size for text, or undefined to use the default font texture size.Color: optional text color.alignment: how to align text. Options areShaku.gfx.TextAlignment.Left,Shaku.gfx.TextAlignment.RightandShaku.gfx.TextAlignment.Center.marginFactor: optional factor for characters spacing. For example value of 2,1 will make double horizontal spacing.
A demo page that draw texts can be found here.
Render Targets
Render Targets provide a way to draw on textures instead of directly on screen. This technique is super useful for post processing effects, or to implement virtual resolution by drawing on a constat sized texture and then stretch it on screen.
A render target is basically a texture asset, just created in a different way:
let renderTarget = await Shaku.assets.createRenderTarget('_my_render_target', width, height);
And now to use it:
// set render target
Shaku.gfx.setRenderTarget(renderTarget);

// draw some stuff here...
// these renderings will appear on the texture instead of the canvas.

// reset render target so we can continue drawing on screen / canvas
Shaku.gfx.setRenderTarget(null);
And now we can use the render target just like we would use any texture:
Shaku.gfx.draw(renderTarget, position, size);
A demo page that uses render targets can be found here.
Cameras
A camera object defines two key properties:
- Viewport: the region of the canvas we render on.
- Projection matrix: offset and scale of everything we draw.
By default, Shaku will use a camera with no offset, scale of 1,1, and viewport that covers the entire canvas.
Easiest way to set camera's offset is with setCameraOrthographic():
let cameraOffset = Shaku.utils.Vector2.zero;
Shaku.gfx.setCameraOrthographic(cameraOffset);
But you can also create a camera object and set it manually. Lets first create a camera:
let camera = Shaku.gfx.createCamera();
And now set it and apply to make it the active camera:
// set offset
let cameraOffset = Shaku.utils.Vector2.zero;
camera.orthographicOffset(cameraOffset);

// use this camera
Shaku.gfx.applyCamera(camera);
And if you want to reset camera back to default, you can call the following method:
Shaku.gfx.resetCamera();
For more details, check out the Camera object API docs.
A demo page that uses cameras can be found here.
Custom Effects
Custom Effects provide a way to change the shaders Shaku uses to draw textures and shapes.
When implementing an effect, you need to do 4 things:
- Write your vertex shader code.
- Write your fragment shader code.
- Define your shaders Uniforms.
- Define your shaders Attributes.
Lets write a simple custom effect, and then we'll go over steps and explain them:
// define our custom effect
class CustomEffect extends Shaku.gfx.BasicEffect
{
  /**
   * Override the fragment shader for our custom effect.
   */
  get fragmentCode()
  {
    const fragmentShader = `
      #ifdef GL_ES
          precision highp float;
      #endif

      uniform sampler2D texture;
      uniform float elapsedTime;

      varying vec2 v_texCoord;
      varying vec4 v_color;

      void main(void) {
          gl_FragColor = texture2D(texture, v_texCoord) * v_color;
          gl_FragColor.r *= sin(v_texCoord.y * 10.0 + elapsedTime) + 0.1;
          gl_FragColor.g *= sin(1.8 + v_texCoord.y * 10.0 + elapsedTime) + 0.1;
          gl_FragColor.b *= sin(3.6 + v_texCoord.y * 10.0 + elapsedTime) + 0.1;
          gl_FragColor.rgb *= gl_FragColor.a;
      }
      `;
      return fragmentShader;
  }

  /**
   * Override the uniform types dictionary to add our custom uniform type.
   */
  get uniformTypes()
  {
    let ret = super.uniformTypes;
    ret['elapsedTime'] = { type: Shaku.gfx.Effect.UniformTypes.Float };
    return ret;
  }
}
Before reading on, can you guess what this effect does?
This effect recieve elapsed time as a uniform (elapsedTime) and animate the texture colors based on the time. Since every component gets a different offset from the start, it will create a rainbow-like effect.
A demo page with the above effect can be found here.
Now lets explain the code.
- First, notice we're extending the
Shaku.gfx.BasicEffectclass. This is the default effect Shaku uses, and by inheriting from it we can skip implementing the vertex shader and just use the default. It also covers basic attributes we need for it. - If you want to create a brand new effect that doesn't use anything from the built-in default effect, extend
Shaku.gfx.Effectinstead. get fragmentCode()return the fragment shader code to compile for this effect. If you don't know how to write shaders, please learn that first (not covered in this doc).get uniformTypes()return a dictionary with uniforms we want to set in the shaders. Note that we use and extend the base class uniforms so we won't miss out on any functionality from the basic effect.
Now lets see how we use this effect to render:
// create a custom effect instance and set as active
let effect = Shaku.gfx.createEffect(CustomEffect);
Shaku.gfx.useEffect(effect);

// update effect elapsed time
// the setter `effect.uniforms.elapsedTime` exists because we defined this uniform in uniformTypes()
effect.uniforms.elapsedTime(Shaku.gameTime.elapsed);
To make Shaku revert to using the default built-in effect, you can later call useEffect with null:
Shaku.gfx.useEffect(null);
Default Effect
To learn more about effects, lets view the default built-in effect Shaku normally uses:
/**
 * Default basic effect to draw 2d sprites.
 */
class BasicEffect extends Effect
{
    get vertexCode()
    {
        return `
attribute vec3 position;
attribute vec2 coord;
attribute vec4 color;

uniform mat4 projection;
uniform mat4 world;

uniform vec2 uvOffset;
uniform vec2 uvScale;

varying vec2 v_texCoord;
varying vec4 v_color;

void main(void) {
    gl_Position = projection * world * vec4(position, 1.0);
    v_texCoord = uvOffset + (coord * uvScale);
    v_color = color;
}
`;
    }

    get fragmentCode()
    {
        return `
#ifdef GL_ES
    precision highp float;
#endif

uniform sampler2D texture;

varying vec2 v_texCoord;
varying vec4 v_color;

void main(void) {
    gl_FragColor = texture2D(texture, v_texCoord) * v_color;
    gl_FragColor.rgb *= gl_FragColor.a;
}
`;
    }

    get uniformTypes()
    {
        return {
            "texture": { type: Effect.UniformTypes.Texture, bind: Effect.UniformBinds.MainTexture },
            "projection": { type: Effect.UniformTypes.Matrix, bind: Effect.UniformBinds.Projection },
            "world": { type: Effect.UniformTypes.Matrix, bind: Effect.UniformBinds.World },
            "uvOffset": { type: Effect.UniformTypes.Float2, bind: Effect.UniformBinds.UvOffset },
            "uvScale": { type: Effect.UniformTypes.Float2, bind: Effect.UniformBinds.UvScale },
        };
    }

    get attributeTypes()
    {
        return {
            "position": { size: 3, type: Effect.AttributeTypes.Float, normalize: false, bind: Effect.AttributeBinds.Position },
            "coord": { size: 2, type: Effect.AttributeTypes.Float, normalize: false, bind: Effect.AttributeBinds.TextureCoords },
            "color": { size: 4, type: Effect.AttributeTypes.Float, normalize: false, bind: Effect.AttributeBinds.Colors },
        };
    }
}
As you can see we use attributes for vertices data, and uniforms for texture, projection, world matrix, and uv adjustment params.
The UV scale and Offset are used when drawing individual sprites using a static texture coords buffer that has the values of {0,0|1,0|0,1|1,1}. When drawing batches, these uniforms will not be used because we generate the texture coords buffer dynamically.
Binds
You may have noticed a new key when defining attributes and uniforms: bind.
Binding is a way for us to tell Shaku about special attributes and uniforms that we want to use for basic stuff, so that Shaku can set their values accordingly.
For example, we can tell Shaku which attribute is used for vertices position in our shader, and Shaku will link it to the vertices position buffer automatically.
We can bind uniforms to the following purposes:
- MainTexture: bind uniform to be used as the main texture.
- Color: bind uniform to be used as a main color.
- Projection: bind uniform to be used as the projection matrix.
- World: bind uniform to be used as the world matrix.
- UvOffset: bind uniform to be used as UV offset. You must implement this for individual sprite rendering.
- UvScale: bind uniform to be used as UV scale. You must implement this for individual sprite rendering.
And we can bind attributes to the following purposes:
- Position: bind attribute to be used for vertices position array.
- TextureCoords: bind attribute to be used for texture coords array.
- Colors: bind attribute to be used for vertices colors array.
Matrices
Matrices are used to transform sprites vertices while rendering. They are used internally to express rotation, scale, and positioning, but you can also use them yourself with the transformations param.
You can access the Matrix class with Shaku.gfx.Matrix.
To learn more about matrices, check out the API docs.
Sounds
We finally reached our second manager, the sound effects manager, which is accessed by Shaku.sfx.
This doc don't cover the entirely of the API, only the main parts of it. To see the full API, check out the API docs.
Play Sound
To play an audio asset:
// load the sound file
let sound = await Shaku.assets.loadSound('assets/my_sound_file.ogg');

// play sound
let volume = 0.85;
let pitch = 1;
Shaku.sfx.play(sound, volume, pitch);
Sound Instances
A sound instance is a way to create a sound object once, and use it multiple times or change its parameters while it plays. Its also much more efficient to reuse instances than multiple play() calls (which actually creates a temporary sound instance inside).
To create a sound instance:
// load sound asset and create instance
let sound = await Shaku.assets.loadSound('assets/my_sound_file.ogg');
let soundInstance = Shaku.sfx.createSound(sound);

// start playing sound
soundInstance.play();
The sound instance have the following properties:
- play(): Start playing the sound.
- stop(): Stop playing the sound and reset time to the beginning.
- pause(): Stop playing sound but keep current time.
- loop: Set if should play in loop or not.
- volume: Set volume.
- currentTime: Set current time.
- duration: Get sound duration.
- paused: Is the sound currently paused?
- playing: Is the sound currently playing?
- finished: Did the sound finish playing?
- preservesPitch: Set if to preserve pitch while changing playback rate.
- playbackRate: Set playback rate.
A demo page that play sounds can be found here.
Sounds Mixer
Sound Mixer is a utility class to mix and fade sounds. It's very useful for music transitioning.
Given the following loaded music assets:
let music1 = await Shaku.assets.loadSound('assets/music1.ogg');
let music2 = await Shaku.assets.loadSound('assets/music2.ogg');
The following will create a mixer that transition from music1 to music2, while allowing tracks to overlap (if overlap is false, the mixer will first fade out music1 completely, and only then will begin fading in music2):
let overlap = true;
let mixer = new Shaku.sfx.SoundMixer(Shaku.sfx.createSound(music1), Shaku.sfx.createSound(music2), overlap);
The following will create a mixer to fade music in:
let mixer = new Shaku.sfx.SoundMixer(null, Shaku.sfx.createSound(music2), true);
And the following will create a mixer to fade music out:
let mixer = new Shaku.sfx.SoundMixer(Shaku.sfx.createSound(music1), null, true);
Now to use the mixer:
To update the mixer call updateDelta() with delta time every frame:
mixer.updateDelta(Shaku.gameTime.delta);
Or if you want to set the mixer to a specific point, use update():
let mixProgress = 0.5; // valid range = 0-1
mixer.update(mixProgress);
A demo page with sounds mixer can be found here.
Input
The input manager is responsible to get input from Keyboard, Mouse and basic touch (behaves like mouse).
To access the Input manager we use Shaku.input.
This doc don't cover the entirely of the API, only the main parts of it. To see the full API, check out the API docs.
Keyboard Input
To get a keyboard key state:
if (Shaku.input.down('left') || Shaku.input.down('a')) {
  // move player left
}
Or you can check when a key was pressed / released:
if (Shaku.input.released('space')) {
  // space was just released
}

if (Shaku.input.pressed('space')) {
  // space was just pressed
}
Mouse Input
To get a mouse key state use:
if (Shaku.input.down('mouse_left')) {
  // mouse left button is down
}
And like with keyboard, you can detect pressed / released as well:
if (Shaku.input.released('mouse_left')) {
  // mouse left button was released now, similar to click event
}
Mouse Position
To get mouse position use:
let mousePos = Shaku.input.mousePosition;
And to get mouse movement from last frame:
let mouseDelta = Shaku.input.mouseDelta;
Wait, mouse position is wrong!
By default the input manager will attach events to the entire document, meaning that mouse position will be relative to the most top-left corner of your page.
If your game canvas does not cover the entire screen, mouse offset will feel wrong because it won't be relative to your canvas top-left corner. You might expect to get 0,0 if you click your canvas most top-left point, but that would only happen if the canvas starts the the page top-left corner.
To solve this, you can tell the input manager to attach events to the gfx canvas (or any other element) and make mouse position relative to it. This will also require the canvas to be focused to recieve input, which is useful when combining interactable HTML elements with your game.
To set the Input manager target to be the main canvas, run the following command before initializing Shaku:
Shaku.input.setTargetElement(() => Shaku.gfx.canvas);
Note that we use a callback and not Shaku.gfx.canvas directly, as Shaku.gfx.canvas will be undefined until we call Shaku.init, which is when we must call setTargetElement().
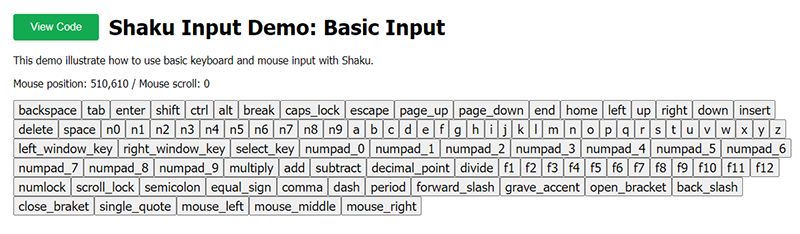
A demo page with mouse and keyboard input can be found here.
Assets
The Assets manager handle loading game resources and assets, and is accessed by Shaku.assets.
We already covered most of it while exploring the other managers, but in this section we will dive into more details about it.
This doc don't cover the entirely of the API, only the main parts of it. To see the full API, check out the API docs.
Keep In Mind
There are two things to keep in mind while dealing with the assets manager:
Assets URL
Every asset have a unique identifier field called url. This is how we identify the asset and store it in cache.
If you try to load the same asset twice, in the second call it will return the previous copy from cache, provided the URL is exactly the same.
When creating assets from code, you can also provide a url if you want to add them to cache and make them accessible anywhere via the assets manager.
Promises
Every load and create method return a promise to resolve when asset is loaded.
Even if the asset was returned from cache, it will be returned via the promise.
If you want to get existing cached asset, don't use the create / load methods, use the getCached() method (shown later).
Promise.asset
All returned promises from the assets manager have additional property: asset.
This property allow you to access the asset before its ready, at your own risk. For example, you can do this:
// myTexture may not be loaded yet!
let myTexture = Shaku.assets.loadTexture(url).asset;
Instead of this:
let myTexture = await Shaku.assets.loadTexture(url);
Or this:
Shaku.assets.loadTexture(url).then((asset) => myTexture = asset);
The idea behind the Promise.asset property is to make it easier to do parallel loading. For example consider the following usecase:
let assets = {
  tree: Shaku.assets.loadTexture("tree.png").asset,
  rock: Shaku.assets.loadTexture("rock.png").asset,
  house: Shaku.assets.loadTexture("house.png").asset
}
await Shaku.assets.waitForAll();
Just keep in mind that using assets before they are ready may cause undefined behavior. You can test asset validity with asset.valid.
Load Sound
To load a sound asset:
let sound = await Shaku.assets.loadSound(url);
To learn more about sound assets, check out the API docs.
Load Texture
To load a texture asset:
let sound = await Shaku.assets.loadTexture(url, params);
Params is an optional dictionary that accepts the following keys:
- generateMipMaps (default=false): should we generate mipmaps for this texture?
To learn more about texture assets, check out the API docs.
Create Render Target
To create a render target (texture we can draw on via the graphics manager):
let rt = await Shaku.assets.createRenderTarget(name, width, height)
In the above example name will be used as url, ie to put the loaded render target in cache.
A render target is just a texture asset created via code. To learn more about texture assets, check out the API docs.
Load Font Texture
To load a font texture asset (texture atlas to draw text using a given font):
let fontTexture = await Shaku.assets.loadFontTexture(url, params);
Params is a mandatory dictionary that accepts the following keys:
- fontName: mandatory font name. on some browsers if the font name does not match the font you actually load via the URL, it will not be loaded properly.
- missingCharPlaceholder (default='?'): character to use for missing characters.
- smoothFont (default=true): if true, will set font to smooth mode.
- fontSize (default=52): font size to generate in texture. larget font size will take more memory, but allow for sharper text rendering in larger scales.
- enforceTexturePowerOfTwo (default=true): if true, will force texture size to be power of two.
- maxTextureWidth (default=1024): max texture width.
- charactersSet (default=FontTextureAsset.defaultCharactersSet): which characters to set in the texture.
To learn more about font texture assets, check out the API docs.
Load Json
To load a json file:
let json = await Shaku.assets.loadJson(url);
console.log(json.data);
To learn more about json assets, check out the API docs.
Create Json
You can also create a json asset dynamically, making it available for others to load:
let json = await Shaku.assets.createJson(url, data);
Load Binary
To load a binary file:
let bin = await Shaku.assets.loadBinary(url);
console.log(bin.data);
To learn more about binary assets, check out the API docs.
Create Binary
You can also create a binary asset dynamically, making it available for others to load:
let bin = await Shaku.assets.createBinary(url, data);
Get Cached Asset
To get an already loaded asset, you can use:
let asset = Shaku.assets.getCached(url);
This method is more convinient and just return the asset immediately, without a promise. However, if the asset is not loaded yet, it will return null.
So be sure to only call getCached() if you know the asset is loaded.
Waiting For Assets
There are three main properties we can use to wait / monitor assets loading:
Shaku.assets.pendingAssets
Return how many assets are currently waiting to be loaded.
Shaku.assets.failedAssets
Return how many assets failed to load.
Shaku.assets.waitForAll
Return a promise that will be resolved when all assets are loaded, or rejected if one of them failed. For example, you can load multiple assets in parallel (without await) and then call:
await Shaku.assets.waitForAll();
This will make sure all assets are loaded before we proceed.
Freeing Assets
All loaded assets are stored in local cache. To free a specific asset you can call:
Shaku.assets.free(url);
Note that if you have a reference to this asset elsewhere and you try to use it after freeing it, it may not work.
You can also free all loaded assets, by calling clearCache:
Shaku.assets.clearCache();
Collision
The Collision manager provides basic collision detection functionality, and is accessed by Shaku.collision.
The collision manager handles detection, but not physics.
This doc don't cover the entirely of the API, only the main parts of it. To see the full API, check out the API docs.
Collision Shapes
A collision shape is a 2d body you can collide with. There are currently 3 collision shapes:
Collision Flags
Every shape has a property called collisionFlags.
This property is a number used as a bitmap for collision filtering. For example, you can define the following:
const CollisionFlags = {
  Walls: 1,
  Lava: 1 << 1,
  Floor: 1 << 2,
  Enemy: 1 << 3,
}
Then define a shape with 'walls' collision flags:
shape.collisionFlags = CollisionFlags.Walls;
And later if we want to only collide with walls or floor, we can query with the following mask:
const WallsAndFloorMask = CollisionFlags.Walls | CollisionFlags.Floor;
Collision World
Collision World is a group of collision shapes you can query, debug render, and more. It represent a level, or scene, where you need to perform collision detection.
Every collision world have an internal grid used for the broad phase detection. Set the grid size proportionately to your collision shape sizes, so that every grid cell would only contain a handful of shapes.
Lets start by creating a collision world:
let gridSize = new Shaku.utils.Vector2(256, 256);
let world = Shaku.collision.createWorld(gridSize);
Adding Shapes
Now lets add 3 shapes to the world:
// add point to world
let point = new Shaku.collision.PointShape(new Shaku.utils.Vector2(125, 65));
world.addShape(point);

// add rectangle to world
let rect = new Shaku.collision.RectangleShape(new Shaku.utils.Rectangle(45, 75, 100, 50));
world.addShape(rect);

// add circle to world
let circle = new Shaku.collision.CircleShape(new Shaku.utils.Circle(new Shaku.utils.Vector2(300, 315), 150));
world.addShape(circle);
Picking
To 'pick' shapes based on position, you can use the pick() method:
// shapes will be an array with all shapes the mouse was pointing on
let shapes = pick(Shaku.input.mousePosition);
Or we can have additional parameters:
let position = Shaku.input.mousePosition;
let radius = 0;
let sortByDistance = false;
let mask = 0xffffff;
let predicate = (shape) => { return true; };
let shapes = pick(position, radius, sortByDistance, mask, predicate)
- radius: is radius around position to pick shapes from.
- sortByDistance: if true, will sort results by distance from position.
- mask: optional collision mask, to match against the shapes collision flags.
- predicate: optional filter method to run in broad phase. return false to skip shape, true to test it.
Collision Tests
If you want to test collision using a specific shape that isn't a point or circle, you can use either testCollision(sourceShape, sortByDistance, mask, predicate) to get a single result (faster), or testCollisionMany(sourceShape, sortByDistance, mask, predicate) for multiple results.
Resolver
The resolver is the class responsible to perform the actual collision detection math between pairs of shapes. If you want to create your own custom shapes, you need to register a handler method to handle your new shape against all existing shapes.
You can access the resolver with Shaku.collision.resolver. To learn more about it, check out the API docs.
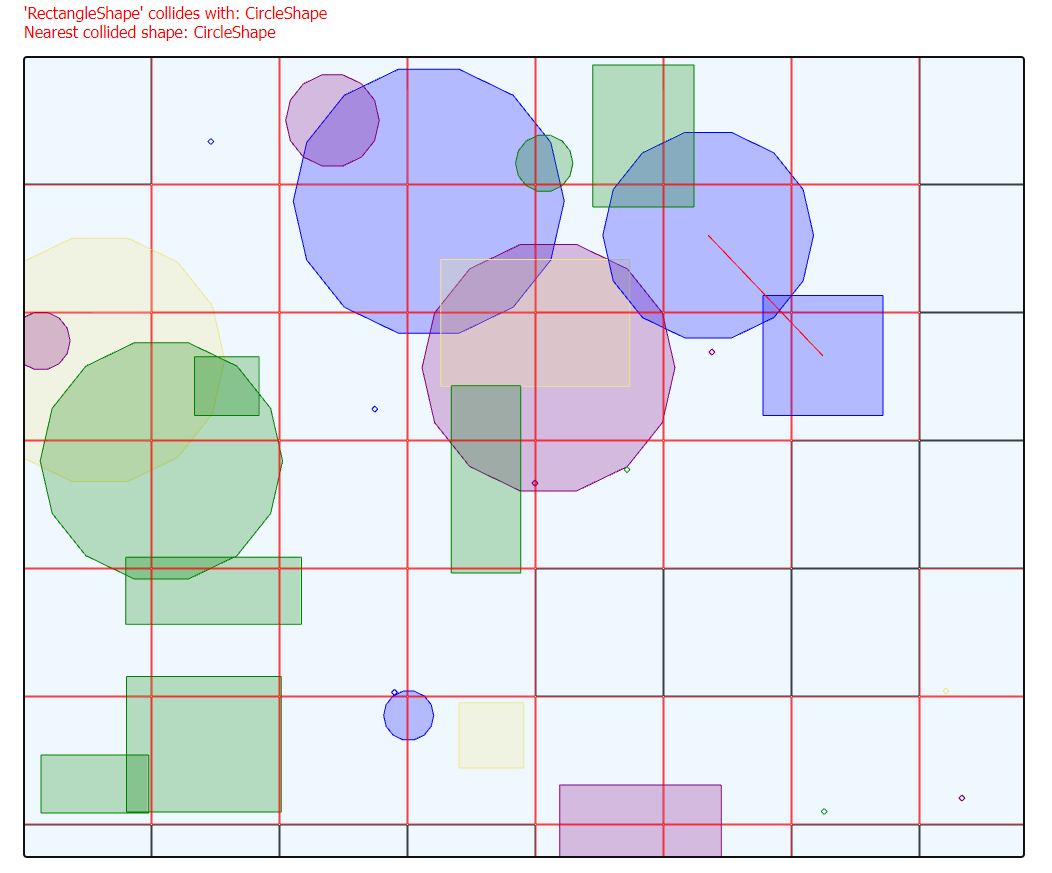
Debug Draw
Its often useful to draw the collision world in order to debug issues. To do so, you can use the debugDraw() method:
world.debugDraw(gridColor, gridHighlitColor, opacity, camera);
- gridColor: optional grid lines color, for cells that have no collision shapes in them.
- gridHighlitColor: optional grid lines color, for cells that have collision shapes in them.
- opacity: optional opacity for all shapes and grid.
- camera: optional camera to draw the collision world with.
Utils
Utils is not a manager, but a collection of built-in utility classes you use with Shaku. You access them with Shaku.utils.
Vector2
Represent a 2d vector. For more info check out the API docs.
Rectangle
Represent a 2d rectangle. For more info check out the API docs.
Circle
Represent a 2d circle. For more info check out the API docs.
Line
Represent a 2d line. For more info check out the API docs.
MathHelper
Contains useful math-related utilities. For more info check out the API docs.
SeededRandom
Generate semi-random numbers using a seed. This is useful if you want to generate the same random numbers on different browsers and runs. For more info check out the API docs.
Color
Represent a color. Color objects store RGBA components as floats (0-1) and not bytes (0-255).
The Color class also have all the built-in CSS colors as static getters:
aliceblue, antiquewhite, aqua, aquamarine, azure, beige, bisque, black, blanchedalmond, blue, blueviolet, brown, burlywood, cadetblue, chartreuse, chocolate, coral, cornflowerblue, cornsilk, crimson, cyan, darkblue, darkcyan, darkgoldenrod, darkgray, darkgreen, darkkhaki, darkmagenta, darkolivegreen, darkorange, darkorchid, darkred, darksalmon, darkseagreen, darkslateblue, darkslategray, darkturquoise, darkviolet, deeppink, deepskyblue, dimgray, dodgerblue, firebrick, floralwhite, forestgreen, fuchsia, gainsboro, ghostwhite, gold, goldenrod, gray, green, greenyellow, honeydew, hotpink, indianred , indigo, ivory, khaki, lavender, lavenderblush, lawngreen, lemonchiffon, lightblue, lightcoral, lightcyan, lightgoldenrodyellow, lightgrey, lightgreen, lightpink, lightsalmon, lightseagreen, lightskyblue, lightslategray, lightsteelblue, lightyellow, lime, limegreen, linen, magenta, maroon, mediumaquamarine, mediumblue, mediumorchid, mediumpurple, mediumseagreen, mediumslateblue, mediumspringgreen, mediumturquoise, mediumvioletred, midnightblue, mintcream, mistyrose, moccasin, navajowhite, navy, oldlace, olive, olivedrab, orange, orangered, orchid, palegoldenrod, palegreen, paleturquoise, palevioletred, papayawhip, peachpuff, peru, pink, plum, powderblue, purple, rebeccapurple, red, rosybrown, royalblue, saddlebrown, salmon, sandybrown, seagreen, seashell, sienna, silver, skyblue, slateblue, slategray, snow, springgreen, steelblue, tan, teal, thistle, tomato, turquoise, violet, wheat, white, whitesmoke, yellow, yellowgreen
So for example you can get css red with Shaku.utils.Color.red.
Note that these colors are pre-compiled and are not generated at runtime, so they will have the same values on all browsers and platforms, even if some of them decide to implement a different values for the css keyword.
For more info check out the API docs.
Animators
Animator is a helper class that you can attach to any object and animate any property over time. You can also make animators update automatically, so you don't need to update them and can just launch and forget about them.
Let's start with a simple animator to create a heartbeat-like pulse effect that runs once:
// create an animator that will grow 'sprite' to x1.5 its size, then shrink back to original size over the course of 0.5 seconds per direction (grow / shrink).
// smoothDamp means the animation won't be linear, it will be faster at the beginning and slower as we reach the end
let heartbeat = (new Shaku.utils.Animator(sprite)).to({'size': sprite.size.mul(1.5)}).repeats(1, true).duration(0.5).smoothDamp(true);

// run the animation once
heartbeat.reset().play();
Or another example, animator to fade out a sound instance (you can also use mixers for that):
(new Shaku.utils.Animator(soundInstance)).to({volume: 0}).play();
So how Animator work?
- Animators have a set of setter methods that return itself, so you can chain the animator setup as seen above.
- You can define 'from' values to begin animation from. If not set, it will use whatever value is currently set in the target.
- You can define 'to' values, which is the values we animate to using lerp or lerp with smooth damp.
- Every key in 'from' and 'to' can use dot notation, so we can either animate an entire object, for example 'size', or animate just a property, for example 'size.x'.
- If the property is a number, we'll just lerp it. If an object, the Animator will attempt to use a static
lerpmethod.Vector2,Rectangle,Circle, andColorall implement a staticlerpand can be used with animators. If your object does not implementlerp, you cannot animate it. - You can either update animators manually with
update()every frame, or callplay()and have Shaku update it automatically every time you callstartFrame().
Lets review all the properties we can set in an Animator instance:
animator.from(values)
Set values to start animation from. If an animated property doesn't have a 'from' value set, the animator will pick the value the target object have when animation starts.
Keys can use dots notation for nested objects.
animator.to(values)
Set values to animate to.
We can animate numbers or any class that has a static lerp() method.
Keys can use dots notation for nested objects.
animator.repeats(enable, reverseAnimation)
Set how many times to repeat the animation:
- enable == false: play animation once per play() call.
- enable == number: repeat animation this number of times per play() call.
- enable == true: repeat animation endlessly after play().
reverseAnimation is an optional flag to set. If true, it will play animation in reverse every time we need to repeats, so we will have smooth transition back to starting state.
If for example reverseAnimation is true and you repeat an animation that grows a sprite 3 times, on first run it will grow, then shrink, then grow again, then fianlly shrink back to start.
If reverseAnimation is not set, every time animation repeats its state will just 'jump' back to the starting values.
animator.smoothDamp(enabled)
If true, animation will go faster at the beginning and slower as we reach the animation end.
animator.then(callback)
Method to run when animation ends.
animator.duration(seconds)
Set animation duration in seconds.
animator.reset()
Reset animation back to start.
animator.play()
Play animation automatically, so you won't have to call update() yourself.
animator.update(delta)
Update animation progress with delta time.
This is what you need to call manually when not using play().
Miscellaneous
The following are some useful miscellaneous you should know about.
Shaku.gameTime
Shaku.gameTime contains the delta time from last frame and total elapsed time since initialization.
You can use it to factor movement and animations that you want to be constant regardless of FPS count.
For example, say you want to move an object at the speed of 100 pixels per second, you can use gameTime like this:
function step()
{
    Shaku.startFrame();

    // gameTime.delta contains the time passed, in seconds, from previous game frame.
    // this means that when all the deltas accumulate to value of 1, it means we passed a second.
    position += Shaku.gameTime.delta * 100;

    Shaku.endFrame();
    Shaku.requestAnimationFrame(step);
}
More info can be found in the API docs.
Shaku.getFpsCount()
Return the current FPS count. Until at least one second have passed, this will always return 0.
Shaku.getAverageFrameTime()
Sometimes FPS is not enough to measure performance, because FPS is capped to 60. So if you develop on a powerful machine that is always on 60 FPS, you may not know that a tiny change you've made increased the time it takes to actually render a frame from 1ms to 10ms, which may be noticeable on weaker machines that may not reach max FPS.
To measure how long it takes to perform a single game step on average, you can call Shaku.getAverageFrameTime() (results are in milliseconds).
Don't try to use Shaku.gameTime.delta to measure performance, as this value is affected by the FPS cap and will be constant if you run on max FPS, regardless of actual performance.
Shaku.requestAnimationFrame()
As seen previously, this is just a wrapper around window.requestAnimationFrame and used to request the next update call for your main loop.
You don't have to use this, but its cleaner this way.
Shaku.destroy()
If for some reason you decide to dispose your page from Shaku, call this. It should cleanup everything. You'll still need to remove the canvas manually though.
Shaku.silent()
Call this before initializing Shaku to silent all prints and logs.
Shaku.version
Return Shaku's current version.
Advanced Topics
Some extra stuff you should know.
Batching
What is the batching optimization when drawing sprites group?
One of the slowest things about using the GPU for rendering, is the communication between the CPU and the GPU. This happens every time you make any draw call to make the shaders start working. Simply put, a single draw call with 1,000 vertices would be significantly faster than a 100 draw calls with 10 vertices each, despite the same amount of work for the shaders.
The batching optimization collect a set of sprites and put them all in a single vertices buffer, so we can reduce the number of draw calls to the GPU. With batching we can draw thousands of sprites without taking any FPS hits.
However, just because you use batching doesn't mean you'll only get a single draw call. Batching will initiate a draw every time that:
- The internal buffer gets full.
- Texture changes.
- Blend mode changes.
This part is crucial to understand, because it means that if you can sort your sprites by texture and blend mode, it will improve performance. Yet another reason why texture atlases are useful.
Why Not Instancing?
If you're savvy in computer graphics, you probably heard about Instancing, which is a more modern and often faster approach than batching.
In this case I chose batching because it allows us to use the same shaders with or without it, while instancing requires some changes to the shaders code itself. Since we only draw simple quads and not complex geometries, the advantage of instancing is is less significant than it would have been had we used complex geometries, so I sacrificed some performance for simplicity.
Note that if you really need instances you can probably implement it with a custom effect + extending the gfx with another method.
A demo project that illustrate performance with batching can be found here.
Shaku on NodeJS
Shaku is a client-side library, designed to run in browsers. However, it has many useful utilities that you might want to use on server side as well, especially if you want to share code between client and server (for example vectors, collision, math helper..).
To use Shaku on NodeJS you can require it just like you would require any node module. It will work just the same, only without the gfx, sfx and input managers, that will return null instead.
Connecting to server logger
You might want to connect Shaku to your own server-side logger instead of console. To do so, you can create custom logger drivers and set them before initializing Shaku. The example below takes an existing winston logger and set it as the Shaku logger:
// set shaku logs
// logger == winston logger instance
const shakuLogs = logger.child(...);  // <-- add whatever custom params you need as the ...
class ShakuLogDrivers
{
    trace(header, msg)
    {
        shakuLogs.debug(msg);
    }
    debug(header, msg)
    {
        shakuLogs.debug(msg);
    }
    info(header, msg)
    {
        shakuLogs.info(msg);
    }
    warn(header, msg)
    {
        shakuLogs.warn(msg);
    }
    error(header, msg)
    {
        shakuLogs.error(msg);
    }
}
Shaku.setLogger(new ShakuLogDrivers());
Alternatively, if you don't want logs from Shaku you can just silent it with Shaku.silent().
Build Shaku
To build shaku after making changes, run build.bat from its containing folder. This will generate Shaku.js and Shaku.min.js under dist.
Note that you must have browserify and uglifyjs installed globally prior of calling build.
To update the docs, call build_api_docs.py (requires Python3).
If you added a new file, please copy and update the header comment from one of the existing files. Then you can execute update_top_comment.py to make sure the header is written properly and have auto fields set.
Changes
List of changes in released versions.
1.1.0
- Improved error text on failed JSON / Binary assets.
- Added 'asset' property to loading assets Promise, so you can access them before they are ready.
- Improved some demos.
- Updated
Vector2add / sub / div / mul to accept two numbers in addition to single number or vector. - Added sort method + sort-for-batching to sprites group.
- Added a method to get average frame time.
- Added a getter to get draw calls count.
- Added culling to batch rendering.
- Changed
renderingRegionto return actual region, withviewportandrenderTargetconsidered (breaking change).
1.2.0
- Added collision detection manager.
- Added
outlineRectto gfx manager. - Added
fillCircleto gfx manager. - Added
outlineCircleto gfx manager. - Changed the topLeft, topRight, bottomLeft, bottomRight getters in
Rectangleto be 'getXXX' methods (breaking change). - Why: if its a getter you can do
rect.topLeft.x = ...which implies you can change it, but you can't. also now its more consistent with getSize() and getCenter().
- Why: if its a getter you can do
- Fixed all rotations to go clockwise, to be more industry standard (breaking change).
- Small default-color optimization in gfx manager.
- Added
InvertBlend Mode. - Added
DarkenBlend Mode. - Renamed
drawLinestodrawLinesStripand added realdrawLines(breaking change). - Changed few exceptions to error logs to be softer on rendering errors.
- Added
throwErrorOnWarnings()to allow more strict mode. - Fixed rectangle-rectangle collision to include touching borders (breaking change).
- Fixed
collideCircle()bug. - Added plus / minus key codes.
1.3.0
- Fixed collision debug render to accept camera parameter.
- Added method to get actual rendering size without offset.
- Changed gfx
renderingRegionandcanvasSizeto be methods and not getters, to make it clear they are immutable (breaking change). - Changed gfx
coverto accept vector in addition to rectangle. - Added
pickmethod to collision world. - Added position value for collision result with points.
- Added
flipXandflipYgetters / setters to sprite. - Fixed
orthographicOffset()bug with viewport offset. - Fixed sprites group demo (wrong rotation).
- Fixed how viewports work and are applied in general (breaking change).
- Hid the camera
perspective()method, at least for now (breaking change). - Fixed collision shapes custom debug color.
- Added
clone()to sprites.
1.3.1
- Refactor and bugfix in the assets manager.
- Added
onReady()method to assets. - Fixed bug in collision world
pick(). - Fixed debug color after changing collision shape flags.
1.3.2
- Added
MathHelperclass. - Added
SeededRandomclass. - Improved all util objects
equalsmethods to be safer. - Added
Lineclass. - Added
Linescollision shape class. - Added
iterateShapesto collision world.
1.4.0
- Adjustments to allow using (parts of) Shaku in nodejs.
- Fixed typo bug when normalizing vector of 0,0.
- Added
remove()to collision shape. - Fixed bug in
removeShape(). - Added
radiansDistanceSigned()and changedradiansDistance()to not be signed (breaking change). - Added
setLogger()method to replace the log handler. - Fixed sanity checks in creating render target.
- Fixed reset camera with render target + added auto camera reset when setting render target (breaking change).
- Added support in multiple textures in effects.
- Fixed setting secondary textures filter and wrap modes.
1.4.1
- Removed accidental glDisable causing warnings in console.
1.4.2
- Added
wrapDegrees()anddot()toMathHelper. - Added a way to change application name in logger.
- Added
setCameraOrthographic()to make it easier to set cameras. - Improved lerping on same values.
- Added perlin noise generator.
- Updated demos.
- Added
drawPoints()anddrawPoint()methods.
License
Shaku is licensed under the permissive MIT license, so you can use it for any purpose (including commercially) and it should be compatible with most common licenses.