README
![]()
swagger-express-ts2
Automatically generate and serve swagger.json v2.0 by express. This project is derived by base project swagger-express-ts.
Getting started
First, install swagger-express-ts2.
npm install swagger-express-ts2 --save
The Basics
In the examples below, we use inversify-express-utils. inversify-express-utils is not required to work with swagger-express-ts.
Step 1: configure express
import * as bodyParser from "body-parser";
import * as express from "express";
import "reflect-metadata";
import { Container } from "inversify";
import { interfaces, InversifyExpressServer, TYPE } from "inversify-express-utils";
import { VersionController } from "./version/version.controller";
import * as swagger from "swagger-express-ts";
import { SwaggerDefinitionConstant } from "swagger-express-ts";
const config = require ( "../config.json" );

// set up container
const container = new Container ();

// note that you *must* bind your controllers to Controller
container.bind<interfaces.Controller> ( TYPE.Controller )
    .to( VersionController ).inSingletonScope().whenTargetNamed( VersionController.TARGET_NAME );

// create server
const server = new InversifyExpressServer ( container );

server.setConfig( ( app : any ) => {
    app.use( '/api-docs/swagger' , express.static( 'swagger' ) );
    app.use( '/api-docs/swagger/assets' , express.static( 'node_modules/swagger-ui-dist' ) );
    app.use( bodyParser.json() );
    app.use( swagger.express(
        {
            definition : {
                info : {
                    title : "My api" ,
                    version : "1.0"
                } ,
                externalDocs : {
                    url : "http://localhost:8080"
                }
                // Models can be defined here
            }
        }
    ) );
} );

server.setErrorConfig( ( app : any ) => {
    app.use( ( err : Error , request : express.Request , response : express.Response , next : express.NextFunction ) => {
        console.error( err.stack );
        response.status( 500 ).send( "Something broke!" );
    } );
} );

const app = server.build();

app.listen( config.port );
console.info( "Server is listening on port : " + config.port );
Step 2: Decorate your models
@ApiModel( {
    description : "Version description" ,
    name : "Version"
} )
export class VersionModel {

    @ApiModelProperty( {
        description : "Id of version" ,
        required : true
    } )
    id : number;

    @ApiModelProperty( {
        description : "" ,
        required : true
    } )
    name : string;

    @ApiModelProperty( {
        description : "Description of version" ,
        required : true
    } )
    description : string;
}
Step 3: Decorate your controllers
@ApiPath({
    path: "/versions",
    name: "Version",
    security: { basicAuth: [] }
})
@controller("/versions")
@injectable()
export class VersionController implements interfaces.Controller {
    public static TARGET_NAME: string = "VersionController";

    private data = [{
            id: "1",
            name: "Version 1",
            description: "Description Version 1",
            version: "1.0.0"
        },
        {
            id: "2",
            name: "Version 2",
            description: "Description Version 2",
            version: "2.0.0"
        }];

    @ApiOperationGet({
        description: "Get versions objects list",
        summary: "Get versions list",
        responses: {
            200: { description: "Success", type: SwaggerDefinitionConstant.Response.Type.ARRAY, model: "Version" }
        },
        security: {
            apiKeyHeader: []
        }
    })
    @httpGet("/")
    public getVersions(request: express.Request, response: express.Response, next: express.NextFunction): void {
        response.json(this.data);
    }

    @ApiOperationPost({
        description: "Post version object",
        summary: "Post new version",
        parameters: {
            body: { description: "New version", required: true, model: "Version" }
        },
        responses: {
            200: { description: "Success" },
            400: { description: "Parameters fail" }
        }
    })
    @httpPost("/")
    public postVersion(request: express.Request, response: express.Response, next: express.NextFunction): void {
        if (!request.body) {
            return response.status(400).end();
        }
        this.data.push(request.body);
        response.json(request.body);
    }

}
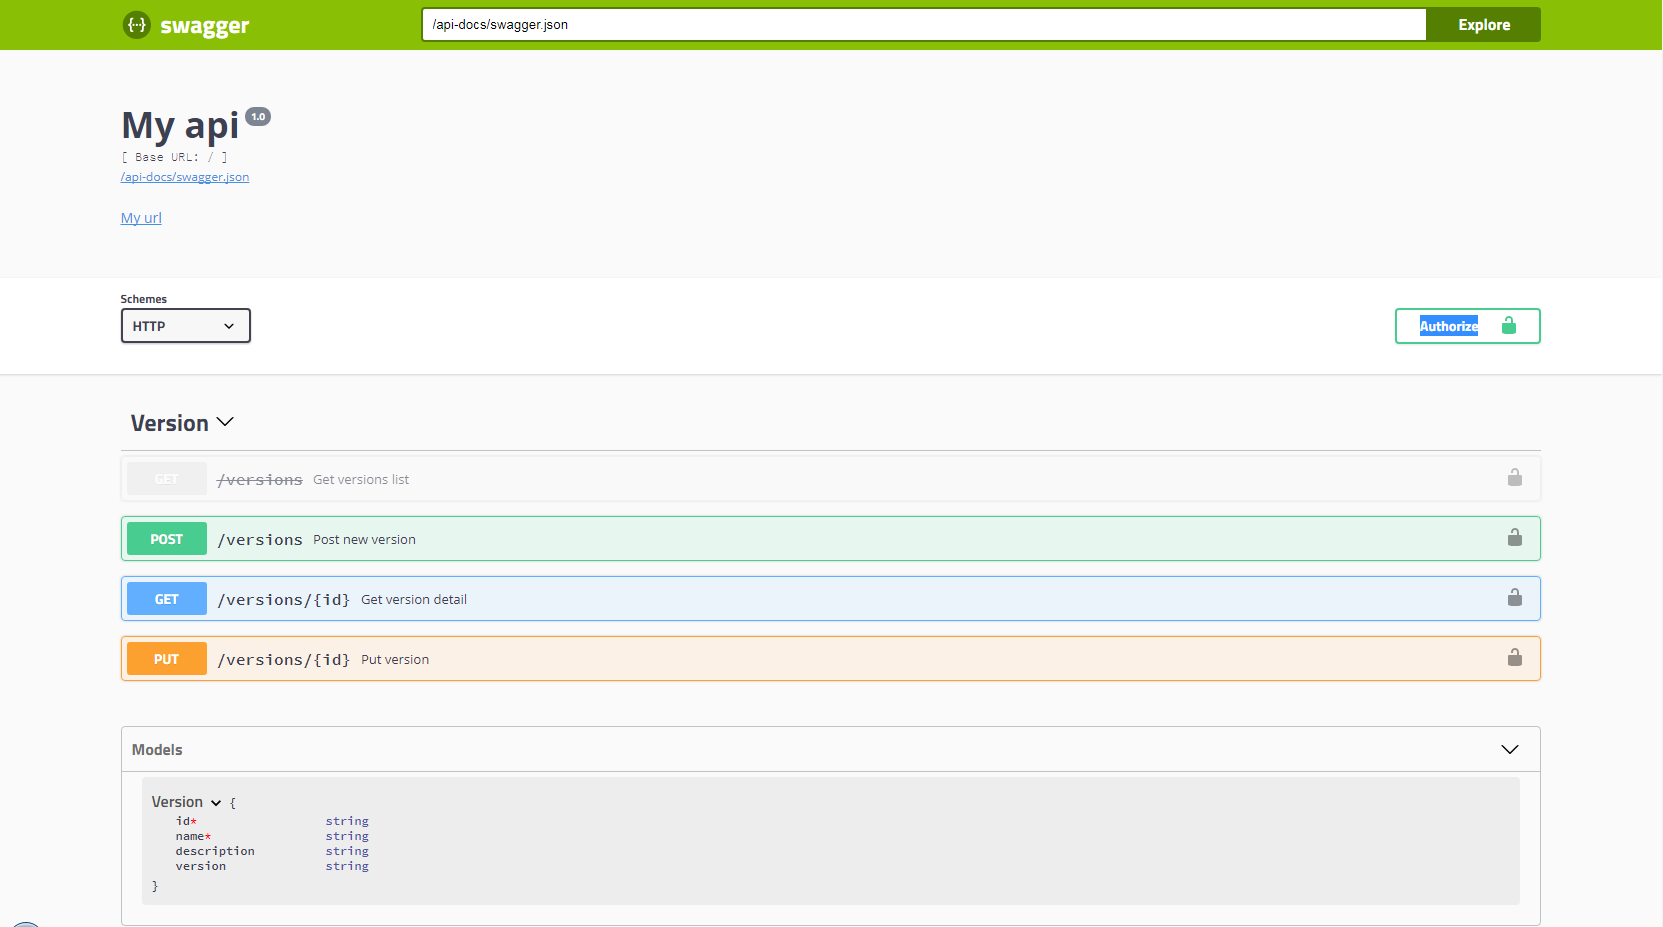
Step 4: Test
Start your server and test on url : /api-docs/swagger.json
Extra
Serve swagger-ui in your API
You can serve swagger.json and swagger-ui in your API.
npm install swagger-ui-dist --save
Create index.html in new directory "swagger".
<!-- HTML for static distribution bundle build -->
<!DOCTYPE html>
<html lang="en">
<head>
    <meta charset="UTF-8">
    <title>Swagger UI</title>
    <link href="https://fonts.googleapis.com/css?family=Open+Sans:400,700|Source+Code+Pro:300,600|Titillium+Web:400,600,700"
          rel="stylesheet">
    <link rel="stylesheet" type="text/css" href="/api-docs/swagger/assets/swagger-ui.css">
    <link rel="icon" type="image/png" href="/api-docs/swagger/assets/favicon-32x32.png" sizes="32x32"/>
    <link rel="icon" type="image/png" href="/api-docs/swagger/assets/favicon-16x16.png" sizes="16x16"/>
    <style>
        html {
            box-sizing: border-box;
            overflow: -moz-scrollbars-vertical;
            overflow-y: scroll;
        }

        *,
        *:before,
        *:after {
            box-sizing: inherit;
        }

        body {
            margin: 0;
            background: #fafafa;
        }
    </style>
</head>

<body>

<svg xmlns="http://www.w3.org/2000/svg" xmlns:xlink="http://www.w3.org/1999/xlink"
     style="position:absolute;width:0;height:0">
    <defs>
        <symbol viewBox="0 0 20 20" id="unlocked">
            <path d="M15.8 8H14V5.6C14 2.703 12.665 1 10 1 7.334 1 6 2.703 6 5.6V6h2v-.801C8 3.754 8.797 3 10 3c1.203 0 2 .754 2 2.199V8H4c-.553 0-1 .646-1 1.199V17c0 .549.428 1.139.951 1.307l1.197.387C5.672 18.861 6.55 19 7.1 19h5.8c.549 0 1.428-.139 1.951-.307l1.196-.387c.524-.167.953-.757.953-1.306V9.199C17 8.646 16.352 8 15.8 8z"></path>
        </symbol>

        <symbol viewBox="0 0 20 20" id="locked">
            <path d="M15.8 8H14V5.6C14 2.703 12.665 1 10 1 7.334 1 6 2.703 6 5.6V8H4c-.553 0-1 .646-1 1.199V17c0 .549.428 1.139.951 1.307l1.197.387C5.672 18.861 6.55 19 7.1 19h5.8c.549 0 1.428-.139 1.951-.307l1.196-.387c.524-.167.953-.757.953-1.306V9.199C17 8.646 16.352 8 15.8 8zM12 8H8V5.199C8 3.754 8.797 3 10 3c1.203 0 2 .754 2 2.199V8z"/>
        </symbol>

        <symbol viewBox="0 0 20 20" id="close">
            <path d="M14.348 14.849c-.469.469-1.229.469-1.697 0L10 11.819l-2.651 3.029c-.469.469-1.229.469-1.697 0-.469-.469-.469-1.229 0-1.697l2.758-3.15-2.759-3.152c-.469-.469-.469-1.228 0-1.697.469-.469 1.228-.469 1.697 0L10 8.183l2.651-3.031c.469-.469 1.228-.469 1.697 0 .469.469.469 1.229 0 1.697l-2.758 3.152 2.758 3.15c.469.469.469 1.229 0 1.698z"/>
        </symbol>

        <symbol viewBox="0 0 20 20" id="large-arrow">
            <path d="M13.25 10L6.109 2.58c-.268-.27-.268-.707 0-.979.268-.27.701-.27.969 0l7.83 7.908c.268.271.268.709 0 .979l-7.83 7.908c-.268.271-.701.27-.969 0-.268-.269-.268-.707 0-.979L13.25 10z"/>
        </symbol>

        <symbol viewBox="0 0 20 20" id="large-arrow-down">
            <path d="M17.418 6.109c.272-.268.709-.268.979 0s.271.701 0 .969l-7.908 7.83c-.27.268-.707.268-.979 0l-7.908-7.83c-.27-.268-.27-.701 0-.969.271-.268.709-.268.979 0L10 13.25l7.418-7.141z"/>
        </symbol>


        <symbol viewBox="0 0 24 24" id="jump-to">
            <path d="M19 7v4H5.83l3.58-3.59L8 6l-6 6 6 6 1.41-1.41L5.83 13H21V7z"/>
        </symbol>

        <symbol viewBox="0 0 24 24" id="expand">
            <path d="M10 18h4v-2h-4v2zM3 6v2h18V6H3zm3 7h12v-2H6v2z"/>
        </symbol>

    </defs>
</svg>

<div id="swagger-ui"></div>

<script src="/api-docs/swagger/assets/swagger-ui-bundle.js"></script>
<script src="/api-docs/swagger/assets/swagger-ui-standalone-preset.js"></script>
<script>
    window.onload = function () {

        // Build a system
        const ui = SwaggerUIBundle ({
            url: "/api-docs/swagger.json",
            dom_id: '#swagger-ui',
            deepLinking: true,
            presets: [
                SwaggerUIBundle.presets.apis,
                SwaggerUIStandalonePreset
            ],
            plugins: [
                SwaggerUIBundle.plugins.DownloadUrl
            ],
            layout: "StandaloneLayout",
            validatorUrl: null
        });

        window.ui = ui
    }
</script>
</body>

</html>
Configure your server like that.
app.use( '/api-docs/swagger', express.static( 'swagger' ) );
app.use( '/api-docs/swagger/assets', express.static( 'node_modules/swagger-ui-dist' ) );
Test it on url "/api-docs/swagger".
Project example
You can quickly test swagger-express-ts with the project example example-swagger-express-ts.
Features and API
- Installation
- Configuration
- @ApiModel
- @ApiModelProperty
- @ApiPath
- @ApiOperationGet
- @ApiOperationPost
- @ApiOperationPut
- @ApiOperationPatch
- @ApiOperationDelete
For any questions, suggestions, or feature requests
Contribution
In case you wanna contribute feel free to create pull request. After review it will be merged into sources, just follow the basic rules
- Try to write clean code
- Write Unit tests for all work you do
- Use strict Type definitions instead of any (or pure JS - use TypeScript instead)
Steps before create pull request
- npm run tslint - to be sure your code is clean by tslint configuration
- npm run test - run all tests in this task will be also source formatted by prettier library so there will not be any unnecessary conflicts based on formating
- npm run start - just start example application (
VersionController) - show http://localhost:9001/api-docs/swagger.json and put content into https://editor.swagger.io/ to validate result
- commit with reference of issue (if not exists please create one)
- commit should looks like standard commit
- #{issue number} - title of commit.
- empty line
- description of changes (for example change of interface, added property and so on)
- push into your repository
- create pull request into repository
- commit should looks like standard commit
- wait for codereview and if necessary do the changes
License
License under the MIT License (MIT)
Copyright © 2018 Peter Sokolík
Permission is hereby granted, free of charge, to any person obtaining a copy of this software and associated documentation files (the "Software"), to deal in the Software without restriction, including without limitation the rights to use, copy, modify, merge, publish, distribute, sublicense, and/or sell copies of the Software, and to permit persons to whom the Software is furnished to do so, subject to the following conditions:
The above copyright notice and this permission notice shall be included in all copies or substantial portions of the Software.
THE SOFTWARE IS PROVIDED "AS IS", WITHOUT WARRANTY OF ANY KIND, EXPRESS OR IMPLIED, INCLUDING BUT NOT LIMITED TO THE WARRANTIES OF MERCHANTABILITY, FITNESS FOR A PARTICULAR PURPOSE AND NONINFRINGEMENT.
IN NO EVENT SHALL THE AUTHORS OR COPYRIGHT HOLDERS BE LIABLE FOR ANY CLAIM, DAMAGES OR OTHER LIABILITY, WHETHER IN AN ACTION OF CONTRACT, TORT OR OTHERWISE, ARISING FROM, OUT OF OR IN CONNECTION WITH THE SOFTWARE OR THE USE OR OTHER DEALINGS IN THE SOFTWARE.